Debugging Embedded Threads with VisualGDB
This tutorial shows how to use VisualGDB to debug a multi-threaded embedded firmware. Unlike Linux or Android
applications where threads are naturally provided by the
operating system and supported by GDB, embedded applications
need to include a thread scheduler that will switch the threads
manually.
As each embedded OS (e.g. FreeRTOS) stores the information about its threads in its own format, you will need to create a small plug-in that will allow VisualGDB to parse the information about the current threads based on reading global variables.
In this example we won’t be using any specific embedded OS, instead we will create a very basic thread scheduler and make a simple plugin that will allow VisualGDB to extract thread information from it.
Before you begin, install VisualGDB 4.3 or later. Ensure you are using the Custom edition or above.
- Start Visual Studio and begin creating a new Embedded project with VisualGDB:
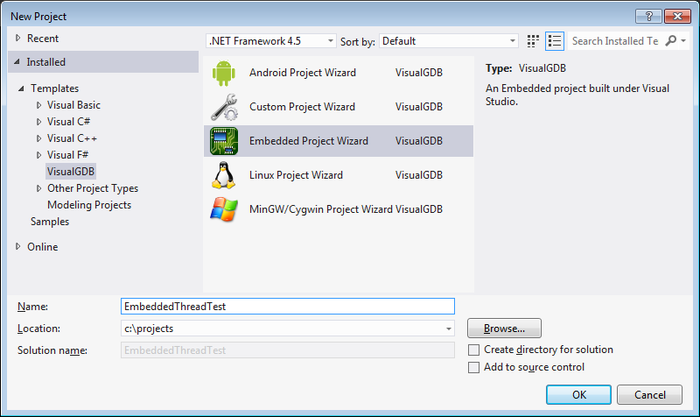
- Select “Create new project” -> “Embedded Binary” on the first page:

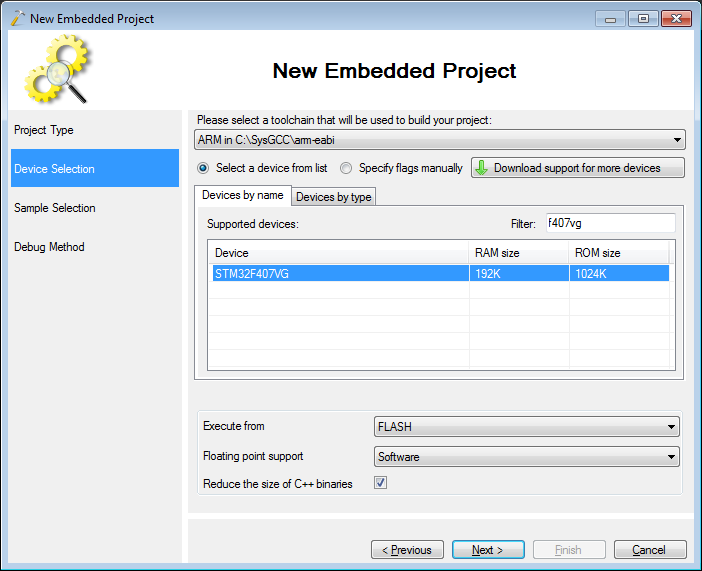
- On the next page select your toolchain and device type. In this example we will use the STM32F4Discovery board. If you are using a different board, follow one of our tutorials to setup a basic project for your board:
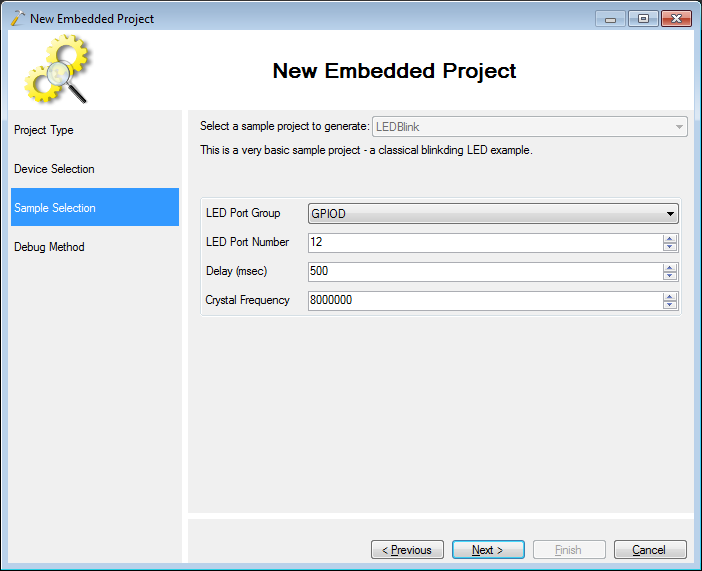
- On the sample page simply accept the default settings:
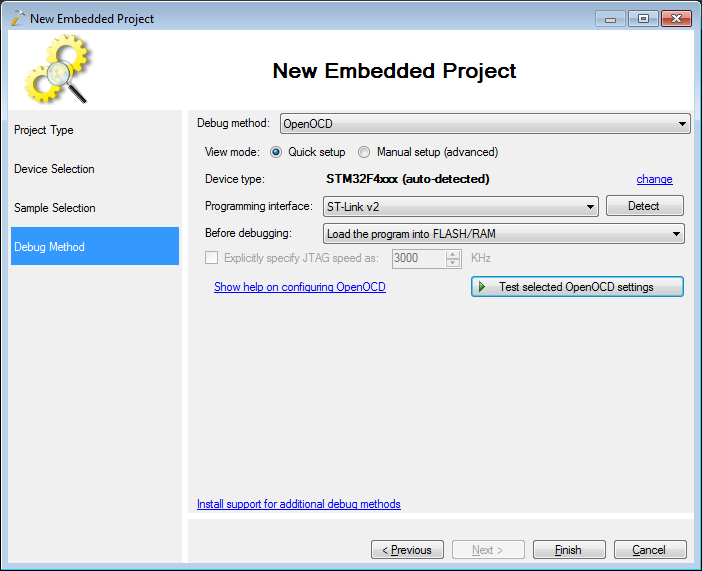
- On the debug method page select the debug method that is compatible with your board. We will use OpenOCD in this example:
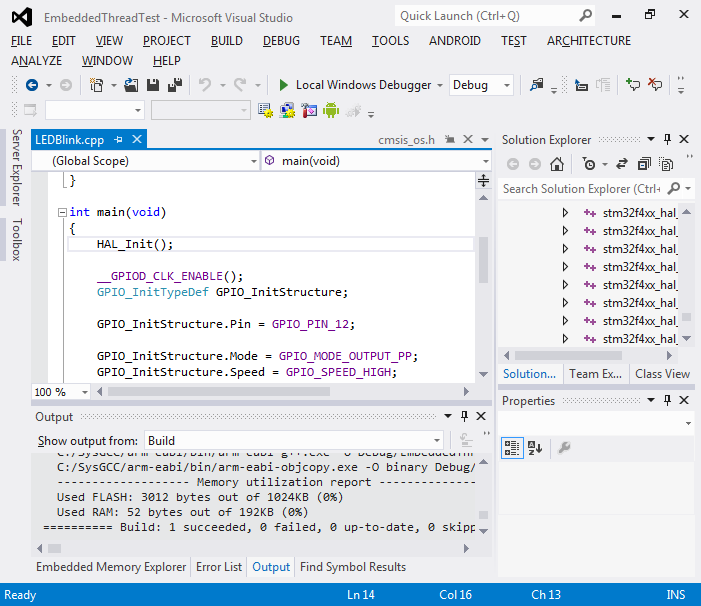
- Now you have created a basic project. Build it with Ctrl-Shift-B to ensure there are no problems:
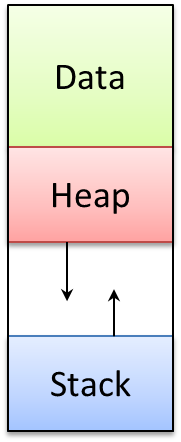
- Before we start converting our application to a multi-threaded one, let’s review the memory layout of an embedded application. It typically consists of some data in the beginning of the RAM, stack in the end and heap (managed by functions like malloc()) between them. The stack dynamically grows backward while the heap dynamically grows forward:
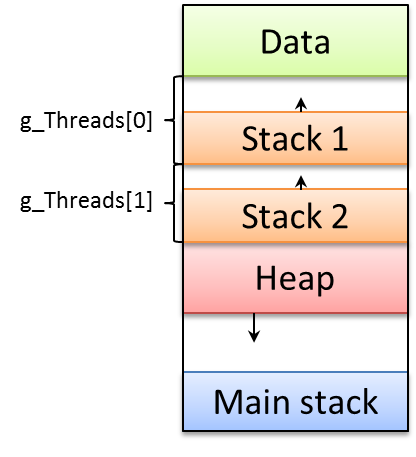
- In a multi-threaded application each thread has its own stack so that they do not interfere with each other. In our example we will create a fixed amount of threads and allocate stack space for them at compile time by declaring global variables. The layout will look the following way:
- The CPU can only run one thread at a time. If we are currently running thread A and want to switch to thread B, this means saving all CPU registers in some thread A’s context buffer and restoring the values from the thread B’s buffer. Switching back would involve doing the opposite operation. The easiest way to do this involves 4 steps:
- Save all CPU registers into the current stack
- Store the current stack pointer somewhere in thread A’s structure
- Load the stored stack pointer from thread B
- Load all CPU registers from stack (as we’ve switched the stack pointer, we’ll get the registers for thread B)
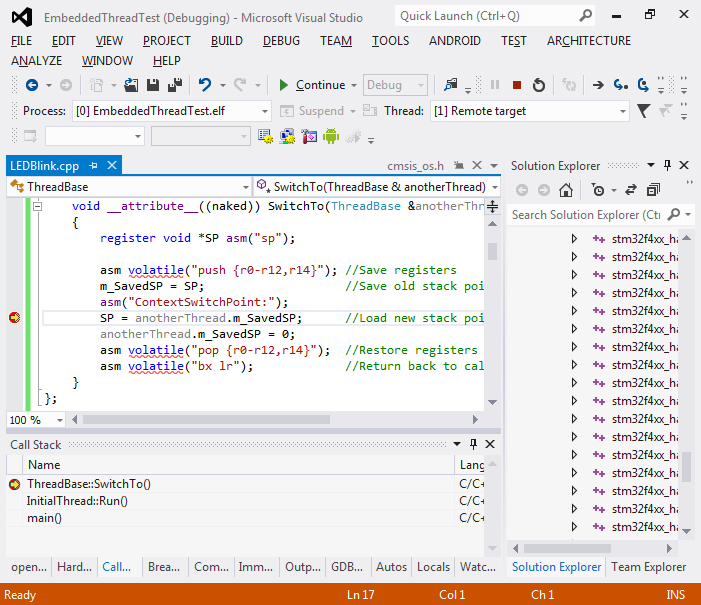
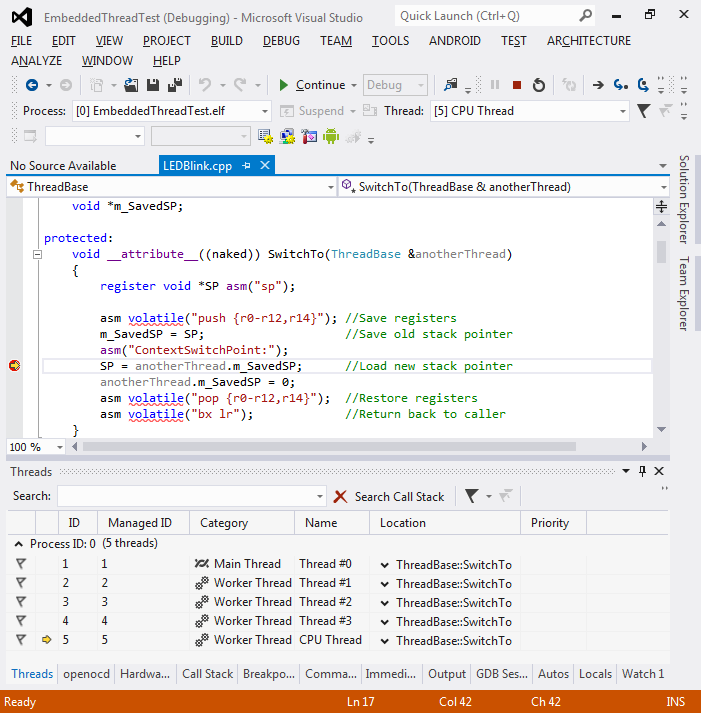
The following code implements this thread switch. Add it to your project:
class ThreadBase
{
protected:
   void *m_SavedSP;

protected:
   void__attribute__((naked)) SwitchTo(ThreadBase &anotherThread)
    {
       registervoid *SP asm("sp");

       asmvolatile("push {r0-r12,r14}"); //Save registers
        m_SavedSP = SP;                   //Save old stack pointer
       asm("ContextSwitchPoint:");
        SP = anotherThread.m_SavedSP;     //Load new stack pointer
        anotherThread.m_SavedSP = 0;
       asmvolatile("pop {r0-r12,r14}"); //Restore registers
       asmvolatile("bx lr");            //Return back to caller
    }
};
If a thread represented by this class is currently running on the CPU, its m_SavedSP member is NULL. If the thread is stopped, its registers (i.e. the values that will be restored when it continues execution) can be recovered as follows:
- The stack pointer (SP) can be read from m_SavedSP
- The instruction pointer (PC) equals to the address of ContextSwitchPoint (the only place in code where register swapping occurs)
- All other registers can be extracted by reading the stack pointed by SP as they were just saved there
- Now we’ll make a class representing a simple thread. The class will contain a buffer to store the thread’s stack. The constructor will initialize the m_SavedSP and the memory pointed by it so that it will look like the ThreadStart() function immediately called SwitchTo() that saved the registers. As a result, when we switch to that thread for the first time, it will start executing from ThreadStart():
template <unsigned _StackSize> class BasicThread : public ThreadBase { private: void *m_Stack[_StackSize / sizeof(unsigned)]; enum {kSavedRegisterCount = 14, kRThisIndex = 0, kLRIndex = 13}; void ThreadStart() { ThreadBody(); for (;;); } protected: virtualvoid ThreadBody() = 0; public: BasicThread() { constint numberOfSavedRegisters = 14; void **pSavedRegisters = m_Stack + (sizeof(m_Stack) / sizeof(void *)) - numberOfSavedRegisters; memset(pSavedRegisters, 0, sizeof(void *)* (numberOfSavedRegisters)); //LR register contains return address (used by bx lr) pSavedRegisters[kLRIndex] = (void *)&BasicThread::ThreadStart; //R0 register contains 'this' pointer used in ThreadStart() pSavedRegisters[kRThisIndex] = this; m_SavedSP = pSavedRegisters; } }; - To demonstrate some basic functionality we will make a thread implementation that increments an internal counter and switches to the next thread:
class MyThread : public BasicThread<1024> { private: void SwitchToNextThread(); unsigned m_ID; public: MyThread(unsigned id) : m_ID(id) { } virtualvoid ThreadBody() { for (unsigned iter = 0;;iter++) { SwitchToNextThread(); } } }; - We’ll define 4 threads and implement the SwitchToNextThread() method:
MyThread g_Threads[] = { MyThread(0), MyThread(1), MyThread(2), MyThread(3) }; void MyThread::SwitchToNextThread() { MyThread *pNextThread = NULL; unsigned threadCount = sizeof(g_Threads) / sizeof(g_Threads[0]); for (unsigned i = 0; i < threadCount; i++) { if (&g_Threads[i] == this) pNextThread = &g_Threads[(i + 1) % threadCount]; } SwitchTo(*pNextThread); } - Finally we need to switch to the first thread from the main() function. As switching to a thread requires saving the previous value of SP in some other thread’s structure, we will create a basic InitialThread class to store that:
class InitialThread : public ThreadBase { public: void Run() { SwitchTo(g_Threads[0]); } }; int main() { InitialThread mainThread; mainThread.Run(); return 0; } - Build your program, set a breakpoint on the ContextSwitchPoint line and run it. The breakpoint will hit and the call stack will show that SwitchTo() was called by InitialThread::Run() in turn invoked from main():
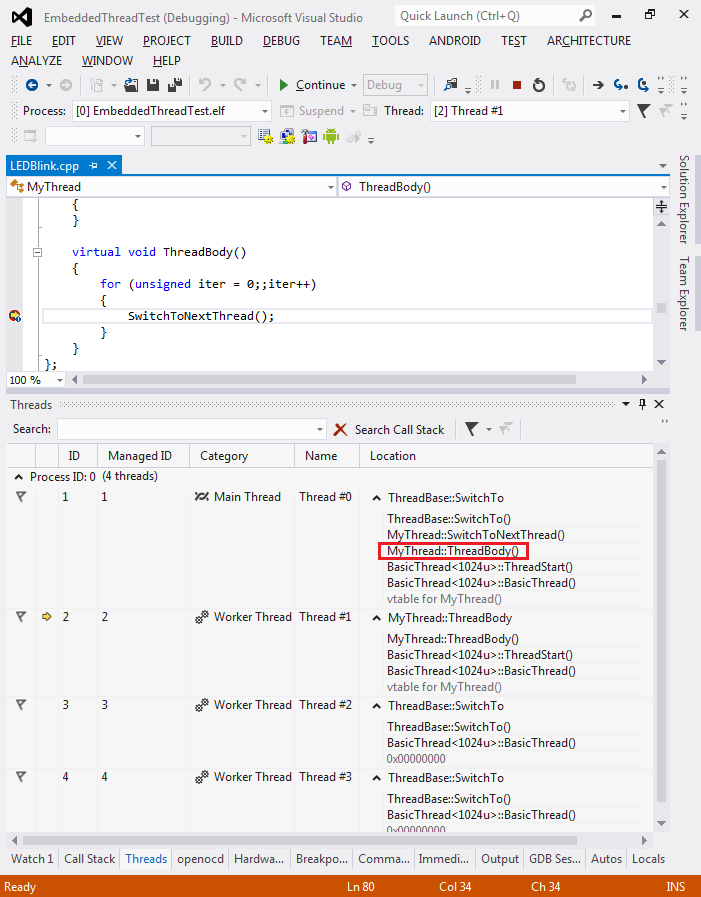
- If you now step through the function line-by-line
(don’t use ‘step out’), you will see how the call stack will
change when the ‘pop’ instruction is executed and how then
the ThreadStart() begins executing (because the ‘bx lr’
instruction returned control to the address in the ‘lr’
register that was loaded by the ‘pop’ instruction from a
memory block initialized in the thread’s constructor):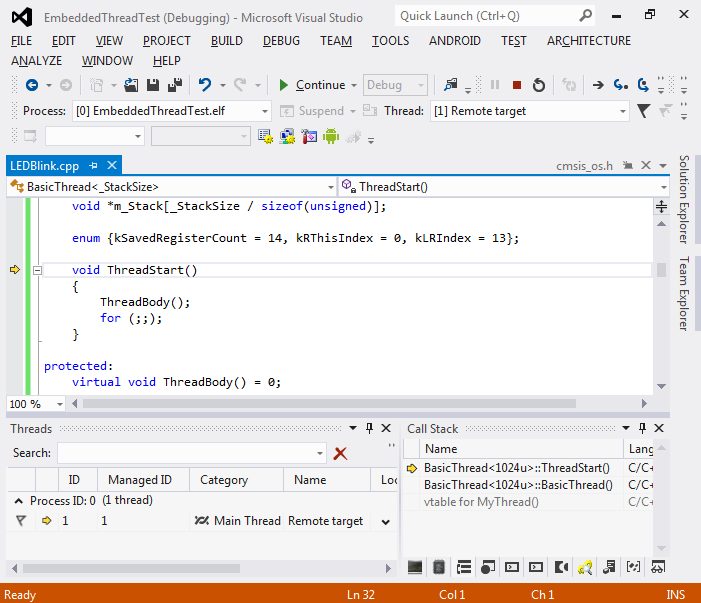
- Note that the threads window does not show all our embedded threads because VisualGDB assumes our application is single-threaded. We can somewhat examine the thread state by manually looking at g_Threads:
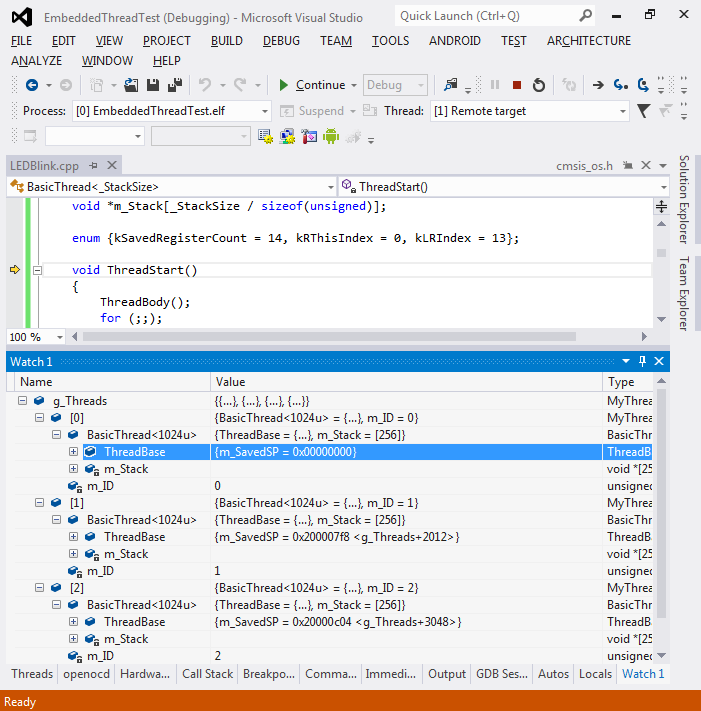 E.g. here we see that thread with ID 0 is running (m_SavedSP = 0) while threads with IDs 1 and 2 are stopped. We could get their call stack by manually analyzing the memory pointed by m_SavedSP, but that would be very annoying and unproductive. We will now make a basic plug-in to make VisualGDB handle that automatically.
 - The core interface implemented by the plugin is IVirtualThread. It contains the following members:
 public interface IVirtualThread
{
   string Name { get; }
   int UniqueID { get; }
   bool IsCurrentlyExecuting { get; }
    IEnumerable<KeyValuePair<string, UInt64>> GetSavedRegisters();
}
The IsCurrentlyExecuting property should return true if the thread is currently being executed by the CPU (and has no saved registers). Otherwise the field should return false and the GetSavedRegisters() method should provide the values of the registers saved by the thread. When the user clicks at the thread in the Threads window, VisualGDB will temporarily load those values and will be able to display the call stack and variable values. When you continue running your program, the register values from the executing thread will be restored. You can access the values of various global variables using the IGlobalExpressionEvaluator interface implemented by VisualGDB:
public interface IGlobalExpressionEvaluator { string EvaluateRawExpression(string expression); UInt64? EvaluateIntegralExpression(string expression); } - Create a new C# class library project, add a reference to the VisualGDBExtensibility.dll assembly in the VisualGDB folder and create a public class implementing the IVirtualThreadProvider interface:
 publicclass VirtualThreadProvider : IVirtualThreadProvider
{
   public IVirtualThread[] GetVirtualThreads(
        IGlobalExpressionEvaluator e)
    {
       int threadCount = (int)e.EvaluateIntegralExpression(
               "sizeof(g_Threads)/sizeof(g_Threads[0])");
        List<IVirtualThread> threads = new List<IVirtualThread>();
       for (int i = 0; i < threadCount; i++)
        {
            UInt64? savedSP = e.EvaluateIntegralExpression(
                "g_Threads[" + i + "].m_SavedSP");
           if (!savedSP.HasValue)
               continue;
            threads.Add(new VirtualThread("Thread #" + i,
                                          savedSP.Value,
                                          i,
                                          e));
        }

       return threads.ToArray();
    }
}
The GetVrtualThreads() method is very simple. It computes the amount of threads from the size of the g_Threads variable and then creates an instance of VirtualThread class for each thread from g_Threads. Note that it’s only interested in the m_SavedSP field.
- Now let’s implement the VirtualThread class:
class VirtualThread : IVirtualThread
{
   private UInt64 _SavedSP;
   privatestring _Name;
   int _Index;
    IGlobalExpressionEvaluator _Evaluator;

   public VirtualThread(string name, UInt64 savedSP, int index,
                         IGlobalExpressionEvaluator evaluator)
    {
        _SavedSP = savedSP;
        _Name = name;
        _Index = index;
        _Evaluator = evaluator;
    }

   ulong GetSavedRegister(int slotNumber)
    {
       return _Evaluator.EvaluateIntegralExpression(
            string.Format("((void **)0x{0:x})[{1}]",
                          _SavedSP, slotNumber)).Value;
    }

   public IEnumerable<KeyValuePair<string, ulong>>
         GetSavedRegisters()
    {
        if (_SavedSP == 0)
           return null;

        List<KeyValuePair<string, ulong>> result =
           new List<KeyValuePair<string, ulong>>();

        //Saved register order: push {r0-r12,r14}
       for (int i = 0; i < 13; i++)
        {
           ulong val = GetSavedRegister(i);
            result.Add(new KeyValuePair<string, ulong>("r" + i,
                                                       val));
        }

        result.Add(new KeyValuePair<string, ulong>("r13",
                                                   _SavedSP));

        result.Add(new KeyValuePair<string, ulong>("r14",
                                     GetSavedRegister(13)));

       ulong? pc = _Evaluator.
            EvaluateIntegralExpression("ContextSwitchPoint");

        result.Add(new KeyValuePair<string, ulong>("r15",
                                                   pc.Value));

       return result;
    }

   publicbool IsCurrentlyExecuting
    {
       get { return _SavedSP == 0; }
    }

   publicstring Name
    {
       get { return _Name; }
    }

   publicint UniqueID
    {
       get { return _Index + 1; }
    }
}
The GetSavedRegisters() method extracts the registers from the stack in the order they were saved by the ‘push’ instruction. It also assumes that the instruction pointer (PC) points to the “ContextSwitchPoint” label and takes the value of the “sp” register from the m_SavedSP.
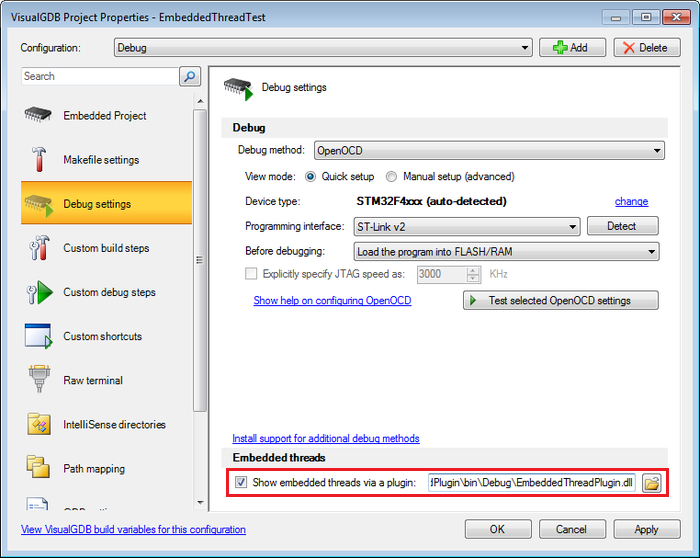
- Build your plugin DLL. Open your embedded project in another instance of Visual Studio, open VisualGDB Project Propeties, go to the Debug Settings page and specify the path of your thread plugin DLL there:
- Start debugging your embedded project. Wait until your breakpoint on ContextSwitchPoint is triggered. See how the virtual threads reported by the plugin are now shown in the Threads window. As none of them was reported as “currently running” (m_SavedSP is not NULL for none of them currently), VisualGDB has created another thread called ‘CPU Thread’ to show the current CPU registers:
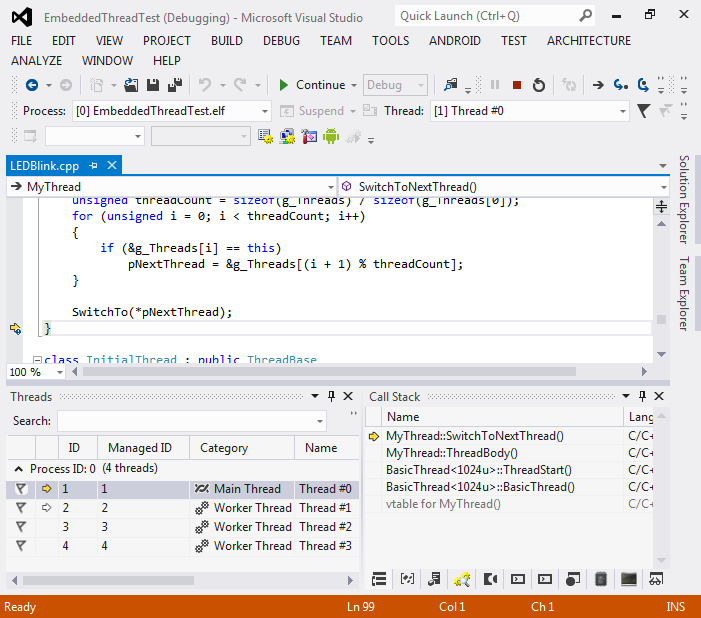
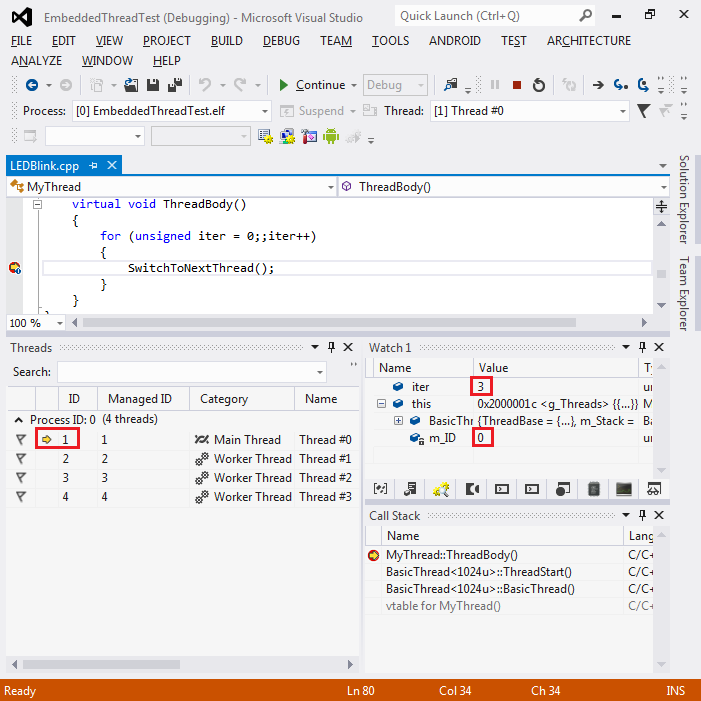
- Currently all threads have the same state, so this is not very useful. Remove the breakpoint in SwitchTo() and set one on the call to SwitchToNextThread(). Skip one breakpoint hit. Observe how the Threads window shows thread 1 as the current thread (verify this by checking m_ID) and how thread 0 shows MyThread::ThreadBody() in the call stack:
- Set a condition “iter == 3” on the breakpoint and resume execution. Once the breakpoint is hit, the CPU will be running the first thread (ID=0) with iter == 3:
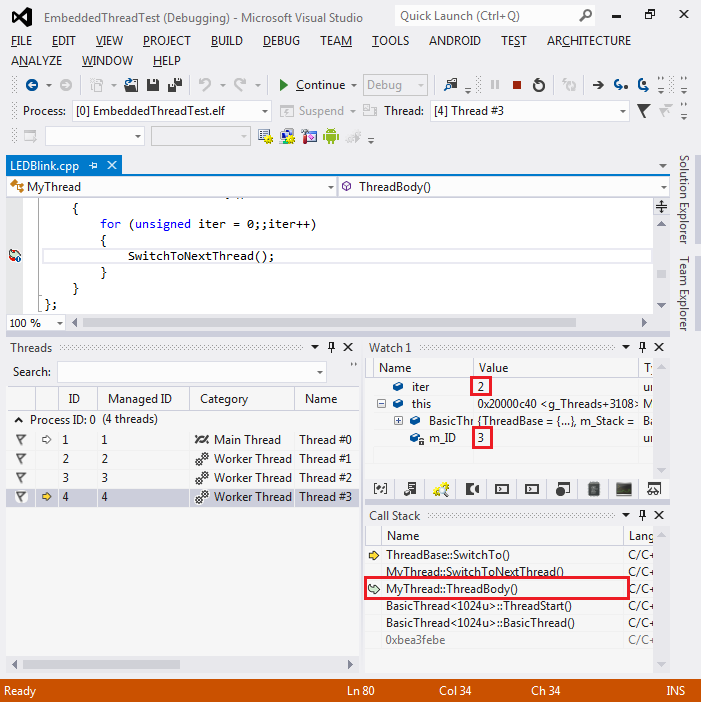
- Click on the last thread in the Threads window and use the Call Stack window to navigate to ThreadBody. You will see that iter now has a value of 2 and m_ID has a value of 3. Those are the correct values for the last thread, as it would only increase the iteration number after the SwitchToNextThread() returns:
- If you want to debug your plugin itself, configure
its project to launch the Visual Studio executable on
debugging and press F5 to start a debugging session: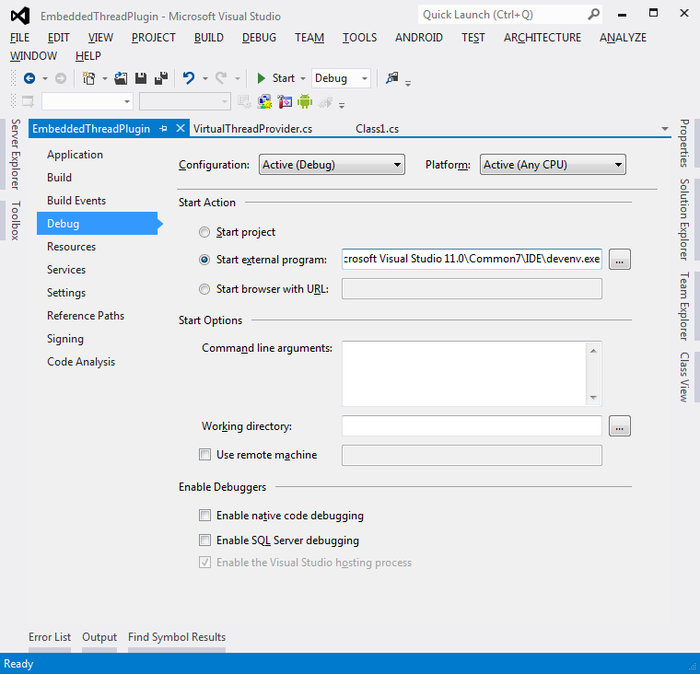
- Now you will have 2 instances of Visual Studio one debugging the other one. You can a breakpoint inside the plugin in the outer instance and then start debugging your embedded project in the inner one. The breakpoint will be hit:
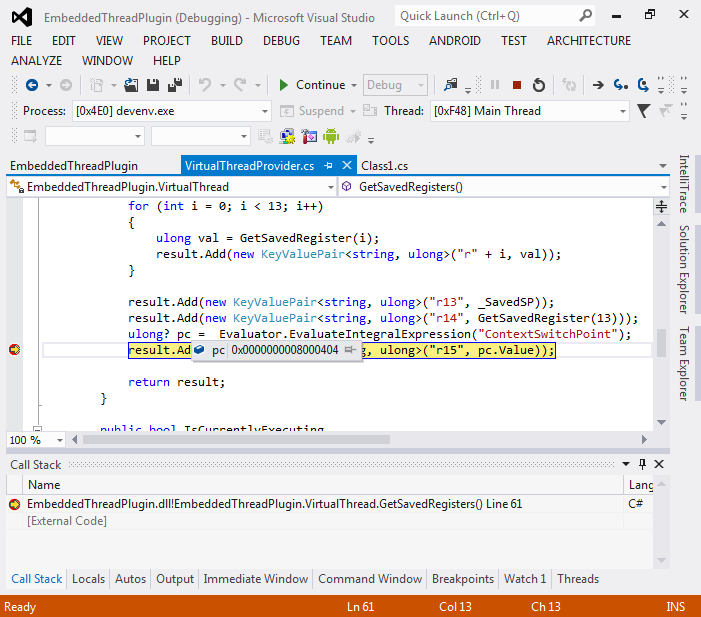
- You can use all normal C# debugging features while debugging your plugin. E.g. you can change it to report the register values that a thread will have after SwitchTo() returns by adding the amount of slots read by the ‘pop’ instruction to the ‘sp’ register and setting ‘pc’ to be equal to ‘lr’:
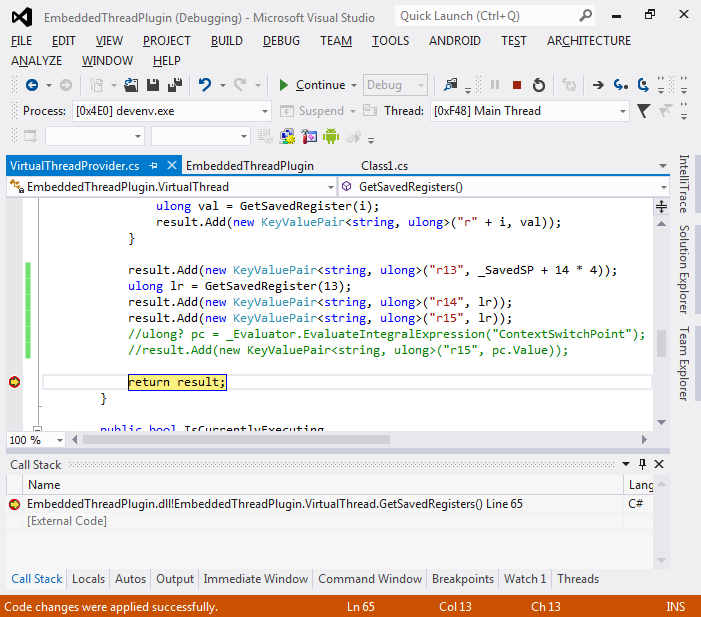
- Once you continue here you will immediately see the changed behavior of the plugin the SwitchToNextThread() will be the topmost frame instead of the SwitchTo() one: