Hosting Web Apps on Raspberry Pi Pico W with the HTTP Server
This tutorial shows how to turn the Raspberry Pi Pico W board into a Wi-Fi access point running a basic web app with its own CSS styles and API. We will start with our Raspberry Pi Pico W HTTP Server sample and will then extend it, adding a new dialog that can be used to make the on-board LED blink with the specified period.
Before you begin, we advise installing VisualGDB 5.6R7 or later, however you can also achieve the same results by editing the files manually and building the project via command line.
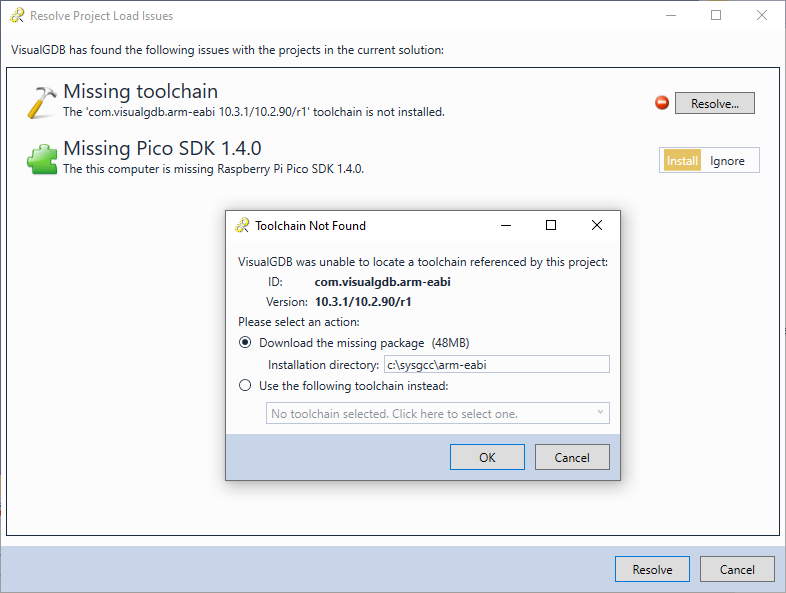
- Clone the https://github.com/sysprogs/PicoHTTPServer/ repository to your machine and open the PicoHTTPServer.sln file in Visual Studio. If this is the first time you are using VisualGDB with Raspberry Pi Pico, it will suggest automatically downloading and installing the toolchain and the Pico SDK:
- Once the project loads, try building it. The initial build will fail with the missing “ip4_secondary_ip_address” error:
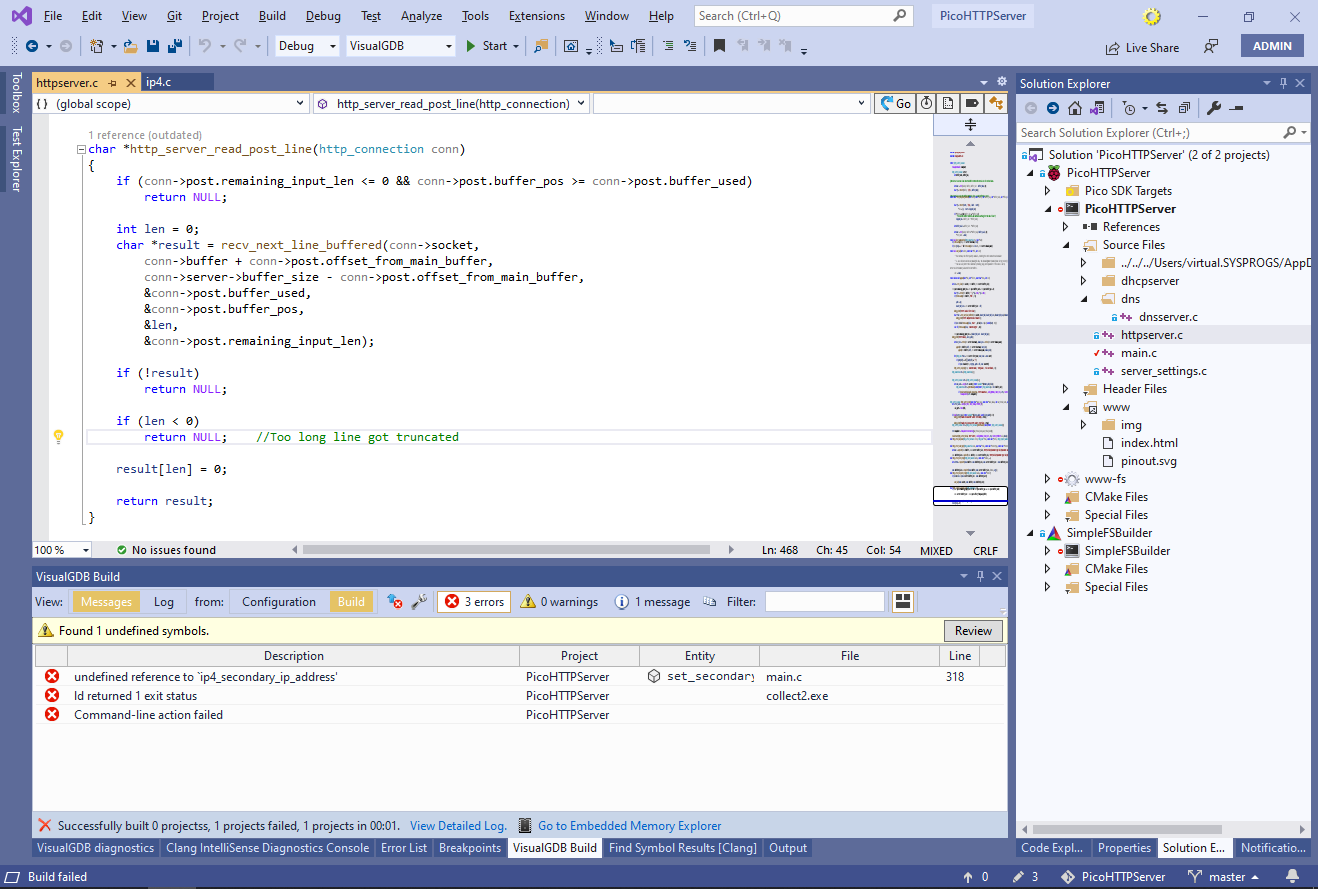
- This happens because the lwIP stack does not support assigning multiple IP addresses to the same netconn object, which is necessary to generate the “sign into network” messages. You can address it by applying the lwip.patch file to the lwIP directory inside the Pico SDK, or by manually adding the 2 lines from it to the ip4.c file:
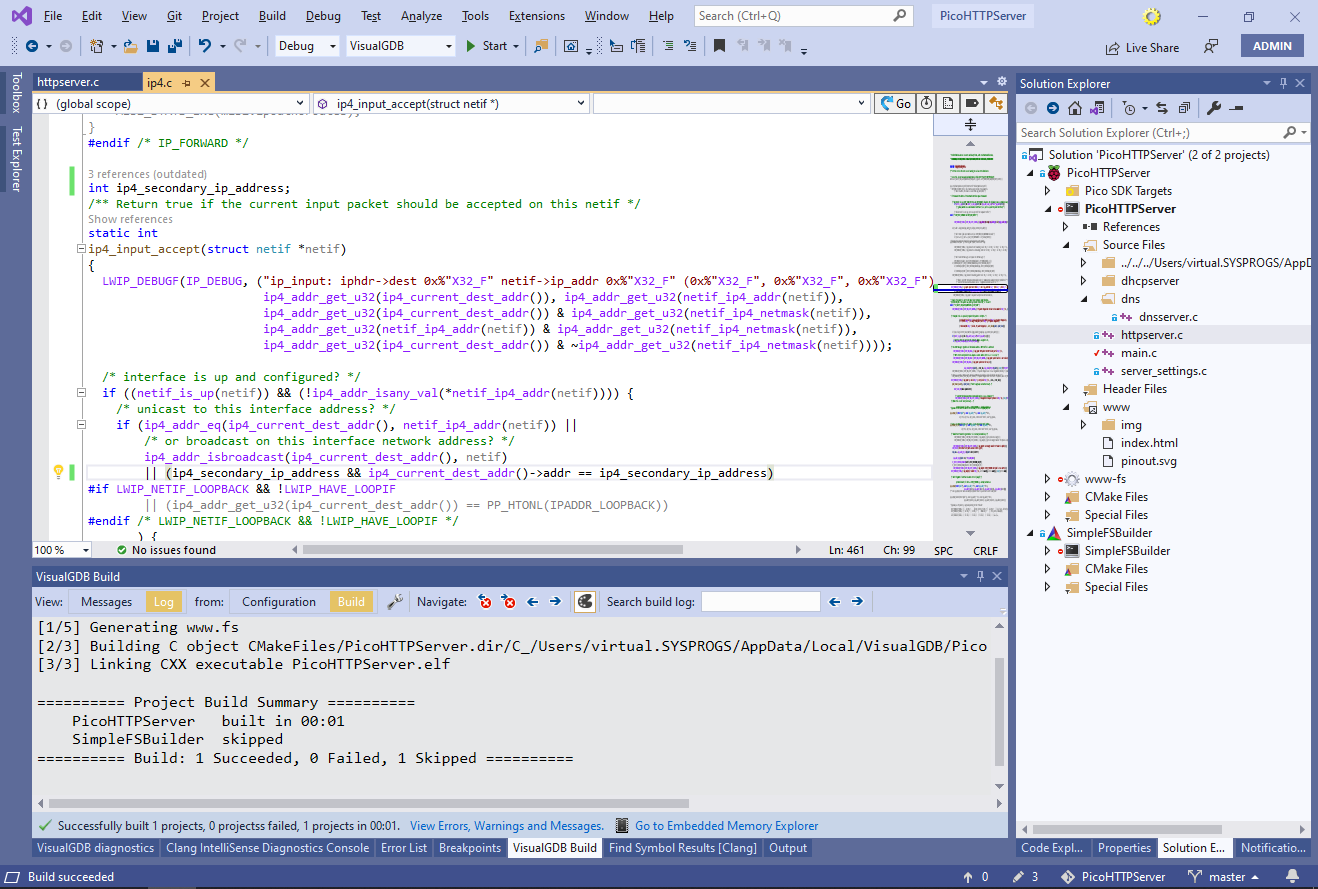 Now the project should build without errors.
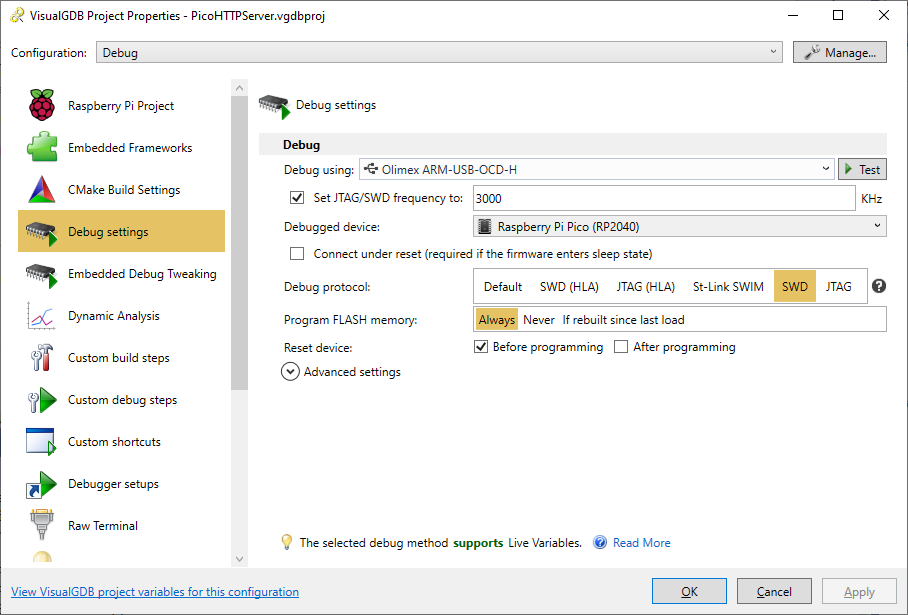
 - If you have connected the SWD pins on your Pico W (see this tutorial), right-click on the PicoHTTPServer project in Solution Explorer, go to the Debug Settings page and make sure the configuration matches your setup:
 You will then be able to program the FLASH memory and begin debugging by simply pressing F5.
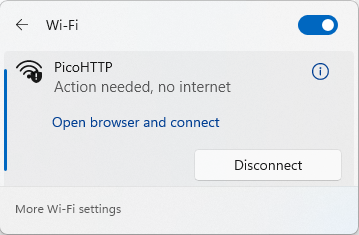
If not, you can deploy the built project into the Pico W by starting the board in the bootloader mode and copying the PicoHTTPServer.uf2 file onto it. - Once the firmware starts, locate the PicoHTTP network from your computer or smartphone and click the “sign into network” link:
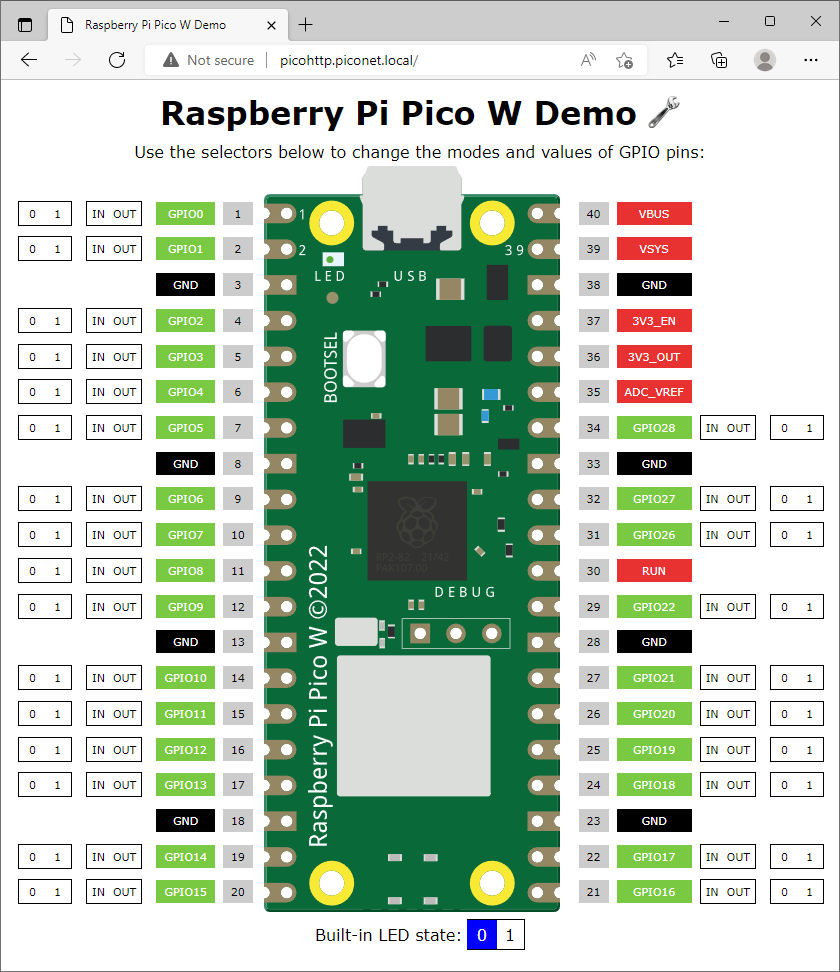
- The link will lead to a simple web app allowing you to control the board pins from the browser:
- We will now modify the web app, adding a new modal dialog and an underlying API to control the LED blinking period. First of all, locate the index.html file in Solution Explorer (or open it manually from the www subdirectory) and go to the <div> with id=”popup_root”:
 The index.html file is automatically served by the Pico W each time it is accessed via the browser. It contains HTML, CSS and JavaScript code necessary to run a basic web app. The <div> element we selected corresponds the semi-transparent layer that is shown over the main page whenever any popup is shown.
 - Add the following HTML code inside the popup_root div after the settings_popup:
<div id="blink_popup" class="blink_popup modal_popup"> <div class="popup_header"> <span>LED Blinking Demo</span> <span class="close_button" style="cursor: pointer;" onclick="show_blink_popup(false)">×</span> </div> <div class="popup_body"> <div class="setting_table"> <span>Blinking period:</span> <input id="blink_period" value="1000"/> <span>ms</span> <button onclick="call_blink_api('period', document.getElementById('blink_period').value)">Update</button> </div> </div> <div class="popup_footer"> <button onclick="call_blink_api('start')">Start</button> <button onclick="call_blink_api('stop')">Stop</button> </div> </div>
It defines a dialog consisting of a header with a close button, a body and a footer. It includes one input field for the period and 3 buttons for sending various requests to the device.
- Now we need to add the styles so that the dialog will look like actual modal window (will have a blue header, close button shown in the right place, and sufficient padding around the edges). Locate the CSS stylesheet inside the index.html file and add the following code to it:
.blink_popup {
    width: 500px;
    padding: 0;
}

.setting_table {
    display: grid;
    grid-gap: 5px;
    grid-template-columns: auto 1fr auto auto;
    align-items: center;
}

.popup_header {
    background: blue;
    margin: 0;
    padding: 10px 20px;
    color: white;
    font-size: 22;
    display: flex;
    justify-content: space-between;
}

.popup_body {
    margin: 0 20px;
}

.popup_footer {
    margin: 0 20px 20px 20px;
}
- Add a function to show and hide the popup inside the <script> element in index.html:
function show_blink_popup(show) {
    document.getElementById("popup_root").style.display = show ? "block" : "none";
    document.getElementById("blink_popup").style.display = show ? "block" : "none";
}
- Finally, modify the header to show a “blink” button near the settings editing button:
<h1>Raspberry Pi Pico W Demo
    <a href="javascript:edit_settings()" class="settings_link"><img style="width: 32px; height: 32px; margin: 0px;" src="img/configure.png"></a>
    <a href="javascript:show_blink_popup(true)" class="settings_link"><img style="width: 32px; height: 32px; margin: 0px;" src="img/stopwatch.png"></a>
</h1>
Also download the stopwatch.png icon and place it into the www/img subdirectory.
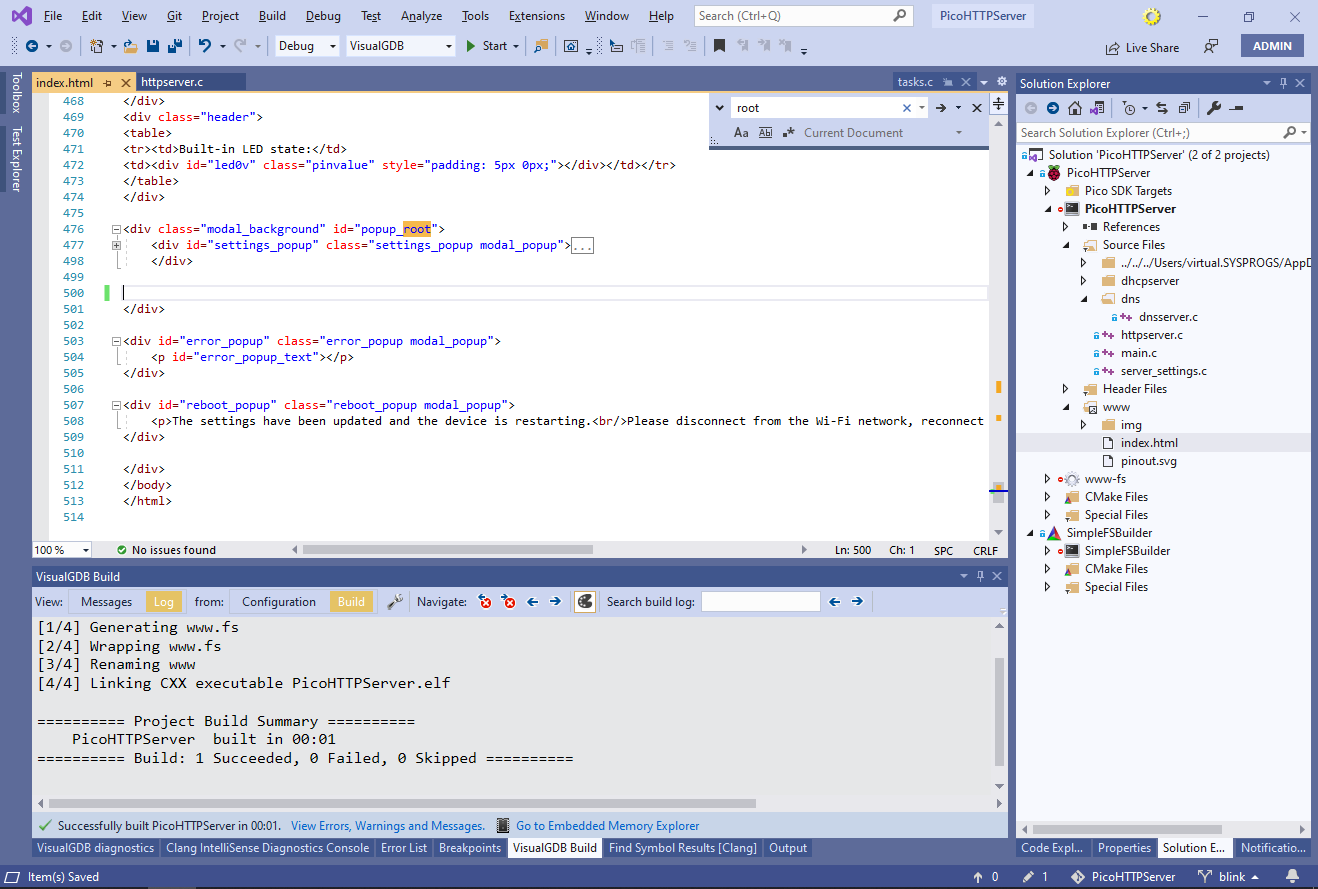
- Build the project and start debugging it. The CMake build scripts will automatically invoke the SimpleFSBuilder tool to pack the modified index.html and stopwatch.png into a simple archive readable by the Pico HTTP server. Make sure you are still connected to the Wi-Fi network and refresh the page in the browser, then click the new stopwatch button:
- If you still see the old index page, make sure the “Always Consider Outdated” setting is enabled in the CMake project properties:
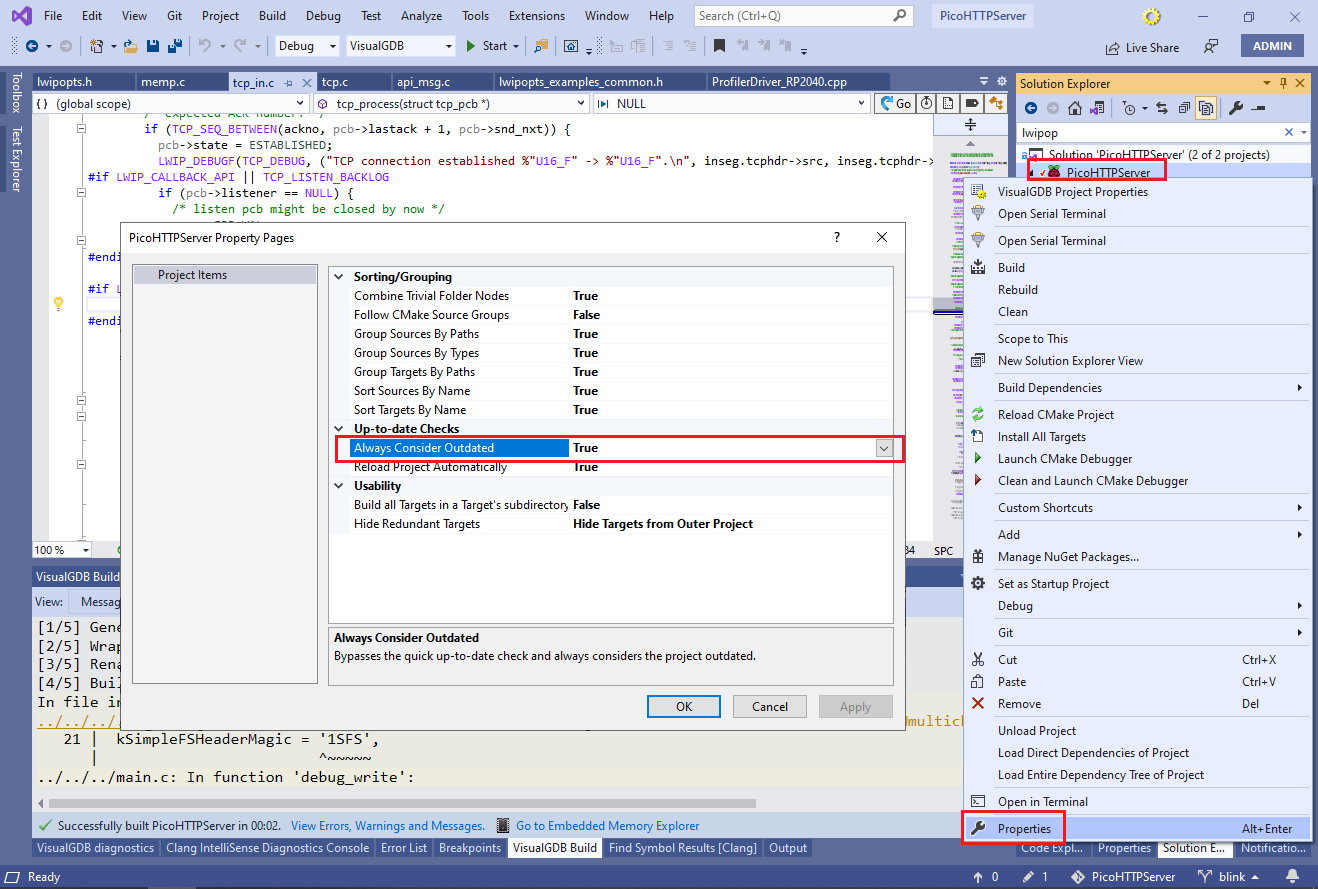 Otherwise, changing the web server payload without modifying any of the source files will not trigger a rebuild.
 - The buttons in the newly added dialog won’t work yet because we have not implemented the call_blink_api() function used by them. Add the following code inside the <script> element in index.html:
function call_blink_api(path, content = null) {
    let xhr = new XMLHttpRequest();
    xhr.open(content ? "POST" : "GET", '/api/blink/' + path, true);
    if (content)
        xhr.setRequestHeader("Content-Type", "text/plain");

    xhr.onloadend = function () {
        if (this.responseText != "OK")
            alert(this.responseText);
    };

    if (content)
        xhr.send(content + "\r\n");
    else
        xhr.send();
}
Each time you press either of the buttons, your browser will send a GET or POST request to the /api/blink/<…> endpoint. If the request returns anything other than the “OK” message, the browser will display the returned text in an error message.
- The final thing we need to is handle these requests from the C code. Locate the calls to http_server_add_zone() in main.c and modify them as shown below:
static http_zone zone1, zone2, zone3;
http_server_add_zone(server, &zone1, "", do_retrieve_file, NULL);
http_server_add_zone(server, &zone2, "/api", do_handle_api_call, NULL);
http_server_add_zone(server, &zone3, "/api/blink", do_handle_blink_api_call, NULL);
This ensures that each request to /api/blink/<…> will get routed to the do_handle_blink_api_call() function. Make sure you register the /api/blink zone AFTER the generic /api zone, as the HTTP server checks the zone list in the backward order.
- Add a function for actually handling the requests:
xSemaphoreHandle s_BlinkSemaphore;
static int s_BlinkPeriod = 1000;

static void blink_task(void *arg)
{
    static bool on = false;
    for (;;)
    {
        xSemaphoreTake(s_BlinkSemaphore, pdMS_TO_TICKS(s_BlinkPeriod));
        cyw43_arch_gpio_put(0, on = !on);
    }
}

static bool do_handle_blink_api_call(http_connection conn, enum http_request_type type, char *path, void *context)
{
    static TaskHandle_t s_BlinkTask;
    if (!strcmp(path, "start"))
    {
        if (!s_BlinkSemaphore)
            s_BlinkSemaphore = xSemaphoreCreateCounting(1, 0);
        if (!s_BlinkTask)
	    xTaskCreate(blink_task, "Blink", configMINIMAL_STACK_SIZE, NULL, TEST_TASK_PRIORITY, &s_BlinkTask);
        http_server_send_reply(conn, "200 OK", "text/plain", "OK", -1);
        return true;
    }
    else if (!strcmp(path, "stop"))
    {
        if (s_BlinkTask)
        {
            vTaskDelete(s_BlinkTask);
            s_BlinkTask = NULL;
        }
        http_server_send_reply(conn, "200 OK", "text/plain", "OK", -1);
        cyw43_arch_gpio_put(0, false);
        return true;
    }
    else if (!strcmp(path, "period"))
    {
        char *line = http_server_read_post_line(conn);
        int period = line ? atoi(line) : 0;
        if (period)
        {
            s_BlinkPeriod = period;
            xSemaphoreGive(s_BlinkSemaphore);
            http_server_send_reply(conn, "200 OK", "text/plain", "OK", -1);
        }
        else
            http_server_send_reply(conn, "200 OK", "text/plain", "Invalid period!", -1);
        return true;
    }
    else
        return false;
}
Note how it cerates the Blink task in response to the start call, deletes it in response to stop, and updates the period in response to the period call. Signaling the s_BlinkSemaphore after updating the period is done to immediately wake up blink_task() without waiting for the previously set period to elapse.
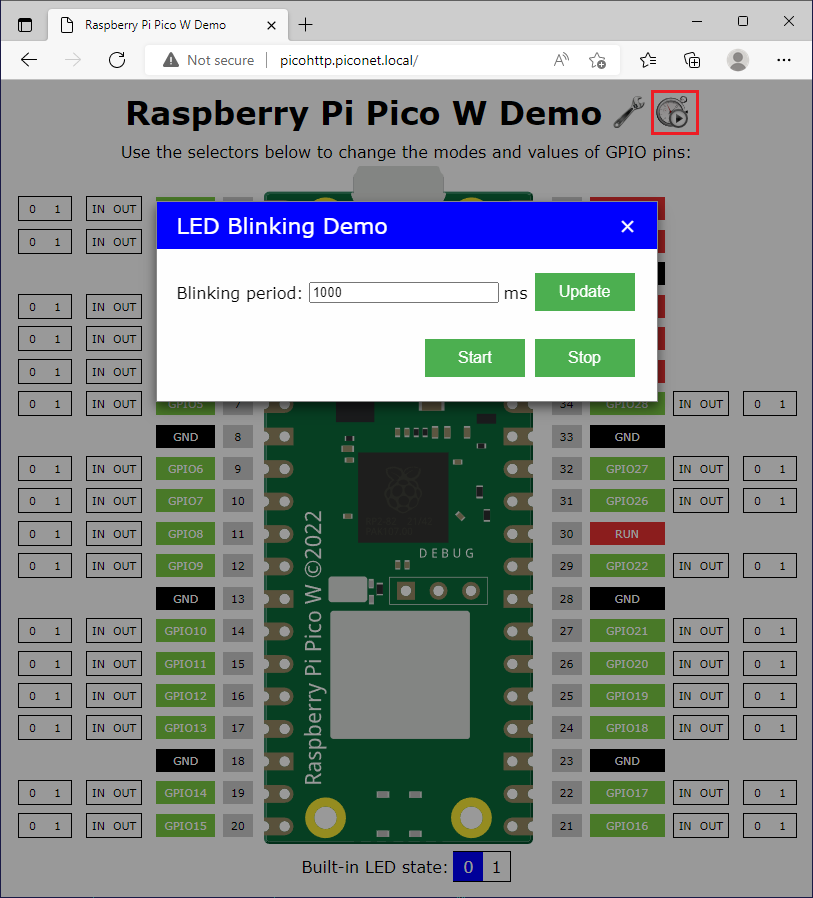
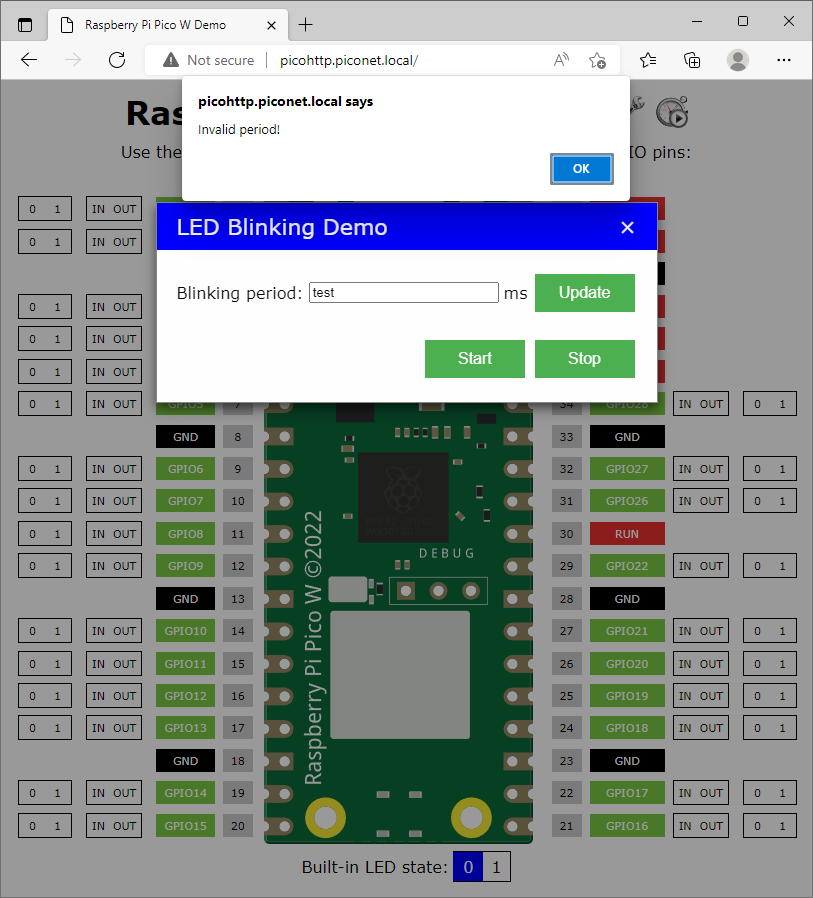
- Press F5 to build the project and start debugging it again. Open the blink dialog in the browser, click “Start” and try changing the period. The on-board LED will blink according to the entered value. If you try setting the period to 0 or a non-number, the browser will display the “Invalid period!” message relayed from the do_handle_blink_api_call() function:
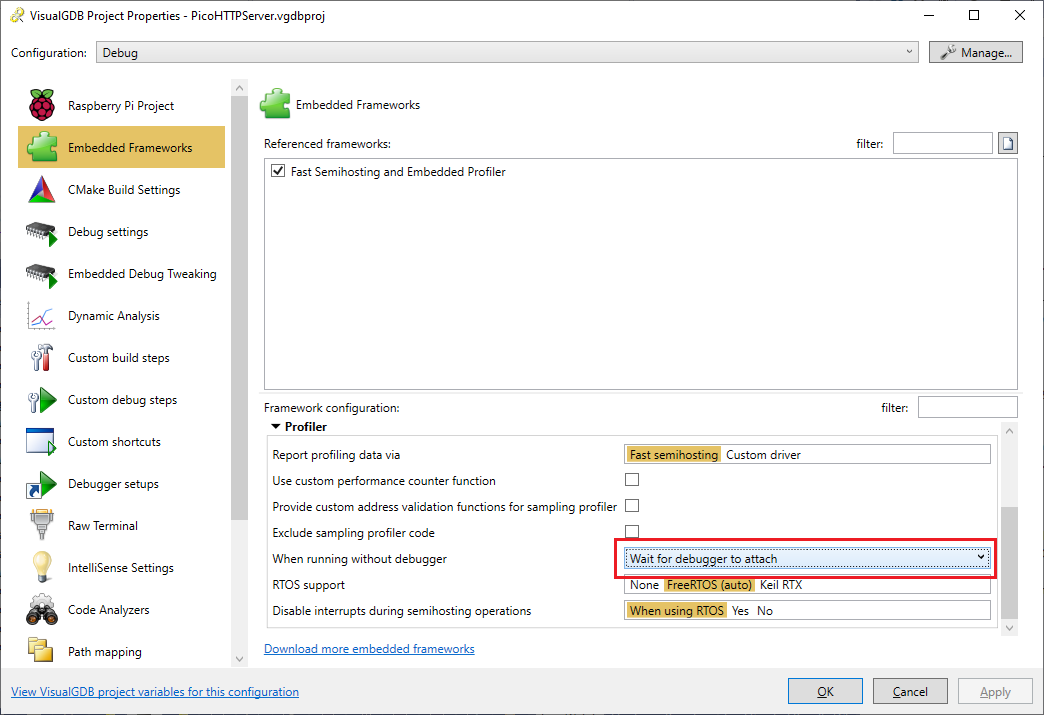
- You can view various debugging output from the project by using the Fast Semihosting feature of VisualGDB. As RP2040 device does not support detecting whether a debugger is attached, the example project comes with the semihosting disabled. You can enable it by setting “When running without debugger: wait for debugger to attach” in VisualGDB Project Properties:
- The debug output will appear in the Debug->Windows->VisualGDB Output window:
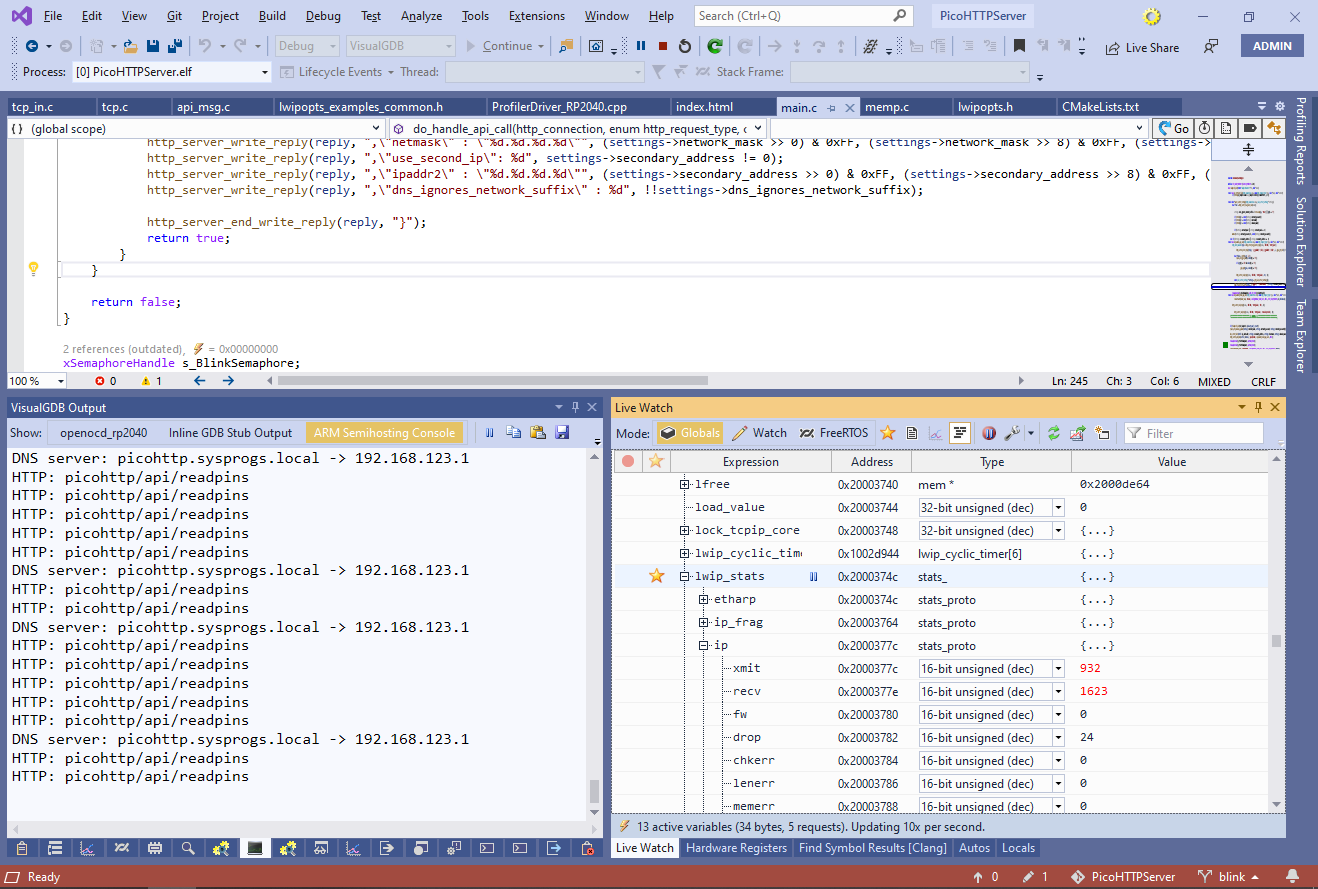 You can also view various lwIP statistics (e.g. number of processed packets) in real time via Debug->Windows->Live Watch->lwip_stats.
You can find the code shown in this tutorial in the blink branch of our GitHub repository. See this commit for the exact changes described above.