Developing Embedded GUI using STemWin Library
This tutorial shows how to create a basic GUI application for the STM32F429I-Discovery board using the STemWin library. We will start with a basic example shipped with the STM32 SDK, will show how to locate different demos inside it and will create a basic demo using the TreeView control to show how the message handling works.
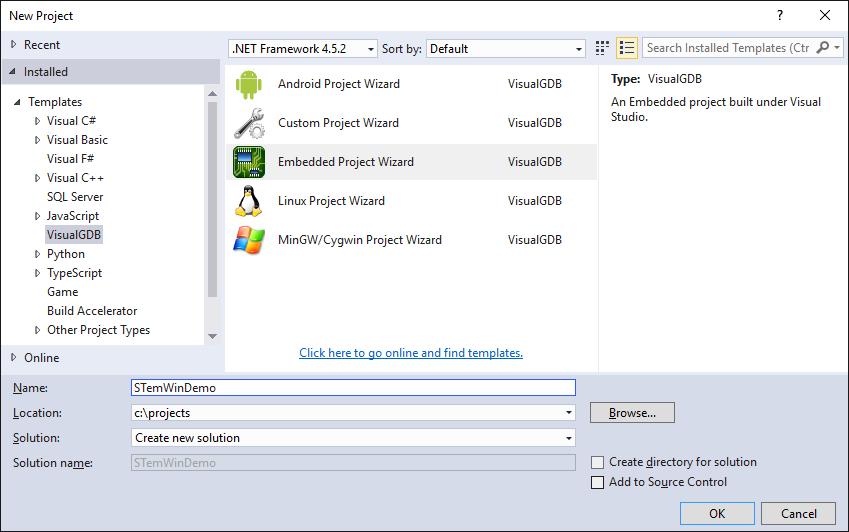
- Start Visual Studio and open the VisualGDB Embedded Project Wizard:
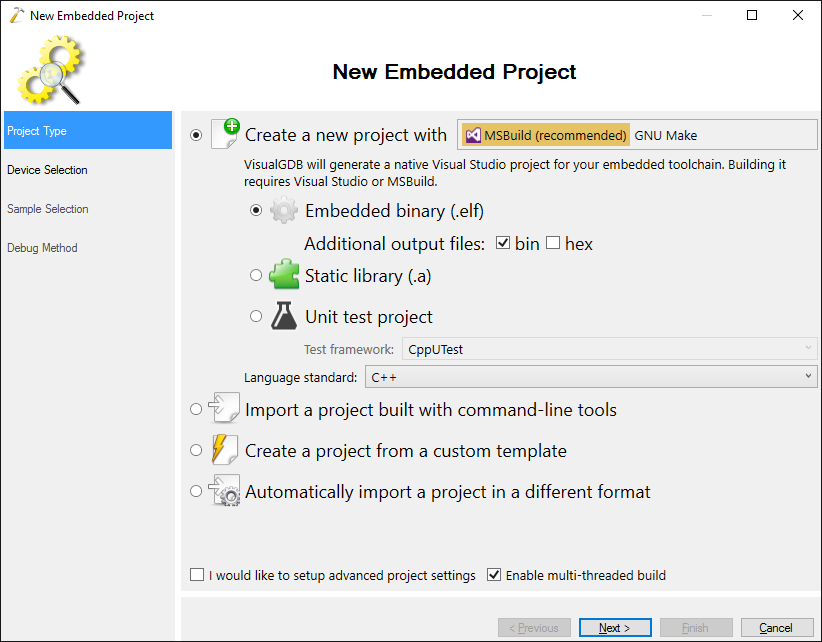
- Proceed with the default “Create a new MSBuild project” options:
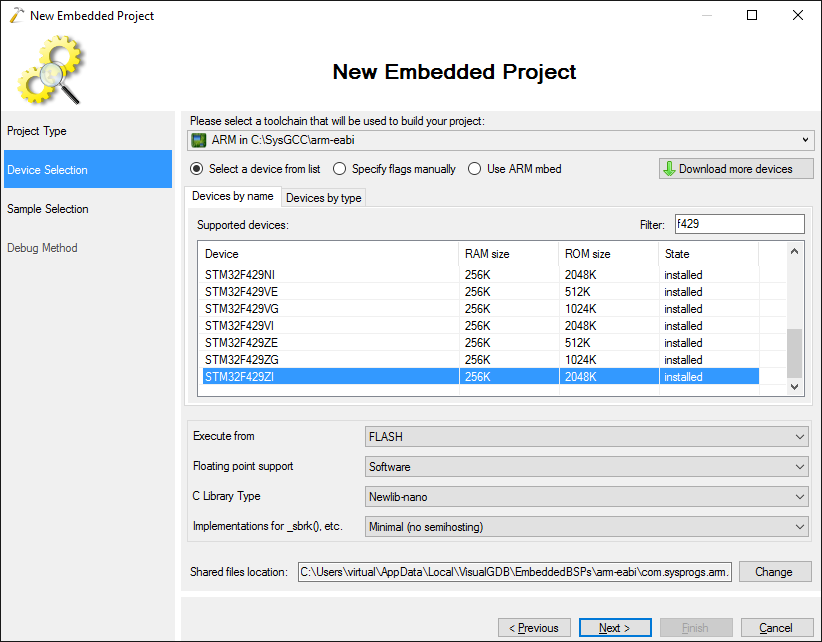
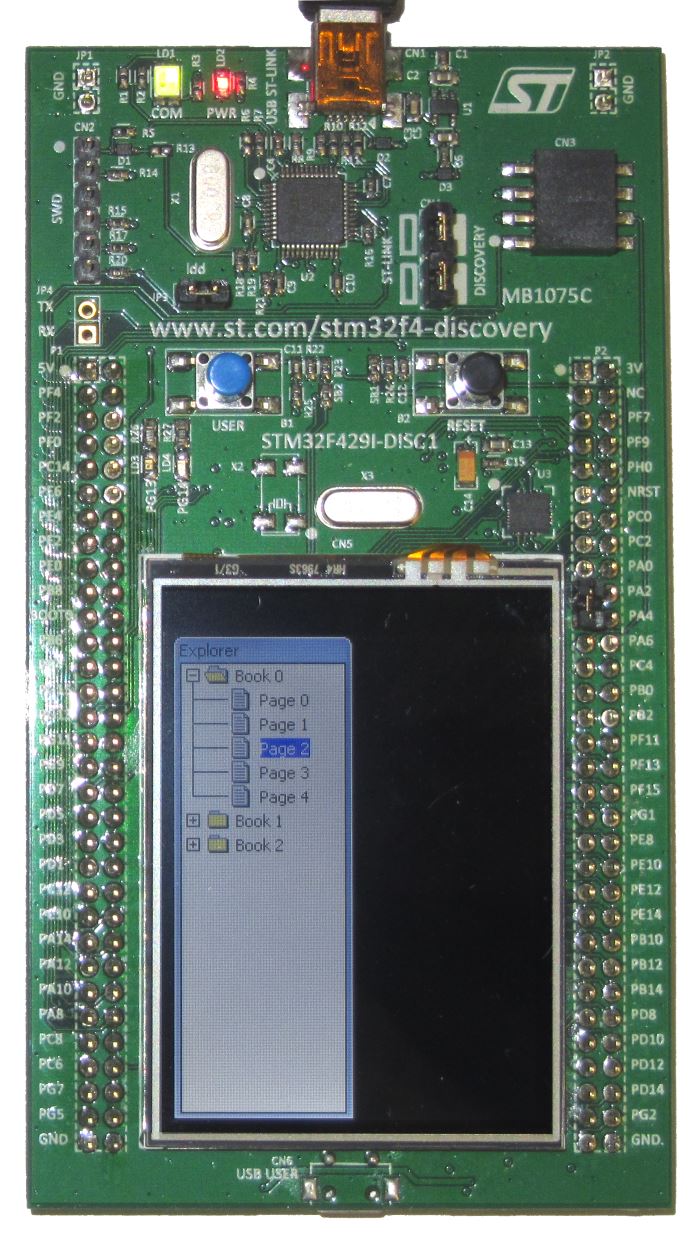
- On the next page select the ARM toolchain and choose your device. In this tutorial we will use the STM32F429-Discovery board with an on-board LCD screen, so we select the STM32F429ZI device:
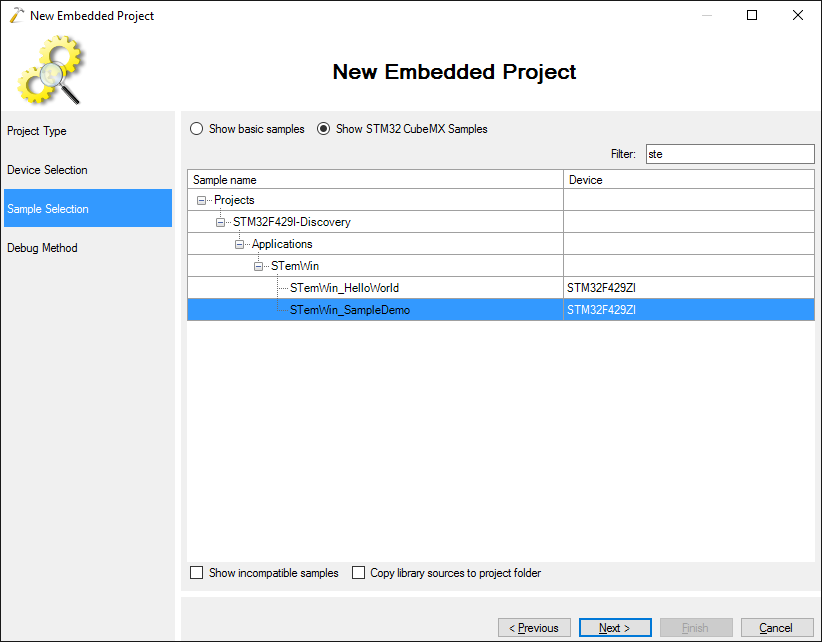
- On the next page select “Show STM32 CubeMX Samples”. Search for “STemWin” to locate STemWin samples for your board:
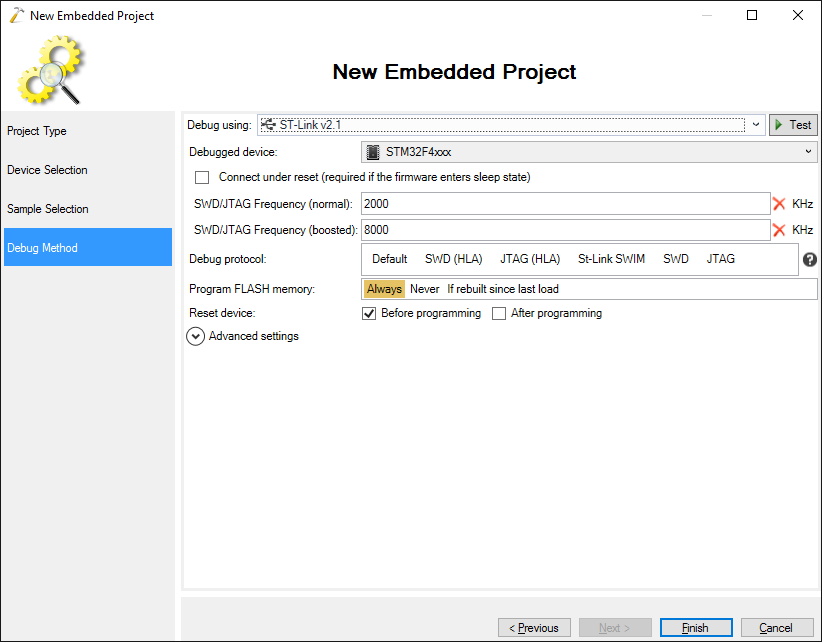
- Connect your board to the computer via USB so that VisualGDB automatically detects it and select your ST-Link in the “Debug using” field:
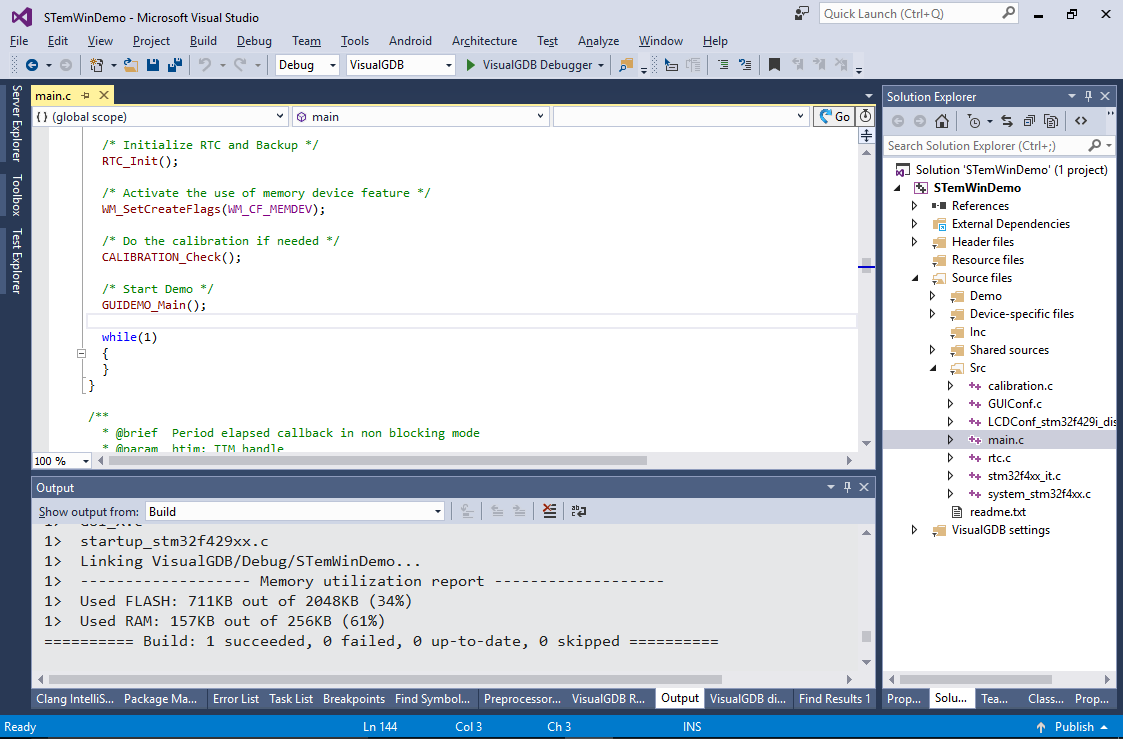
- Press “Finish” to create the project. VisualGDB will generate a project based on the STemWin sample. Build it start :
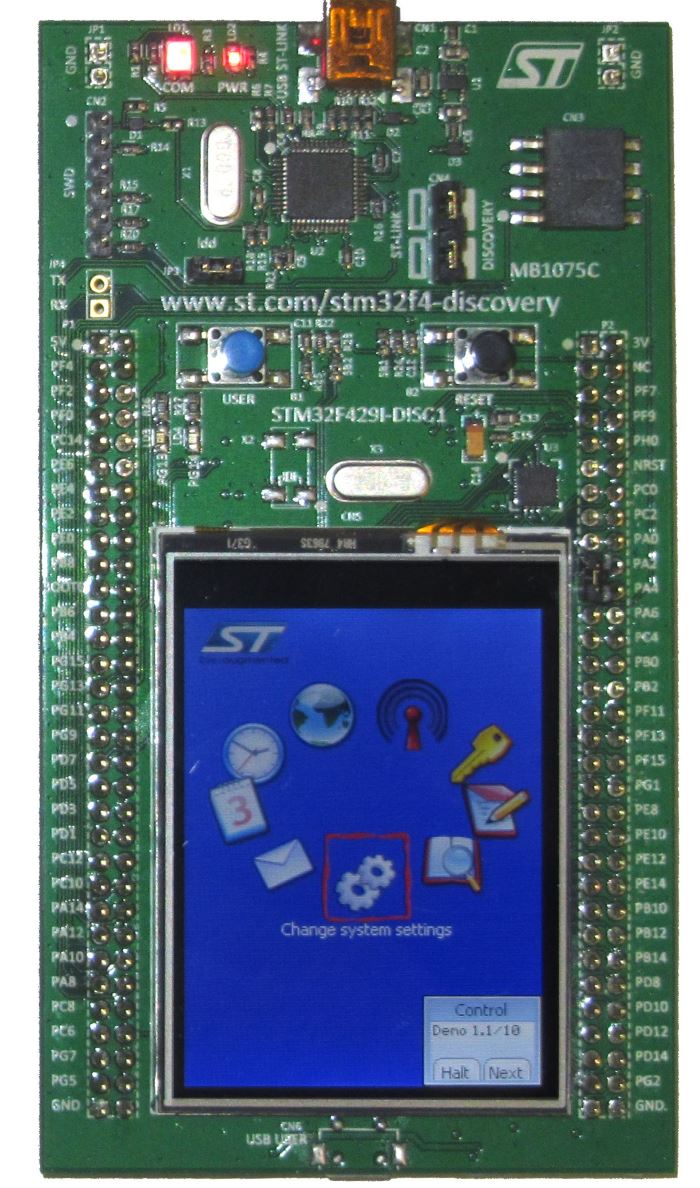
- Calibrate the on-board screen and wait for the radial menu demo to appear:
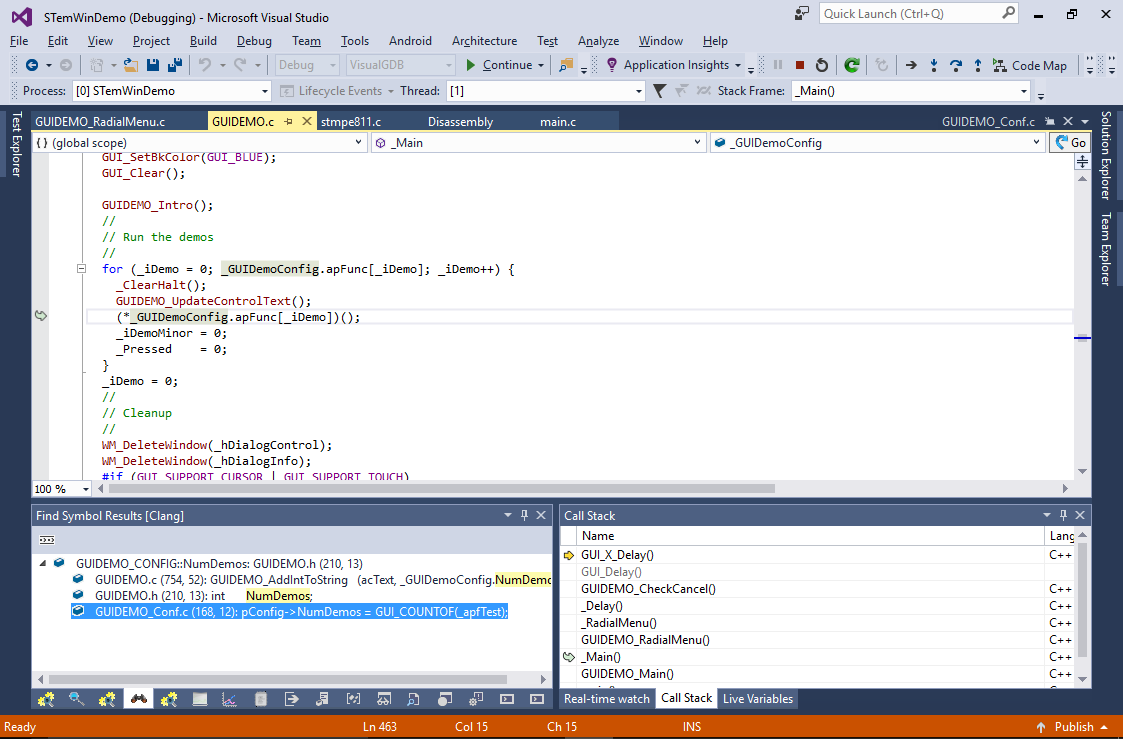
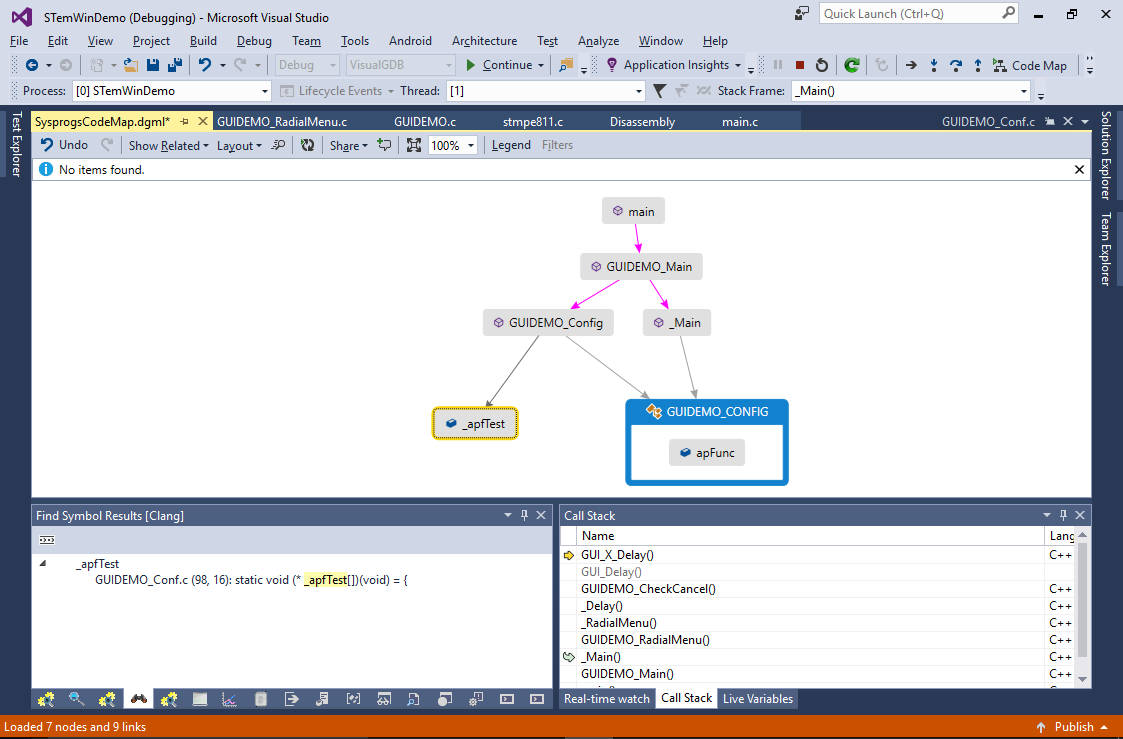
- Press the “break all” button in Visual Studio and use the Call Stack window to navigate to the _Main() function. See how it is looping through the tests defined in _GUIDemoConfig.apFunc:
- You can use the Code Map powered by VisualGDB Clang IntelliSense to quickly locate the function responsible for filling the apFunc array: GUIDemo_Config(). The function reads the list of tests from the global _apfTest variable and writes them to apFunc:
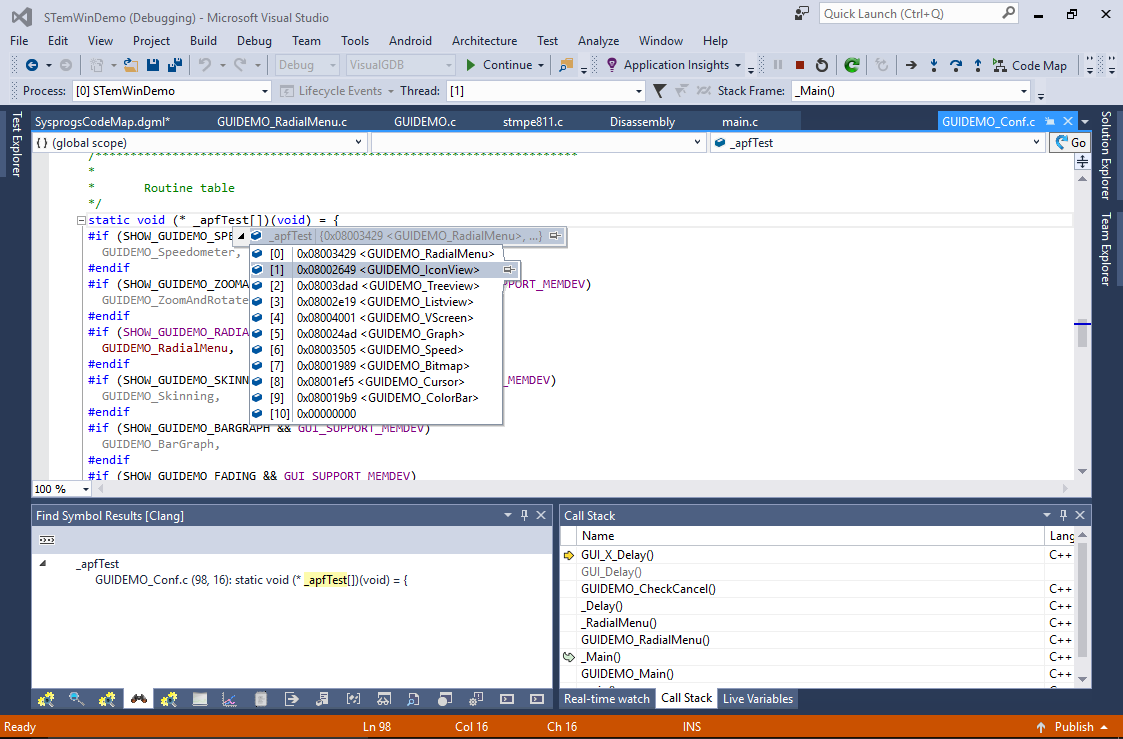
- Double-click on _apfTest and go to its definition. Hover the mouse over it to see the list of tests actually included in the build:
- One of the tests shown in the list is GUIDEMO_Treeview. Locate the corresponding file in Solution Explorer and open it:
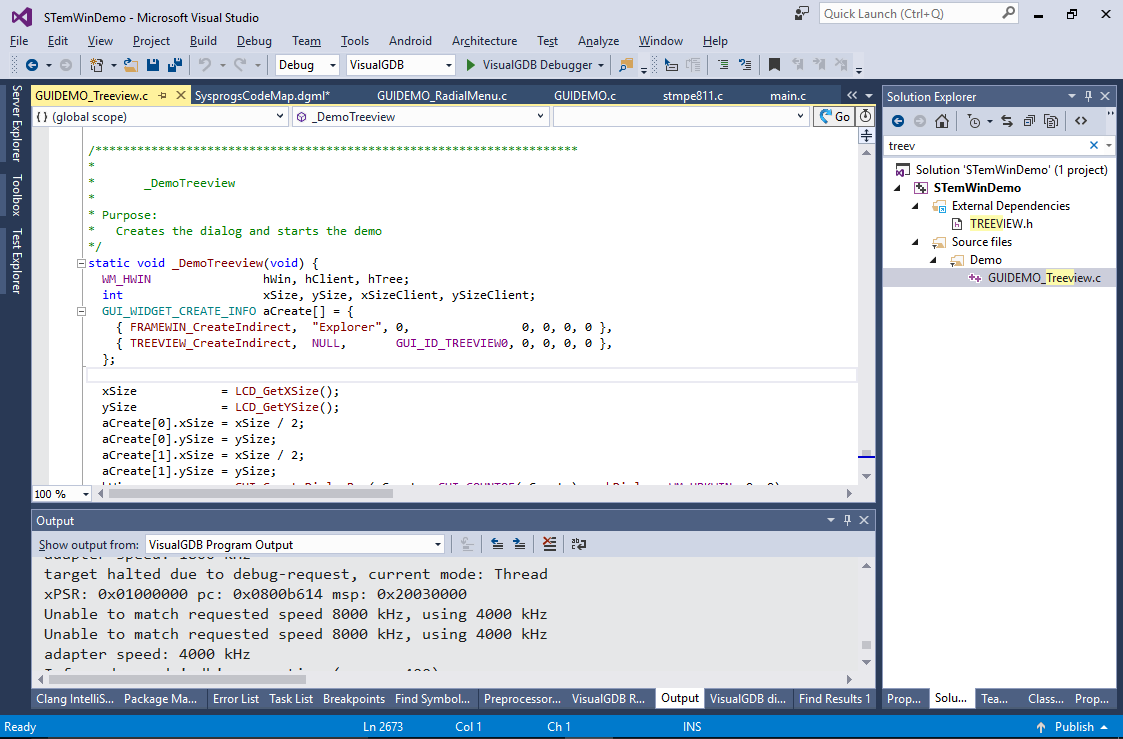
- The demo creates a basic tree view using the TREEVIEW_CreateIndirect() function and fills it with sample items. We will now create a new demo based on it to show the basic usage of STemWin. Create a new file called Experiments.cpp and add the following code there:
#include "main.h"
#include "rtc.h"
#include "GUIDEMO.h"
#include "WM.h"
static bool s_bDone;

extern "C" void RunExperiments()
{
    WM_HWIN                hWin, hClient, hTree;
    int                    xSize, ySize, xSizeClient, ySizeClient;

    GUI_WIDGET_CREATE_INFO controlList[] = {
        { FRAMEWIN_CreateIndirect, "Explorer", 0, 0, 0, 0, 0 },
        { TREEVIEW_CreateIndirect, NULL, GUI_ID_TREEVIEW0, 0, 0, 0, 0 },
    };

    xSize            = LCD_GetXSize();
    ySize            = LCD_GetYSize();
    controlList[0].xSize = xSize / 2;
    controlList[0].ySize = ySize;
    controlList[1].xSize = xSize / 2;
    controlList[1].ySize = ySize;
    hWin             = GUI_CreateDialogBox(controlList, GUI_COUNTOF(controlList), DialogCallback, WM_HBKWIN, 0, 0);
    hClient          = WM_GetClientWindow(hWin);
    xSizeClient      = WM_GetWindowSizeX(hClient);
    ySizeClient      = WM_GetWindowSizeY(hClient);
    hTree            = WM_GetDialogItem(hWin, GUI_ID_TREEVIEW0);
    WM_SetSize(hTree, xSizeClient, ySizeClient);

    while (!s_bDone)
    {
        GUI_Exec();
    }

    WM_DeleteWindow(hWin);
}
The code creates a basic window in the left half of the screen that will consist of a basic window frame and a tree view. STemWin uses messages and functions similar to the native Win32 API functions for managing windows. Once your application creates all the GUI elements, it should call GUI_Exec() in a loop.
- Add a DialogCallback function similar to the Win32 dialog function that will handle the WM_INIT_DIALOG and WM_NOTIFY_PARENT messages:
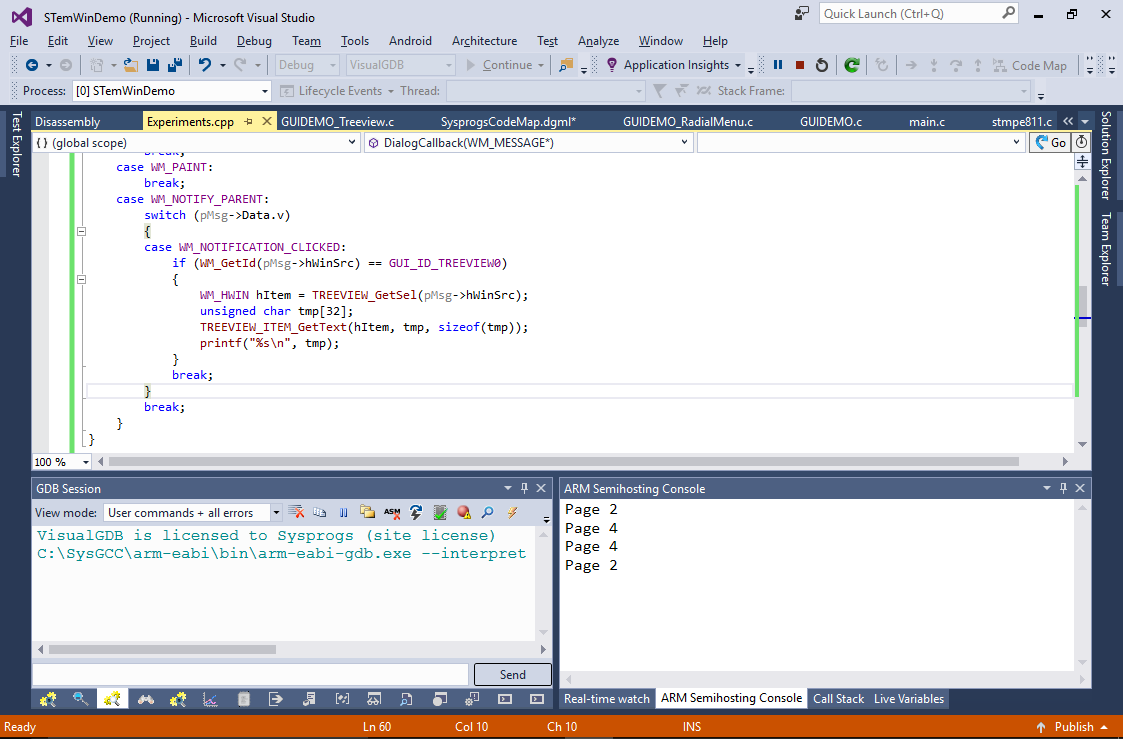
static void DialogCallback(WM_MESSAGE * pMsg)
{
    WM_HWIN hItem, hDlg;
    hDlg = pMsg->hWin;
    switch (pMsg->MsgId)
    {
    case WM_INIT_DIALOG:
        hItem = WM_GetDialogItem(hDlg, GUI_ID_TREEVIEW0);
        PopulateTreeView(hItem);
        break;
    case WM_NOTIFY_PARENT:
        switch (pMsg->Data.v)
        {
        case WM_NOTIFICATION_CLICKED:
            if (WM_GetId(pMsg->hWinSrc) == GUI_ID_TREEVIEW0)
            {
                WM_HWIN hItem = TREEVIEW_GetSel(pMsg->hWinSrc);
                unsigned char tmp[32];
                TREEVIEW_ITEM_GetText(hItem, tmp, sizeof(tmp));
                printf("%s\n", tmp);
            }
            break;
        }
        break;
    }
}
- Finally add a PopulateTreeView() function that will create 2 levels of items in the tree view: 3 books with 5 pages in each book:
static void PopulateTreeView(WM_HWIN hTree)
{
    TREEVIEW_ITEM_Handle hBook, hPage;
    char tmp[128];
    for (int i = 0; i < 3; i++)
    {
        sprintf(tmp, "Book %d", i);
        if (!i)
            hBook = TREEVIEW_InsertItem(hTree, TREEVIEW_ITEM_TYPE_NODE, 0, 0, tmp);
        else
            hBook = TREEVIEW_InsertItem(hTree, TREEVIEW_ITEM_TYPE_NODE, hBook, TREEVIEW_INSERT_BELOW, tmp);

        for (int j = 0; j < 5; j++)
        {
            sprintf(tmp, "Page %d", j);
            if (!j)
                hPage = TREEVIEW_InsertItem(hTree, TREEVIEW_ITEM_TYPE_LEAF, hBook, TREEVIEW_INSERT_FIRST_CHILD, tmp);
            else
                hPage = TREEVIEW_InsertItem(hTree, TREEVIEW_ITEM_TYPE_LEAF, hPage, TREEVIEW_INSERT_BELOW, tmp);
        }
    }

    TREEVIEW_SetAutoScrollH(hTree, 1);
    TREEVIEW_SetAutoScrollV(hTree, 1);
    TREEVIEW_ITEM_Expand(TREEVIEW_GetItem(hTree, 0, TREEVIEW_GET_FIRST));
    WM_SetFocus(hTree);
}
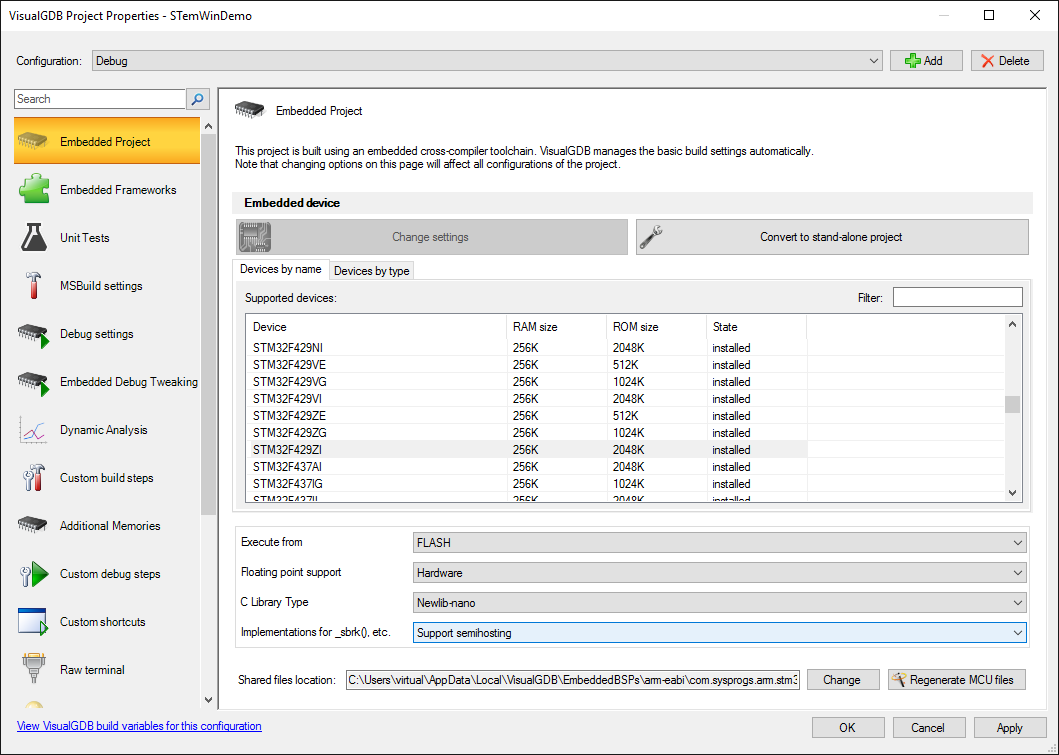
- In order to see the output from printf() you need to enable semihosting (mechanism for sending text from the program to the debugger). You can do this via the first page of VisualGDB Project Properties:
- Now you can build the program and start it by pressing F5. Check the screen on your board to see the tree view:
- Try tapping on some of the elements and observe the ARM Semihosting Console window in Visual Studio:
- Normally each semihosting call (i.e. a call to printf()) requires the debugger to handle an interrupt, read memory and resume the program, resulting in noticeable delays. You can reduce them by enabling the fast semihosting framework via VisualGDB Project Properties:
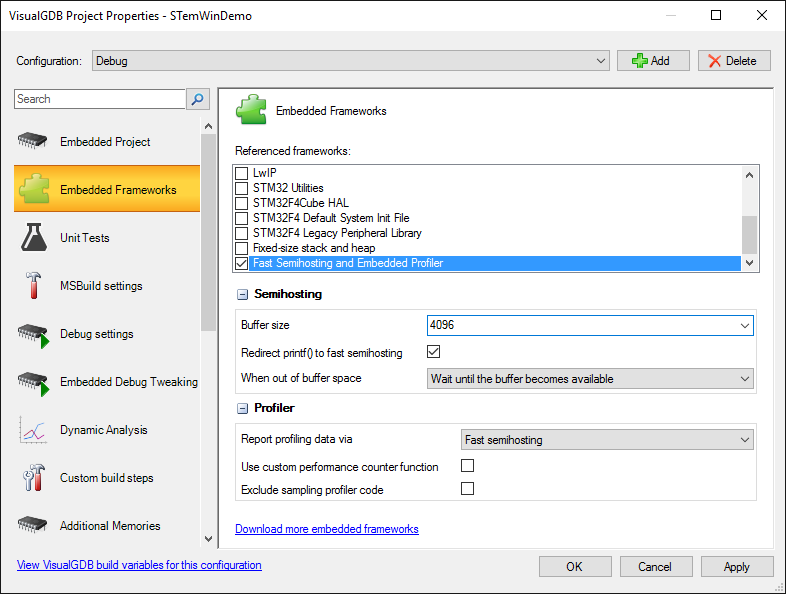 Fast semihosting will use a ring buffer inside the device memory to send the data to the debugger non-stop, greatly improving the performance.