Creating a Bluetooth LE Mouse using Nordic nRF51 and Visual Studio
This tutorial shows how to create a Bluetooth LE Mouse firmware using the Nordic nRF51 SDK and VisualGDB, demonstrates different aspects of debugging Bluetooth firmware and shows the main concepts of the Nordic nRF51 Bluetooth LE stack. Before you begin, install VisualGDB 5.0, get a Bluetooth LE-capable device (e.g. a new Android phone) and follow our basic Nordic tutorial to get started.
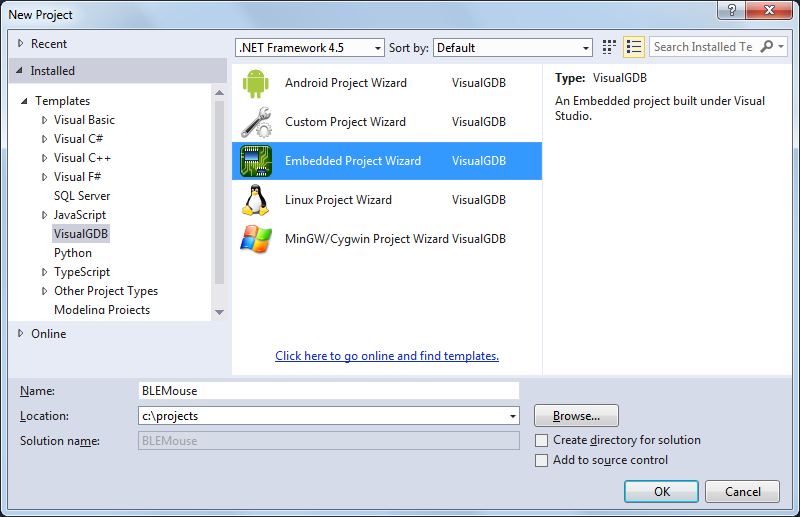
- Start Visual Studio. Select File->New Project->VisualGDB->Embedded Project Wizard:
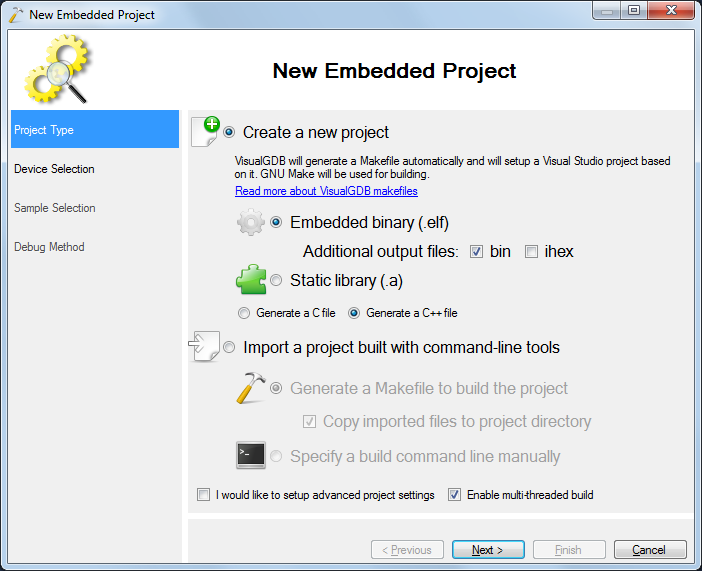
- Proceed with the default “Embedded binary” setting. As the Bluetooth LE applications contain a lot of source files, it is recommended to select the “Enable multi-threaded build” flag:
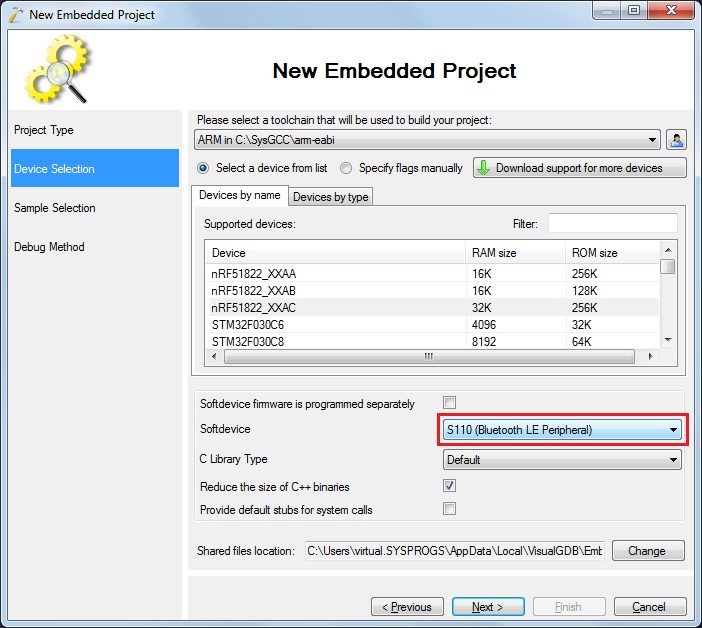
- Choose the device you are targeting and select the S110 soft device. Ensure that the “softdevice firmware is programmed separately” checkbox is NOT checked:
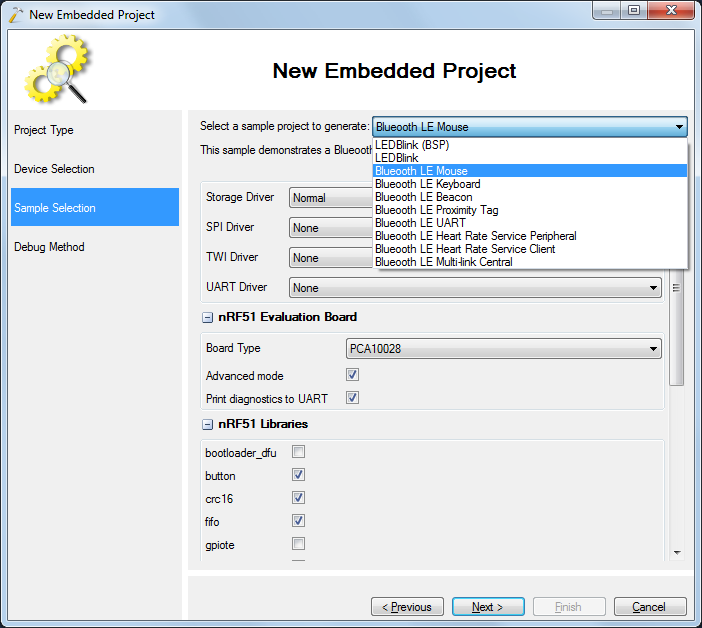
- On the next page select the “Bluetooth LE mouse” sample and specify your board type from the sticker on the board below. PCA10028 corresponds to the nRF51-DK board:
- On the last page of the wizard select the Segger J-Link debug method (Nordic boards come with on-board J-Link) and check the “reset device after programming” checkbox:
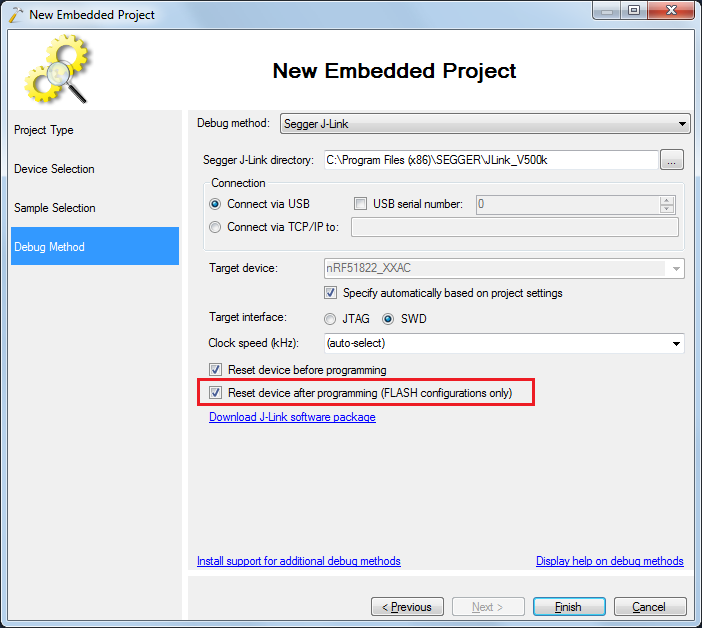 If you are using a different debug method, ensure that you enable device resetting for it as well. If you don’t do that, GDB will run the entry point of your program after loading it into device and this will bypass the softdevice initialization code. If you reset the device after programming, the ARM core will choose the correct entry point from the soft device automatically.
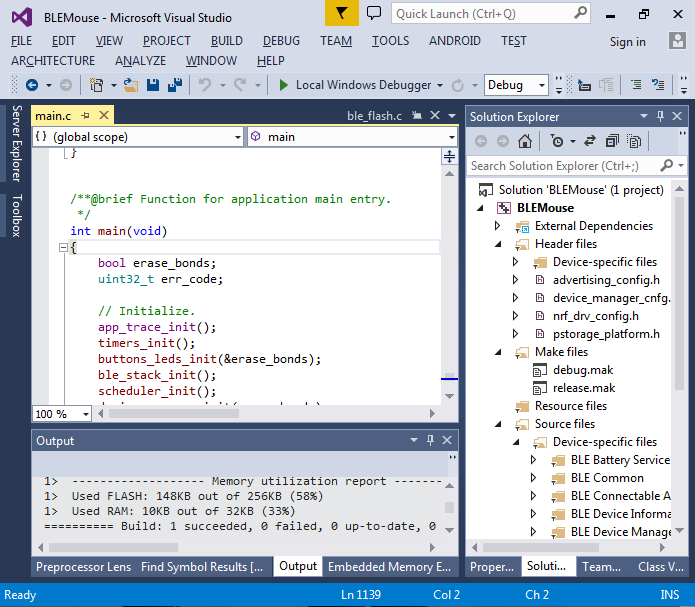
 - Click “Finish” to generate your project. Then build it by pressing Ctrl-Shift-B:
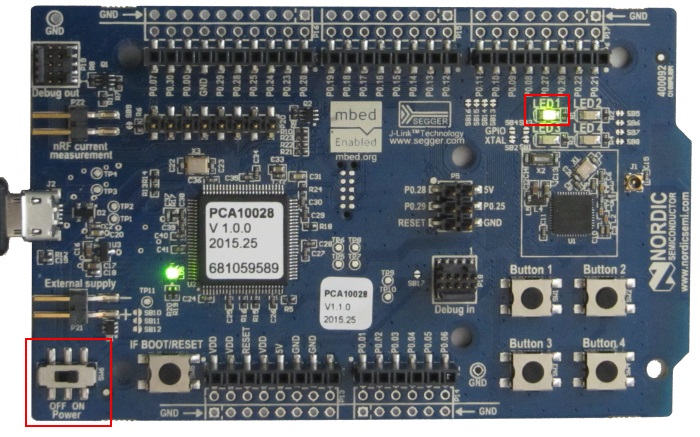
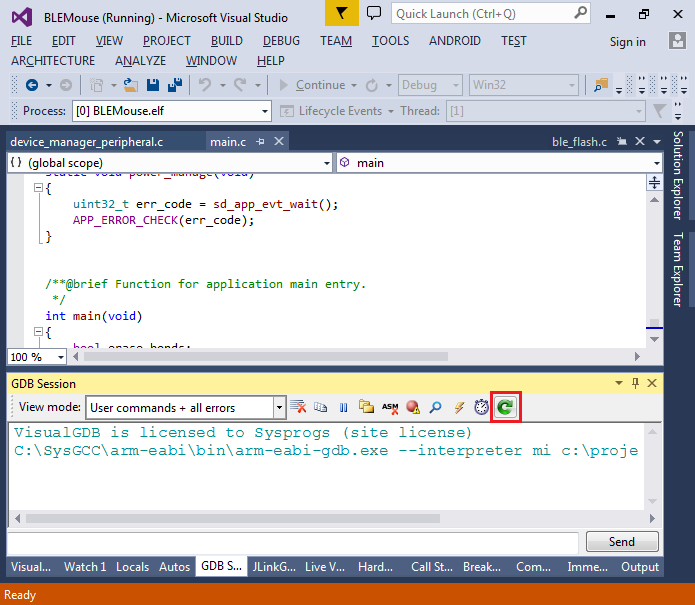
- Connect your board to the computer and ensure the switch on the board is on. Press F5 to start debugging the project. Ensure that the LED1 is blinking indicating that the board is sending discovery packets letting other devices find it:
- If the LED1 is not blinking, try resetting the device using the Reset button in the GDB Session window:
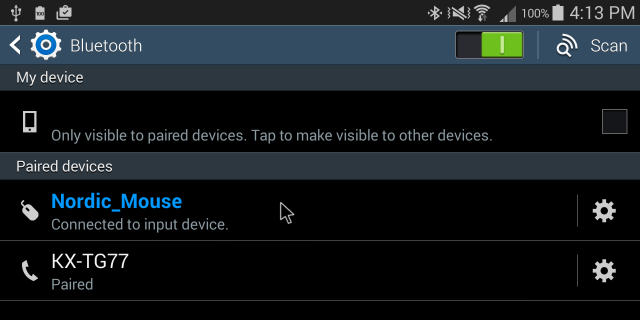
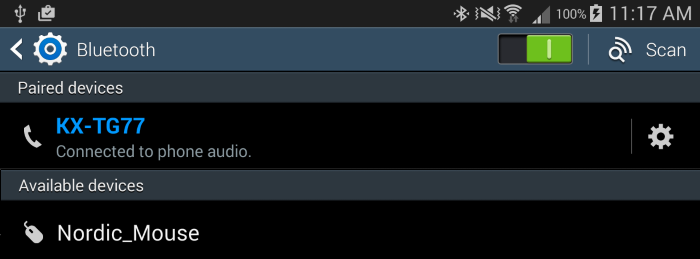
- Get a Bluetooth LE-capable device (e.g. an Android smartphone or a tablet running Android 4.3+) and search for Bluetooth devices:
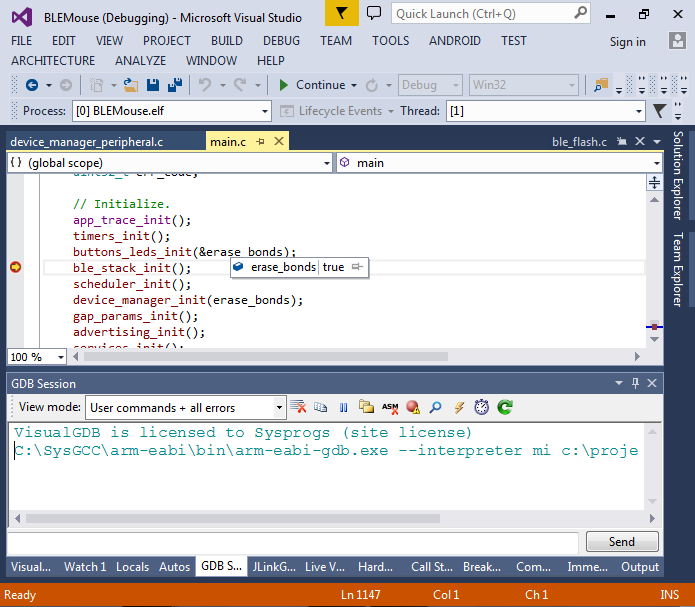
- If the device does not appear in the list, reset the board while holding the button 2 on it. This should reset in erasing the bonds stored in the nRF51 memory. If this does not help, double-check with the debugger that erase_bonds is set or set it explicitly:
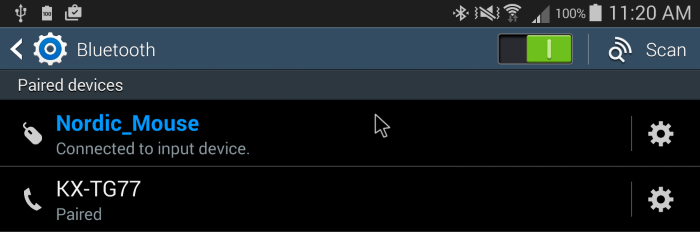
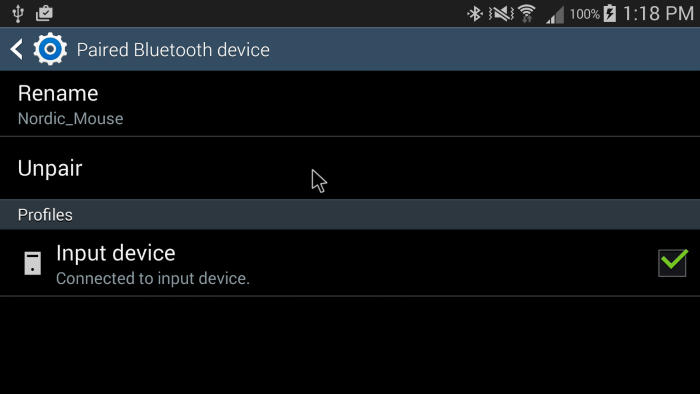
- Pair your Android device with the mouse. Then try pressing buttons on the board and observe how the mouse pointer moves:
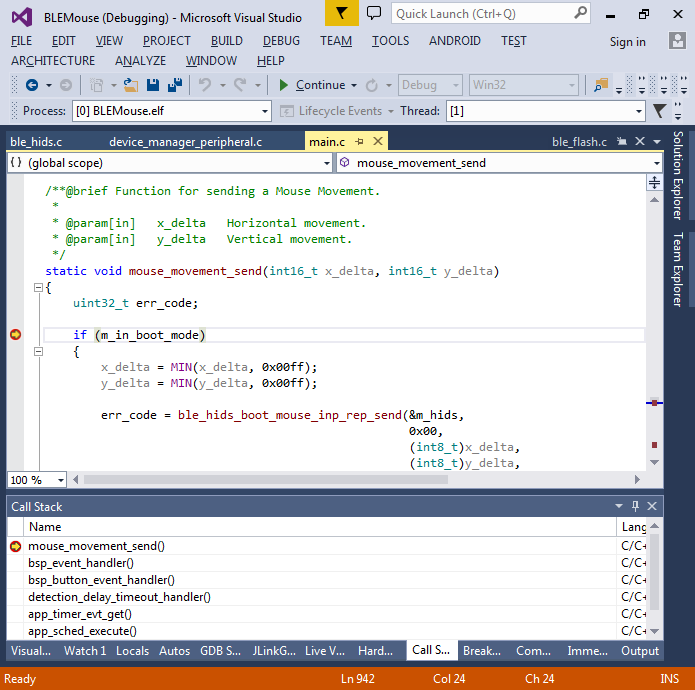
- Now we will use the debugger to see how the input events are handled. Set a breakpoint in the mouse_movement_send() function in main.c and press a button on the board:
- If you try stepping through the code now, most likely your device will reset itself. This happens when the Bluetooth hardware triggers an interrupt while we are stopped in the debugger and by the time it is handled (when we step through code), the softdevice detects that too much time has passed and resets the processor. This is a known limitation documented here and here. To work around it, we will disable interrupt handling by setting the PRIMASK register to 1:
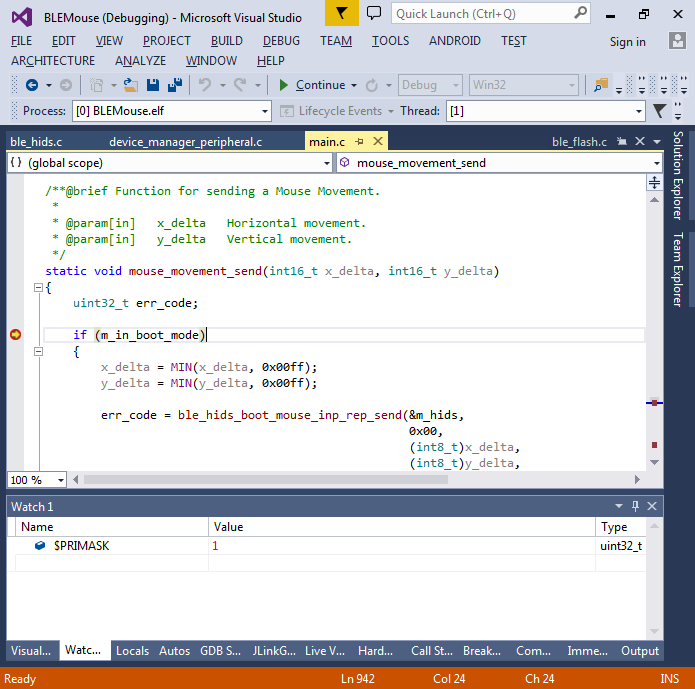 This will allow stepping through the code without being interrupted, but once you are done stepping, you will need to reset the device, as the Nordic soft device cannot continue normal operation after not being able to handle the interrupts in time.
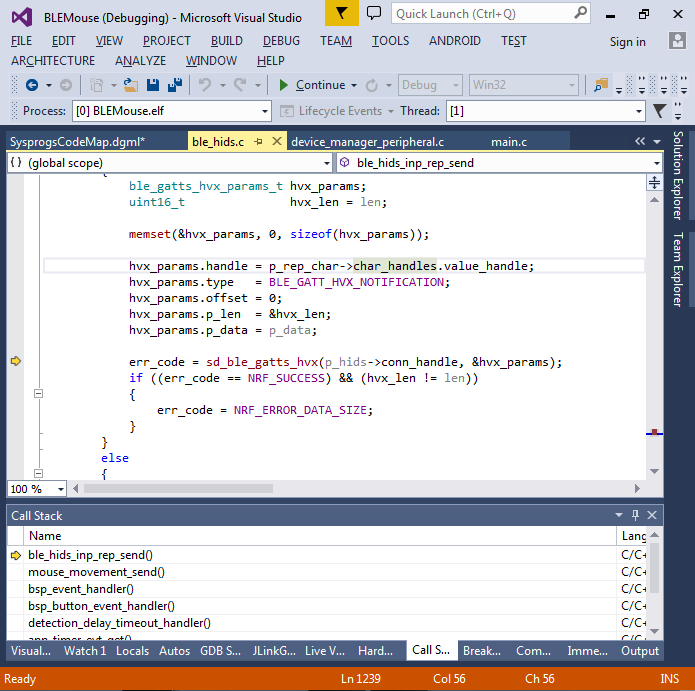
 - If you step into the ble_hids_inp_rep_send() function, you will see that it sends an “attribute value updated” notification using the sd_ble_gatts_hvx() function. Note that the functions prefixed with sd_ are implemented inside the softdevice and cannot be stepped into. As we cannot reliably continue running softdevice code after being stopped in the debugger, we will use the code map to quickly find related code. First of all, we will find how is the attribute updated in this call gets registered. Right-click on the characteristic handle (char_handles) and select “Show on Code Map”:
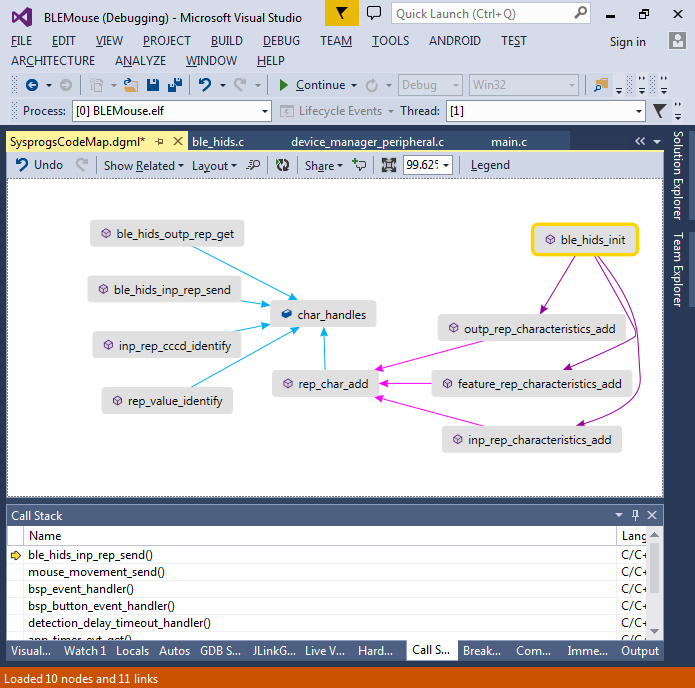
- Then use the “show functions referencing this” and “show functions calling this” commands to find the function that registers the characteristics and the functions that call it during initialization:
- Set a breakpoint inside inp_rep_characteristics_add() and reset your device. The breakpoint will hit allowing you to examine what happens during initialization. You can also right-click on a function and select “Explore Call Hierarchy” to quickly navigate through the functions calling it:
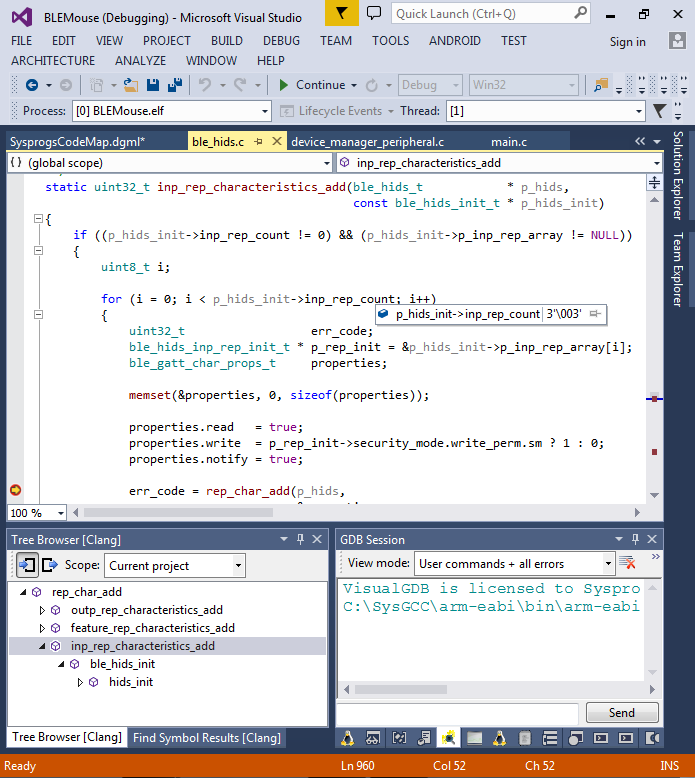
- If you use the “find all references” command to see where the p_inp_rep_array field is assigned, you will find that the hids_init() function is registering 3 input characteristics, one of them being INPUT_REP_MOVEMENT:
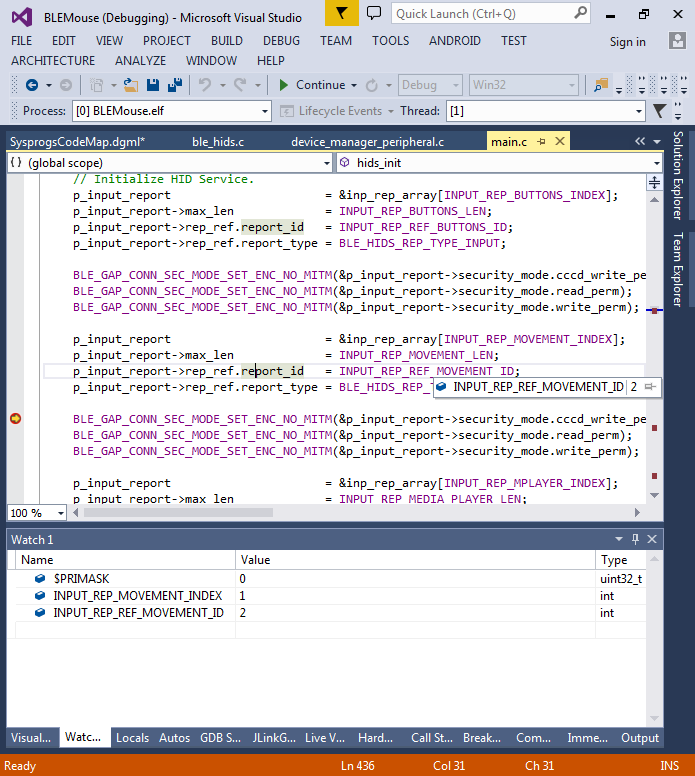
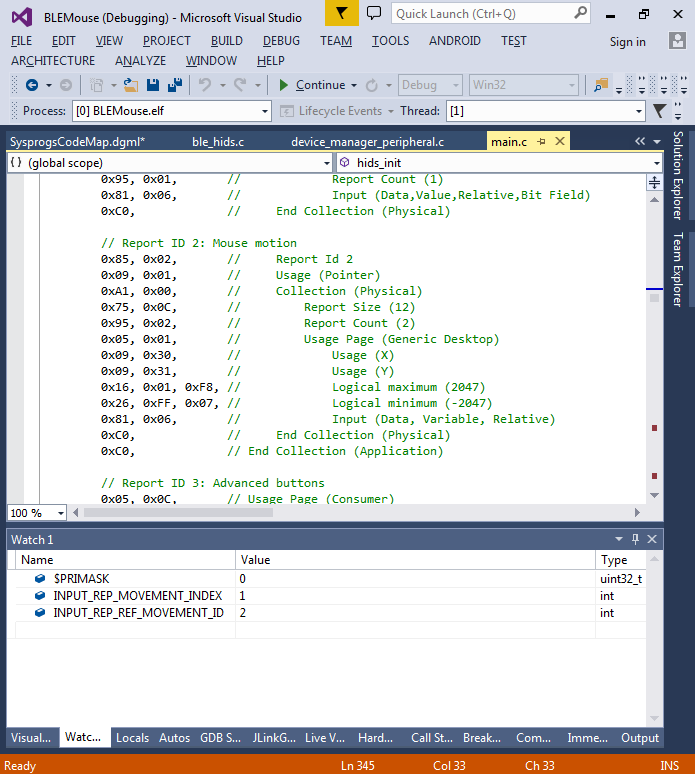
- The registration code, however, does not specify that the report #2 corresponds to the mouse motion. This is specified in the HID descriptor that is filled in the hids_init() function:Accord
- The HID descriptor filled in hids_init() is then registered by the rep_map_char_add() function as the REPORT_MAP_CHAR characteristic:
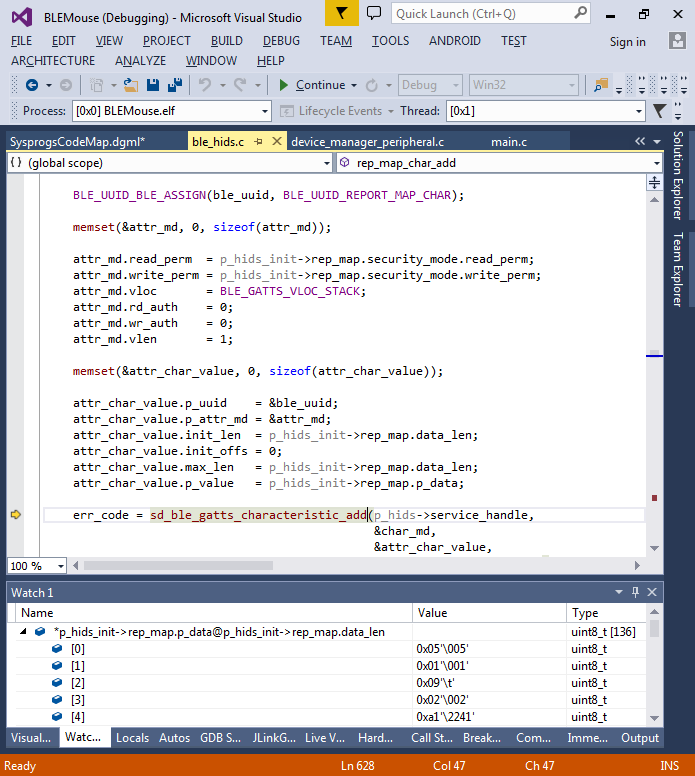 According to the Bluetooth LE HID specifiction, the report map characteristics contains HID report descriptor from the USB HID specification.
 - Now we will see what happens when device bonding occurs and what information is stored in the FLASH memory. Make sure your device has the connection to the nRF51 board and the buttons result in mouse movement, then unpair the device:
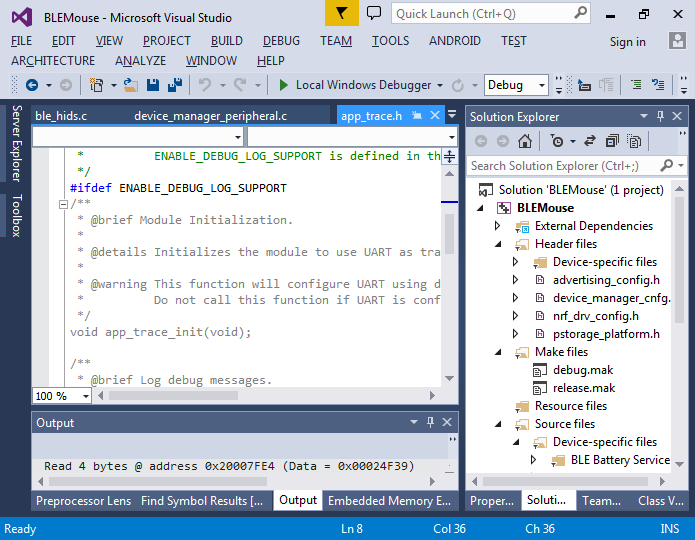
- To see what happens during pairing and unpairing we will enable debug logging. The device pairing logic is implemented in the device_manager_peripheral.c file using DM_LOG() and other similar macros. Using the go-to-definition command we can see that they are disabled unless ENABLE_DEBUG_LOG_SUPPORT is defined:
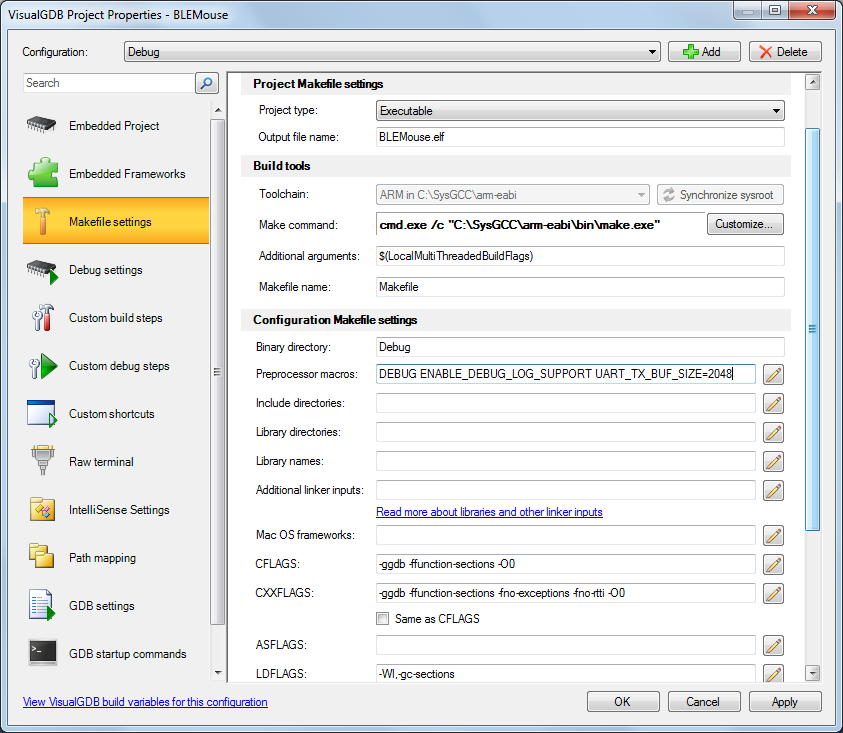
- Add the ENABLE_DEBUG_LOG_SUPPORT on the Makefile Settings page of VisualGDB Project Properties and set UART_TX_BUF_SIZE to 2048 to avoid buffer overruns:
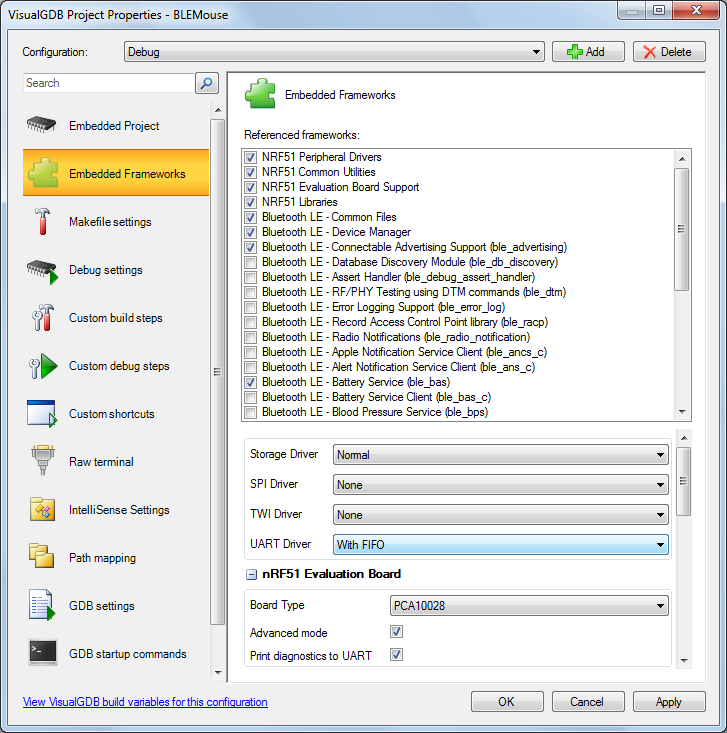
- Then select UART with FIFO in the “UART Driver” field on the Embedded Frameworks page:
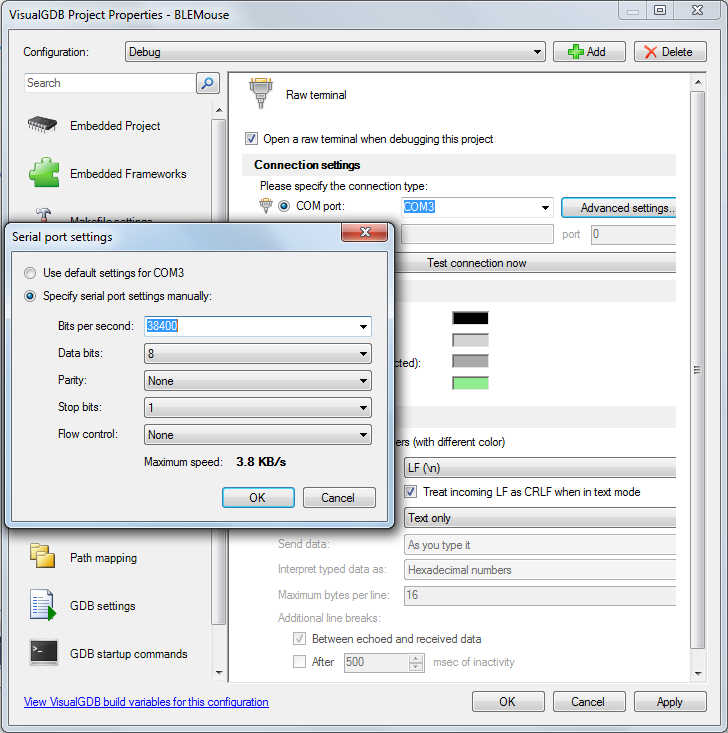
- The on-board J-Link comes with a USB COM port driver that is connected to the Nordic device. If you are using the Custom edition of VisualGDB or higher, you can view the output from the COM port directly in Visual Studio by enabling it on the Raw Terminal page of VisualGDB Project Properties:
- Press OK to apply the changes. If you get a “command line too long” error, try relocating the NRF51 BSP to a shorter path (e.g. c:\nrf51) using the “change” button on the Embedded Project page of VisualGDB project properties:
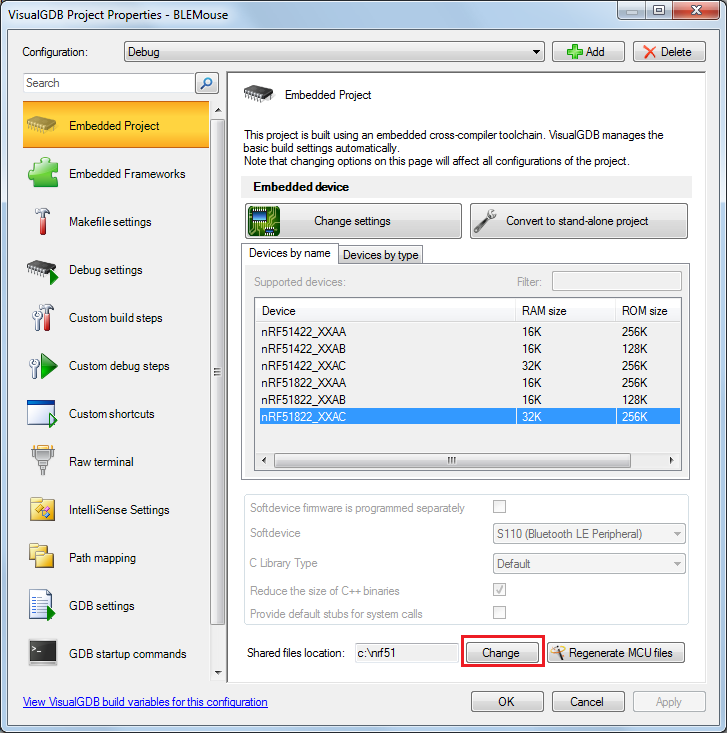 Do not forget to do a clean rebuild of your project if you have relocated the shared files.
 - Now you can start debugging and observe the debug output in the COMx window (do not confuse it with ARM Semihosting console):
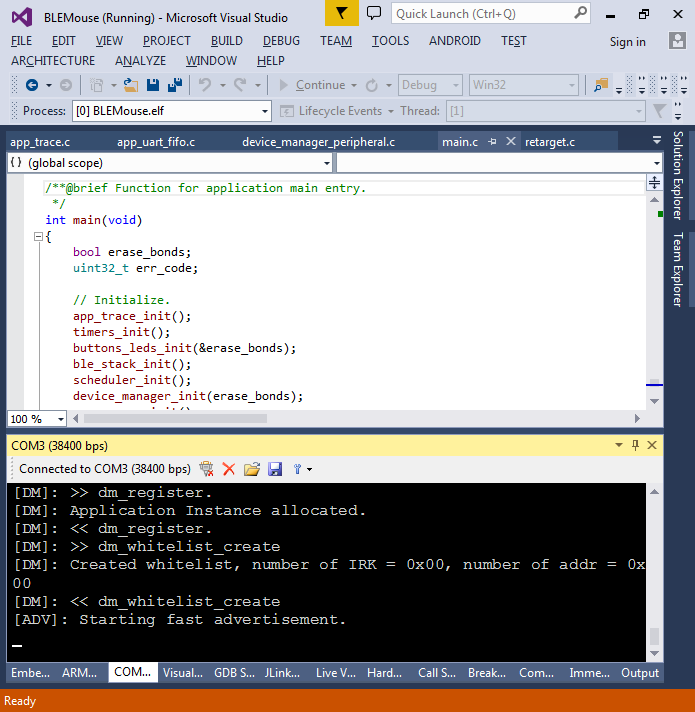
- Pair your Android device with the nRF51 board and observe the output. Note the “Bonded!” message:
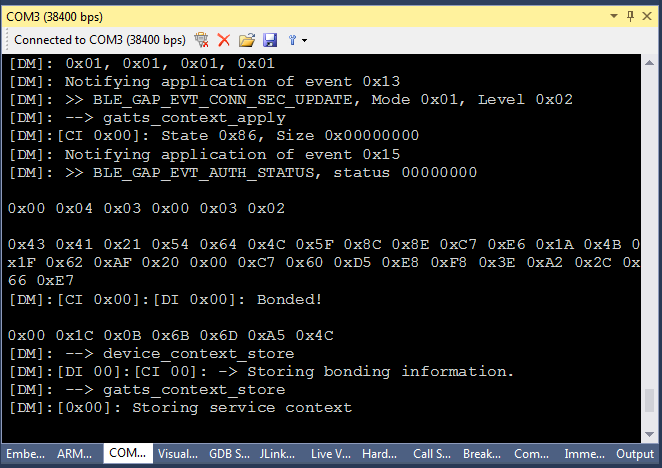
- Looking through the debug output and searching the source code for the messages shown there reveals the sequence of events that occurs during bonding:
- First of all the BLE_GAP_EVT_CONNECTED event is sent. The dm_ble_evt_handler() function allocates a connection object in m_connection_table and tries to find a device instance matching the address of your Android device.
- Then the BLE_GAP_EVT_SEC_PARAMS_REQUEST event is triggered. As no matching device instance was found before, dm_ble_evt_handler() calls device_instance_allocate() that results in storing the device address in m_peer_table.
- The BLE_GAP_EVT_CONN_SEC_UPDATE event is sent resulting in updating of the security keys.
- Finally, the BLE_GAP_EVT_AUTH_STATUS is sent. This results in storing the bond information in the FLASH memory via a call to device_context_store(). The data format used by the device manager can be found by searching device_manager_peripheral.c for “device_manager_context_offsets”.
- If you are frequently uploading different programs using the same softdevice, you can remove the softdevice code from the firmware built by VisualGDB via VisualGDB Project properties:
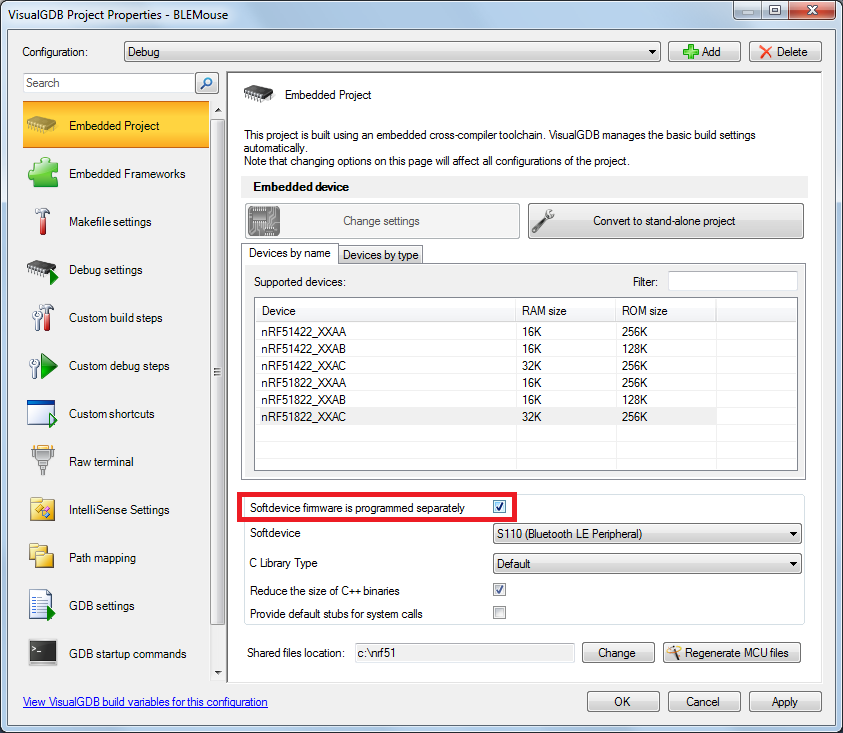 This will leave a gap in the area where the softdevice normally resides, resulting in reduced firmware upload time. However if you try to upload such firmware to a device that does not have a softdevice already programmed (or has a different softdevice), you will get strange runtime errors.


