Troubleshooting Missing Header File Issues
This page explains how to troubleshoot the “<header file>: No such file or directory” errors in C/C++ projects (1):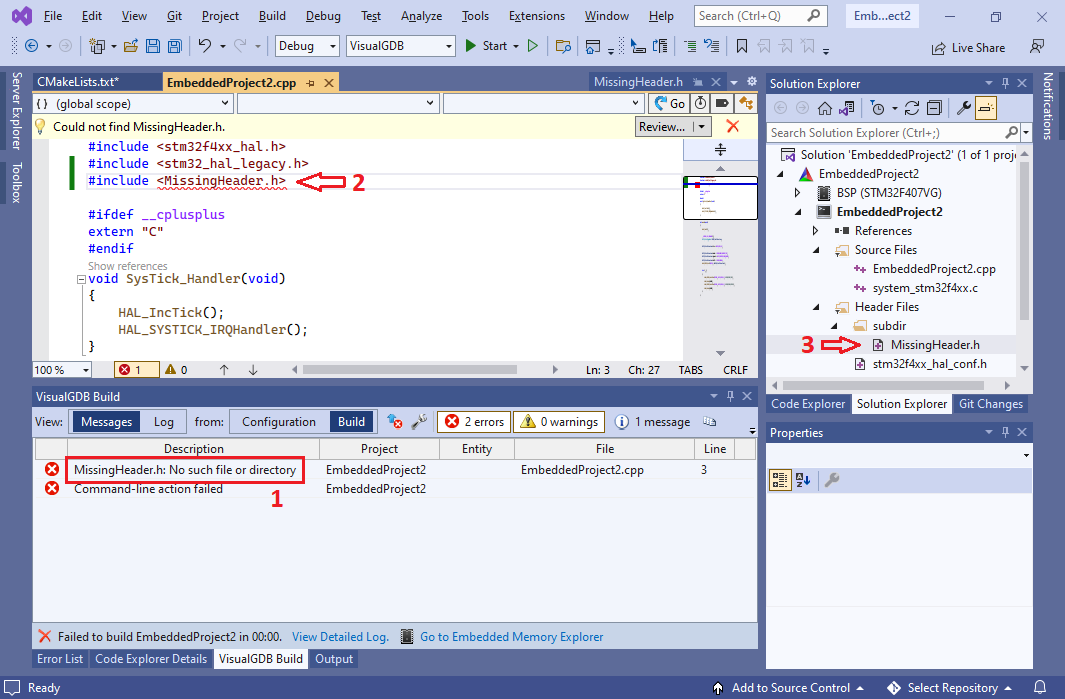 This error is triggered when a source file (.c/.cpp) or another header file (.h) tries to include another header file that cannot be found. The error message typically points to the location of the #include directive (2). The error can happen even if the missing header file is actually shown in Solution Explorer (3).
The error happens because C/C++ projects use an explicit list of directories to search for header files. This list is separate from the list of header files in Solution Explorer, that are only used for navigation. E.g. if the include directories are c:/dir1 and c:/dir2, the C/C++ compiler will try resolving the #include <MissingHeader.h> directive by checking the following 2 paths:
- c:/dir1/MissingHeader.h
- c:/dir2/MissingHeader.h
Additionally, if the include directive used the #include “file” instead of #include <file> syntax, it will also check the directory of the including file.
If none of the checked files are found, the compiler shows the “<header file>: No such file or directory” error and stops.
Automatic troubleshooting
In many cases you can let VisualGDB automatically locate the missing headers automatically using the header discovery bar (see this tutorial). The rest of this page shows how to troubleshoot this type of problem manually.
WARNING: If you attempt automatic troubleshooting, make sure you backup the project before changing it. Referencing incorrect include directories could break the project further, making it harder to fix later.
Manual troubleshooting
The first step in troubleshooting the missing header errors is finding out the exact source file triggering it, and the include directories it tries to use. The easiest way to find it out is by looking at the compielr command line for that file, from the build log:
arm-none-eabi-g++.exe -DARM_MATH_CM4 -IC:/Users/<...>/STM32F4xxxx/CMSIS_HAL/RTOS2/Include -g3 -O0 <...> |
The header search directories, where the compiler will search when resolving the #include directives, are specified via one of the following options:
- -I<directory>
- -I <directory>
- -isystem <directory>
If the directory containing the actual file is not passed to the compiler via one of these arguments, it will not be able find the header file.
For the advanced CMake-based projects, the compiler command line will be shown directly in the Log view of the VisualGDB Build window: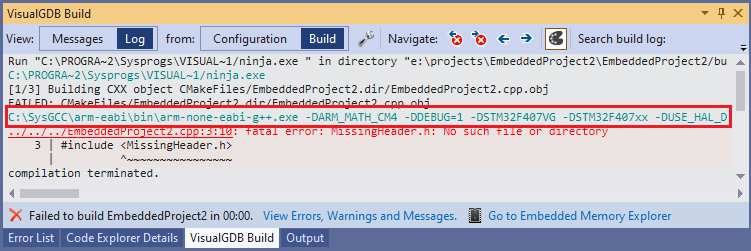 Note that as long as its shown in cyan, you can right-click on it and select “Dump command line to batch file” to automatically export it (including the working directory, environment, etc) to a .bat file that can be edited and used to troubleshoot the issue outside VisualGDB.
For other project types you can find the command line as shown below:
- If you are using MSBuild, all command lines will be stored in the .rsp files inside the build directory. They will contain -I<directory> and other relevant arguments.
- If you are using GNU Make, the command lines will be always shown in the build output, although the order might be different.
- If you are using an imported Makefile-based project, you may need to add “V=1”, “_V=1” or “VERBOSE=1” to GNU Make arguments to enable command line logging. You can add it via VisualGDB project Properties -> Build Settings -> Make Command.
- If you are using Ninja, you can force it to output all command lines by adding “-v” to its command line.
Once you confirm that the correct include directory is not passed to the compiler, you can adjust the project properties to add it there. For most of the projects, it is done via the C/C++ -> General page of VS project properties (not VisualGDB Project Properties):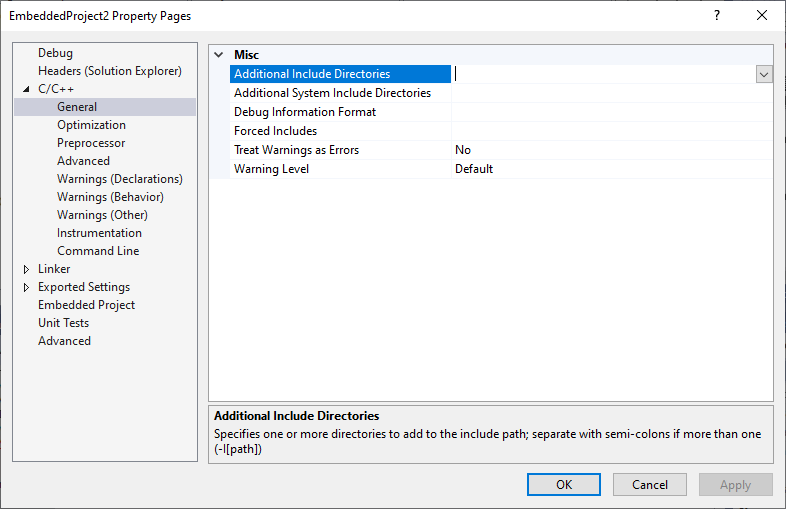 The exact location of the setting depends on the project type:
- For Advanced CMake projects it can be added via VS properties for a particular target.
- For Embedded CMake projects you can add it to the BSP settings (affecting all targets) or to a specific target.
- For MSBuild projects you can use the regular VS Project Properties.
- For GNU Make projects you can use VisualGDB Project Properties -> Makefile Settings.