Displaying Custom Registers in the Hardware Registers Window
This tutorial shows how to display custom hardware registers in the “Hardware Registers” window during VisualGDB debug sessions. We will modify the project properties to display the CP15 coprocessor registers using the “mon cp15” command provided by the Segger GDB stub. Before you begin, install VisualGDB 5.4 Beta 2 or later, create a basic embedded project for your target and ensure you can debug it.
- Start a regular debugging session and open the Debug->Windows->Hardware Registers window. If your target is directly supported by VisualGDB, you will see the values of the hardware registers defined by the target. If not, you can select an SVD or XML file with the normal register definitions in the Hardware Registers window:
- We will now modify the VisualGDB project properties to add extra register definitions that will be displayed in the Hardware Registers window. VisualGDB supports 2 types of hardware registers:
- Registers accessed by reading the memory at a specified address (e.g. regular peripheral registers).
- Registers accessed using special gdb stub commands (e.g. CP15 coprocessor registers).
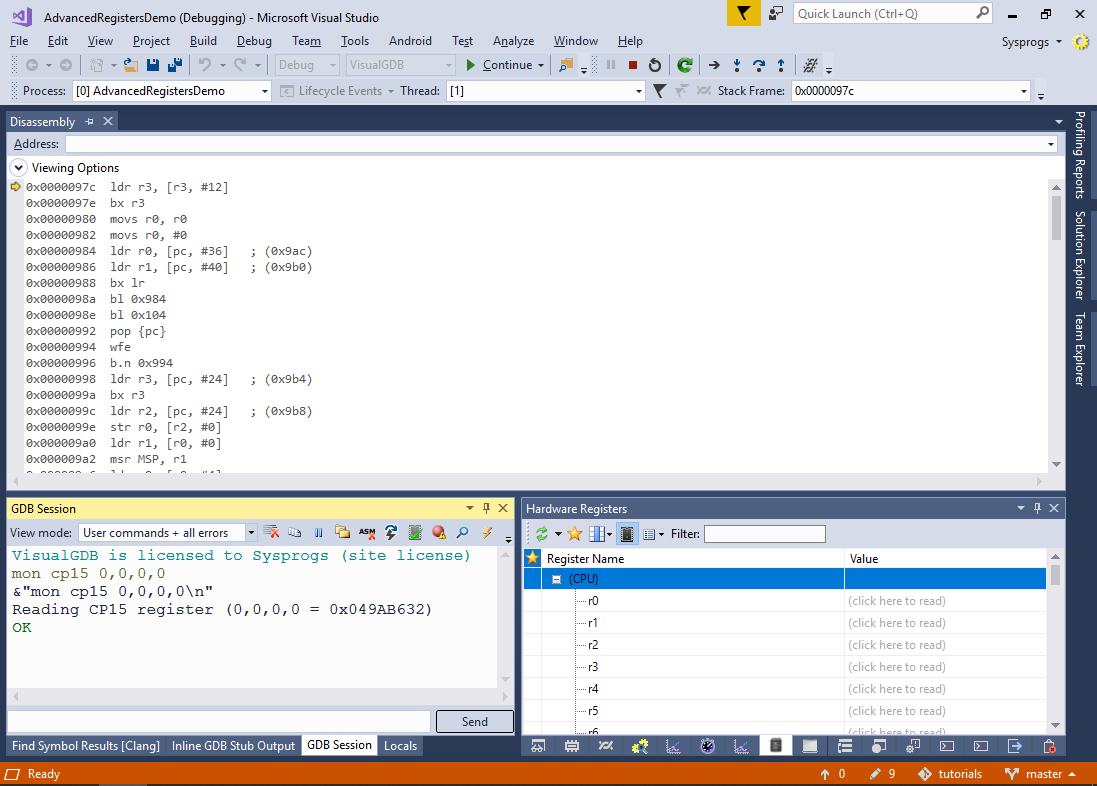
Before creating the register definition file, try querying the value manually via the GDB Session window. E.g. if you are using Segger J-Link, you can query the CP15 registers using the “mon cp15” command (see J-Link documentation). A summary of CP15 registers can be found here. Try querying the ID register by running the “mon cp15 0,0,0,0” command:
- Now we will configure VisualGDB to issue the “mon cp15” command automatically when you view the IDCODE register value via the Hardware Registers window. Create a file called cp15.xml in the project directory with the following contents:
<?xml version="1.0"?>
<MCUDefinition xmlns:xsi="http://www.w3.org/2001/XMLSchema-instance" xmlns:xsd="http://www.w3.org/2001/XMLSchema">
  <RegisterSets>
    <HardwareRegisterSet>
      <UserFriendlyName>CP15 registers</UserFriendlyName>
      <Registers>
        <HardwareRegister>
          <Name>IDCODE</Name>
          <SizeInBits>32</SizeInBits>
          <Extension>
            <QueryCommand>mon cp15 0,0,0,0</QueryCommand>
            <QueryRegex>Reading CP15 register \([^=]+ = (0x[0-9a-fA-F]+)\)</QueryRegex>
            <SetFormat>mon cp15 0,0,0,0 = 0x{0:x}</SetFormat>
	  </Extension>
	</HardwareRegister>
      </Registers>
    </HardwareRegisterSet>
  </RegisterSets>
</MCUDefinition>
Then add $(ProjectDir)\cp15.xml to VisualGDB Project Properties -> Embedded Debug Tweaking -> Advanced Settings -> Additional register definition files:

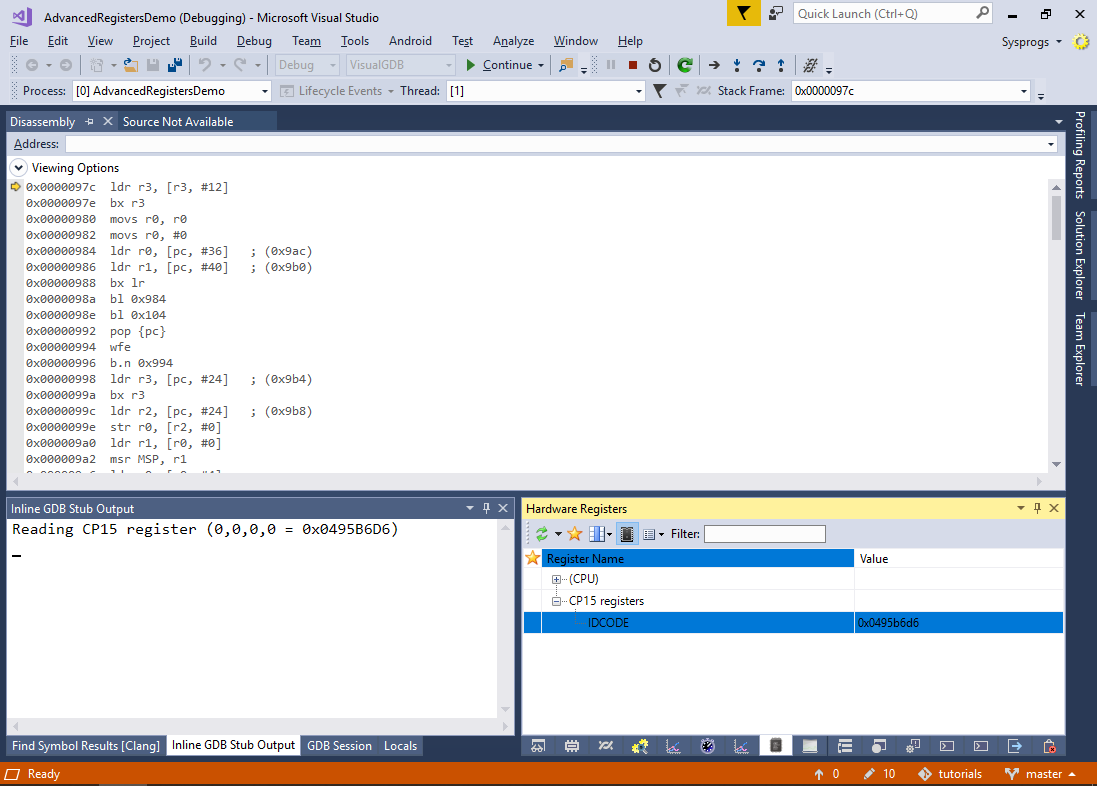
- Start the debugging session. You will now see the IDCODE register in the Hardware Registers window. VisualGDB will automatically use the commands specified in the cp15.xml file to get and set its value:
- You can use the same technique to define other similar registers. For registers accessed via custom GDB commands, define the Extension element with the following sub-elements:
- QueryCommand defines the command that will be used to query the register value.
- QueryRegex defines the regular expression used to extract the value. The first group of the regular expression should correspond to the actual value (it must include the “0x” prefix if it’s hexadecimal).
- SetFormat defines the composite format string for the gdb command that will set the register value. {0} corresponds to the new register value in decimal format, {0:x} corresponds to the hexadecimal representation.
For registers accessed by reading the target memory, simply define the “Address” element, e.g.:
<HardwareRegister>
   <Name>SYST_CSR</Name>
   <SizeInBits>32</SizeInBits>
   <Address>0xe000e010</Address>
</HardwareRegister>
VisualGDB will automatically combine register definitions from all files specified via the “Additional register definition files” setting, so you can define multiple register sets and reuse them between your projects.