Developing OpenOCD FLASH drivers for External Memories
This tutorial shows how to develop FLASH drivers for use with the Sysprogs fork of OpenOCD and VisualGDB. FLASH drivers are responsible for automatically programming any external FLASH memories that your board is using. If you want to place some code or data in your project into an external FLASH memory and access it from your code as if it was located in the normal FLASH memory, you need to do the following:
- Add the external memory via External Memories page of VisualGDB Project Properties
- Actually setup the memory mapping from your startup code so that the memory contents is accessible to your program
- Develop a FLASH driver that will automatically program the external memory when you start debugging your project
This tutorial focuses on developing the FLASH driver; more information on configuring the project can be found in this tutorial.
We will show how to develop a FLASH driver based on the QSPI FLASH of the STM32F7-Discovery board.
- Follow this tutorial up to the step where a FLASH Driver is configured. Instead of configuring the driver, add the following lines to the main source file and start debugging the project as is:
int QSPI_DATA g_ArrayInQSPI[] = { 1, 2, 3, 4, 5 };

int main()
{
    //...
    volatile int x = g_ArrayInQSPI[0];
}
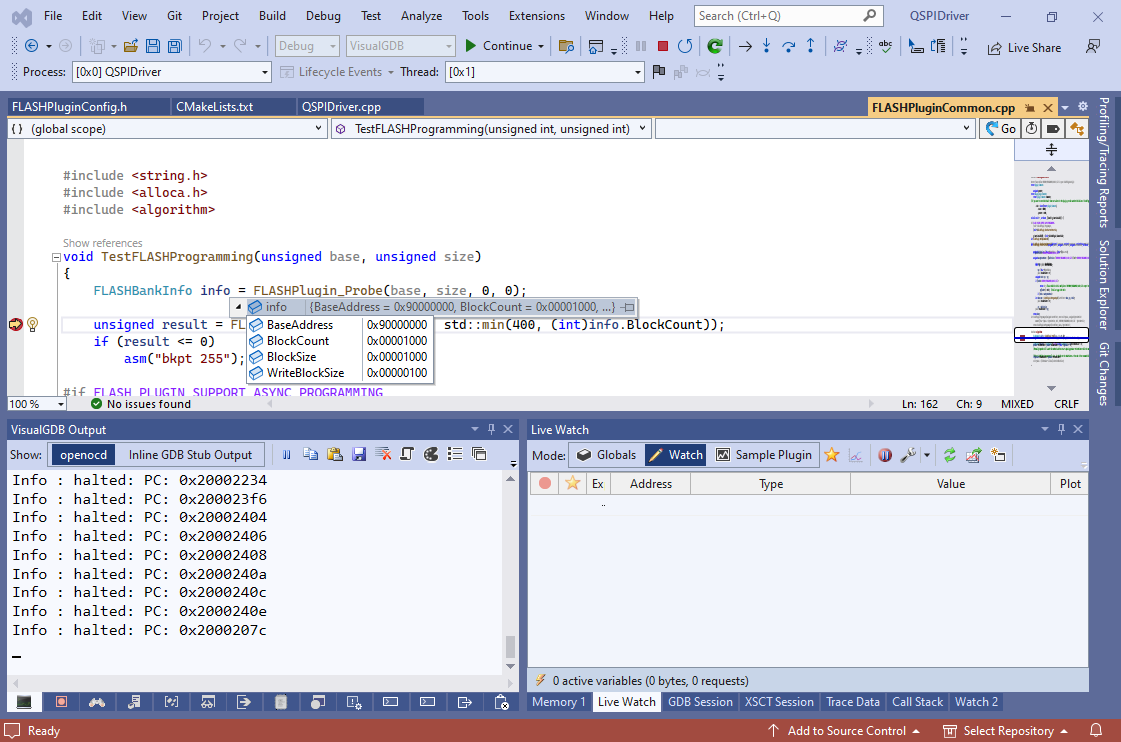
- Use the debugger to double-check that the address of g_ArrayInQSPI is actually inside the QSPI address space (>=0x90000000) and that it contains garbage:
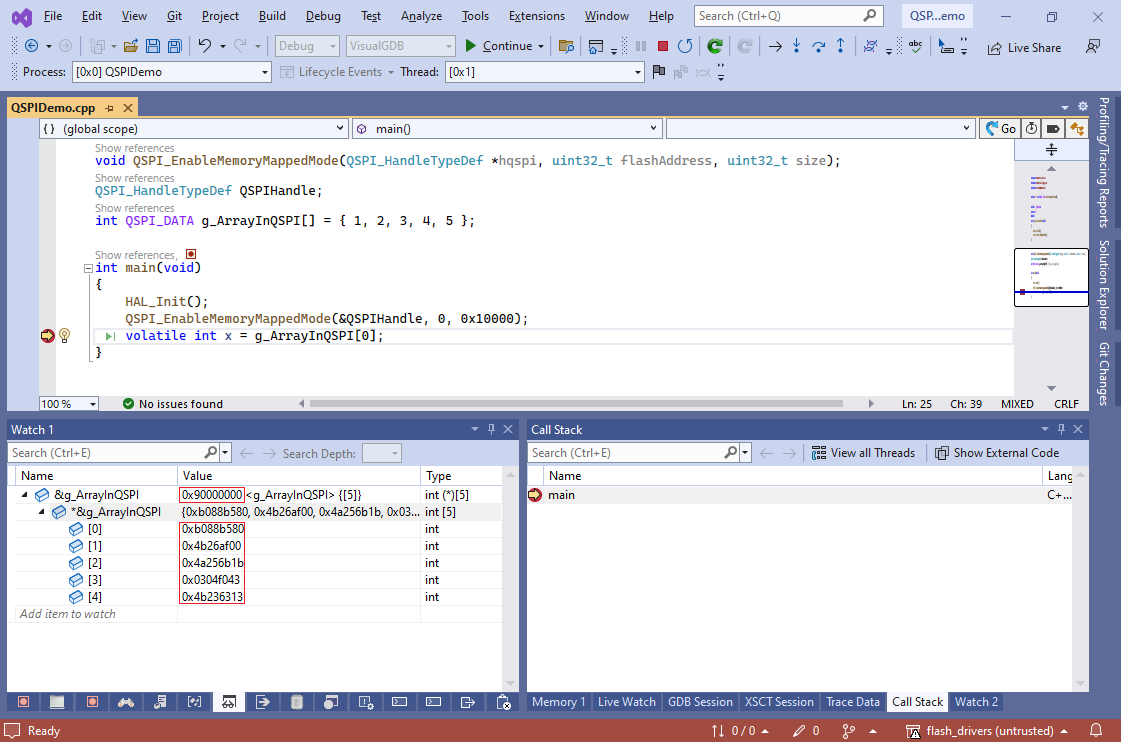 The values are incorrect because OpenOCD only knows how to program the internal FLASH memory of the STM32F7 chip, but knows nothing about QSPI. After we are done developing and configuring the driver, the array will be automatically programmed at the beginning of the debug session and will contain expected values.
 - Before you begin creating your driver project, download the code from the Sysprogs FLASH driver framework repository somewhere on your computer.
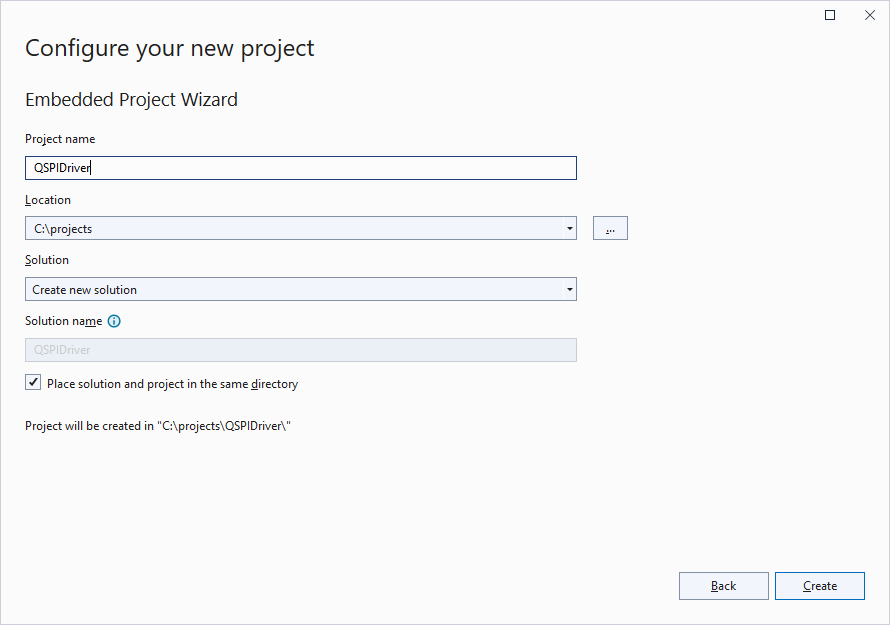
- Start another instance of Visual Studio and open the VisualGDB Embedded Project Wizard:
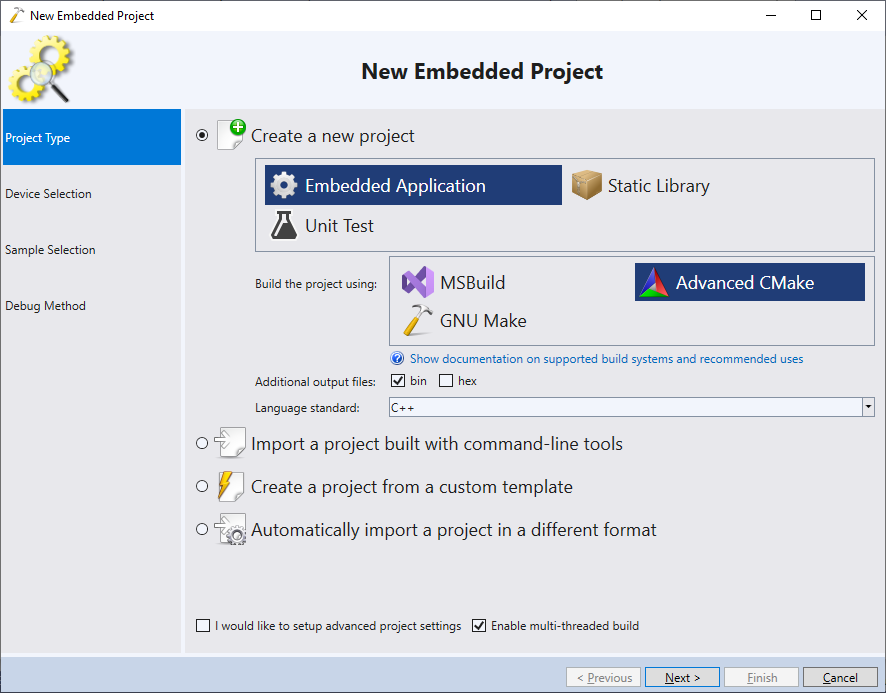
- The driver is just an ELF file with certain mandatory functions defined inside it, so proceed with the default “Embedded Application” selection using Advanced CMake:
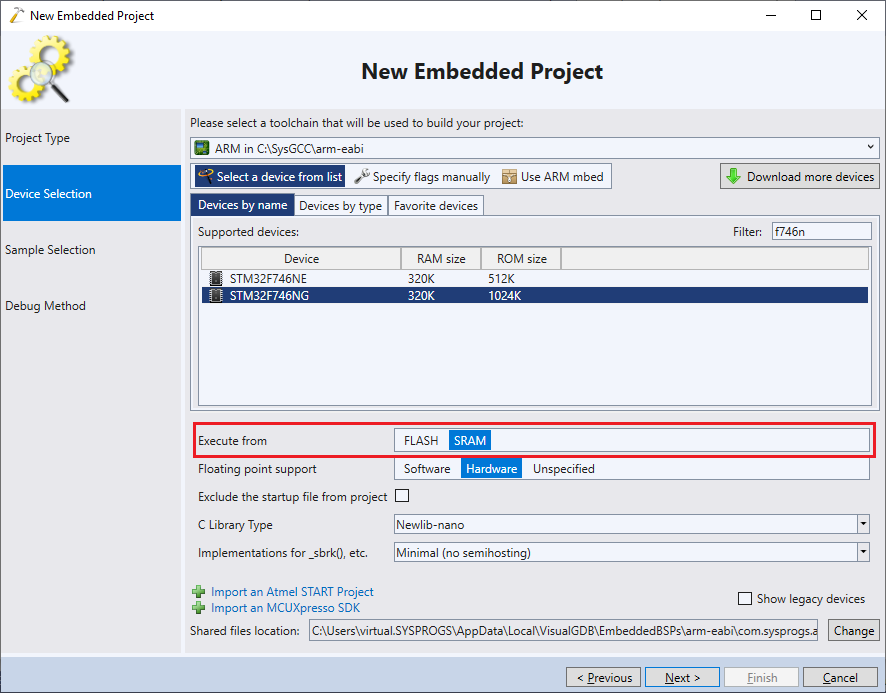
- Select your device from the list (in this tutorial we select STM32F746NG that is installed in the STM32F7-Discovery board). The FLASH driver should be able to run from RAM (to avoid reprogramming the internal device FLASH to load it) and should be as small as possible to minimize the load time. Select “Execute from: SRAM” and “C library type: Newlib-nano” to achieve that:
- Proceed with the default “LEDBlink (HAL) sample”:

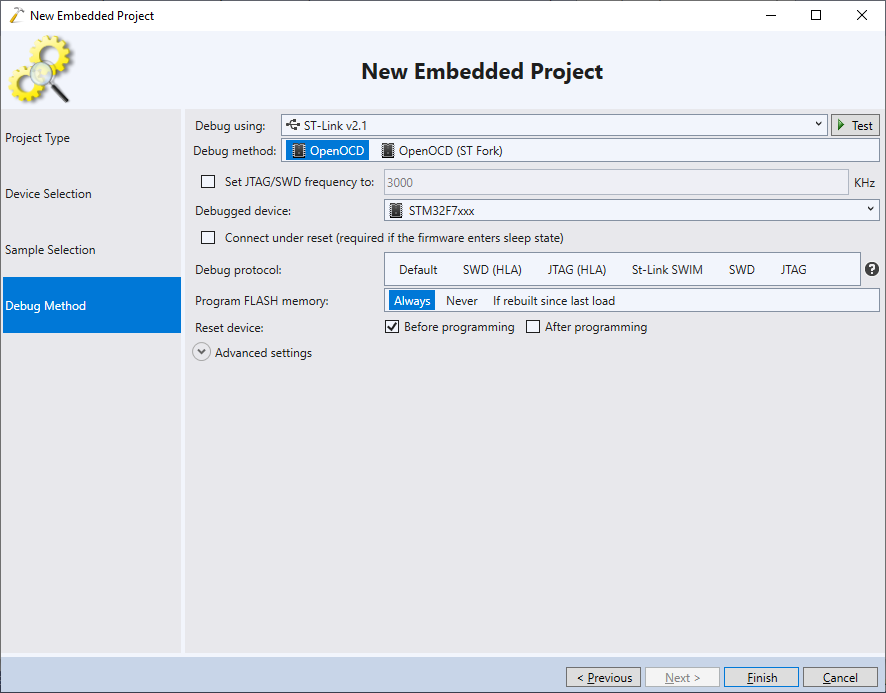
- On the Debug Method page select allow VisualGDB to automatically detect your ST-Link interface and configure OpenOCD:
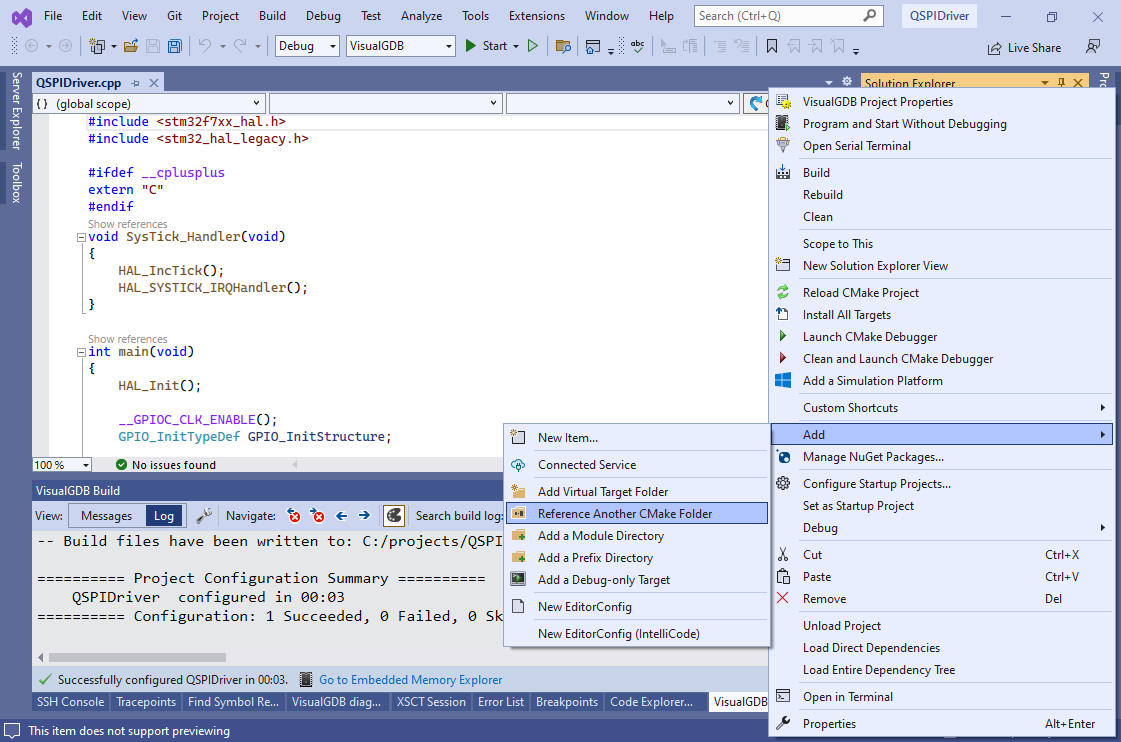
- Right-click on the top-level project node in Solution Explorer (with the triangular CMake icon) and select “Add->Reference another CMake folder“:
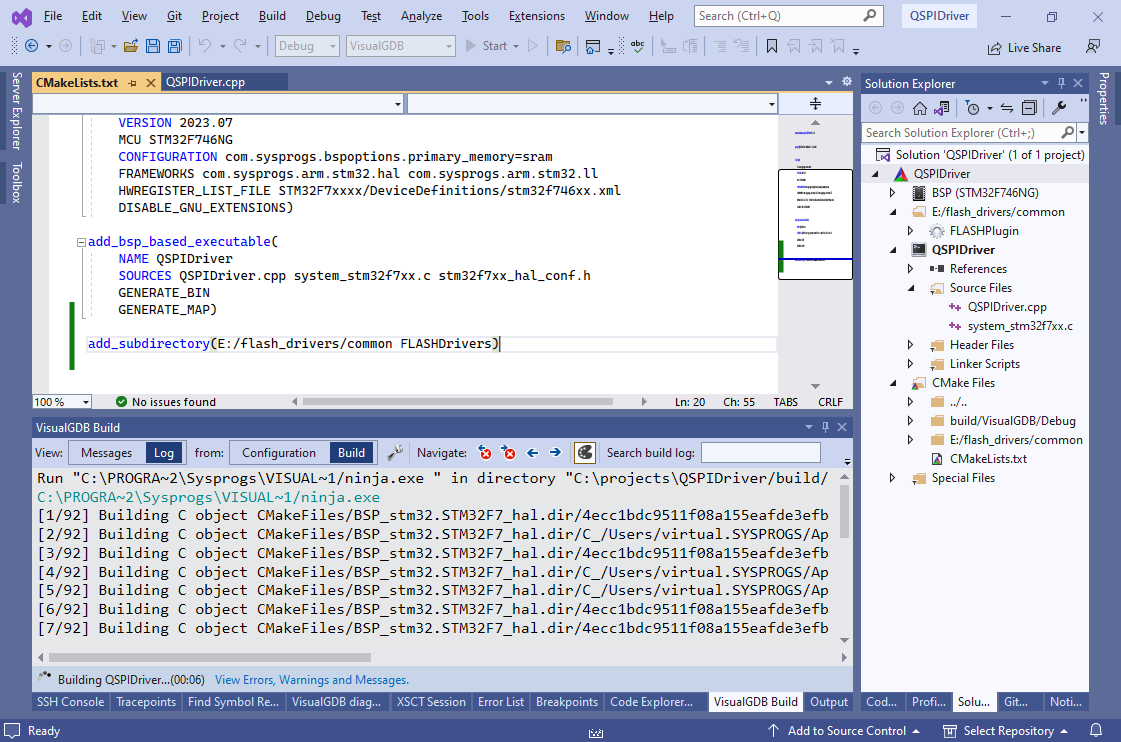
 Then point VisualGDB to the <FLASH drivers repository>\common directory.
 - VisualGDB will add an “add_subdirectory()” statement to top-level CMakeLists.txt. If the repository is located outside the project directory, CMake will show a configuration error unless you specify the binary directory name as shown below:
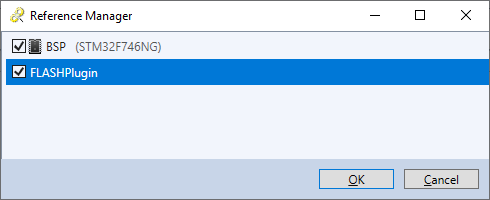
- Save the CMakeLists.txt file to allow VisualGDB to reload the project. Then right-click on the application node in Solution Explorer (console icon) and select “Add->Add Reference“:

- Add a reference to the FLASHPlugin target:
- Go to the Embedded Frameworks page of VisualGDB Project Properties and add a reference to “STM32746G-Discovery drivers”. Ensure that the QSPI driver is selected below:
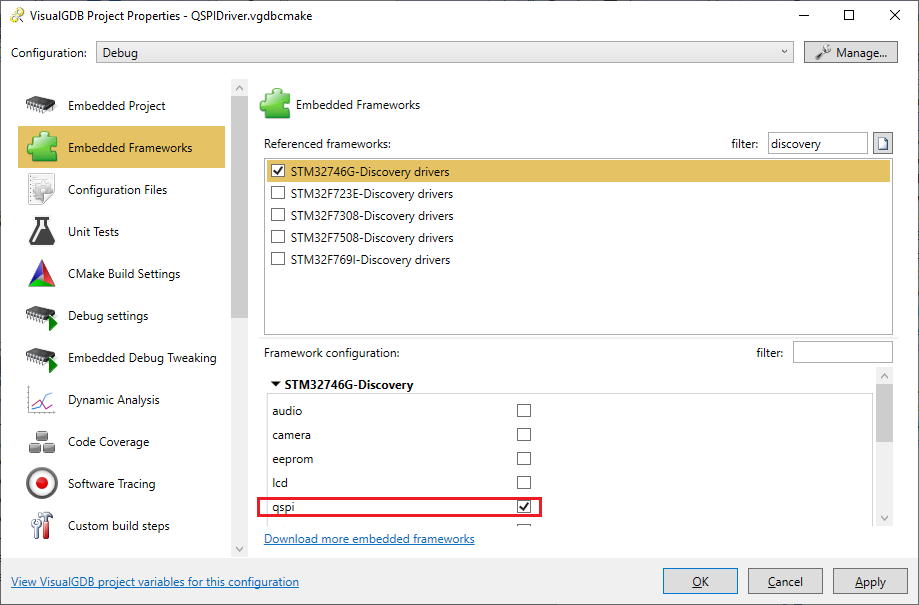
- Create a new file called FLASHPluginConfig.h in your project directory with the following contents:
#pragma once

#include <stm32f7xx_hal.h>
#include <stm32746g_discovery_qspi.h>

#define MINIMUM_PROGRAMMED_BLOCK_SIZE N25Q128A_PAGE_SIZE
#define FLASH_PLUGIN_SUPPORT_ASYNC_PROGRAMMING 1
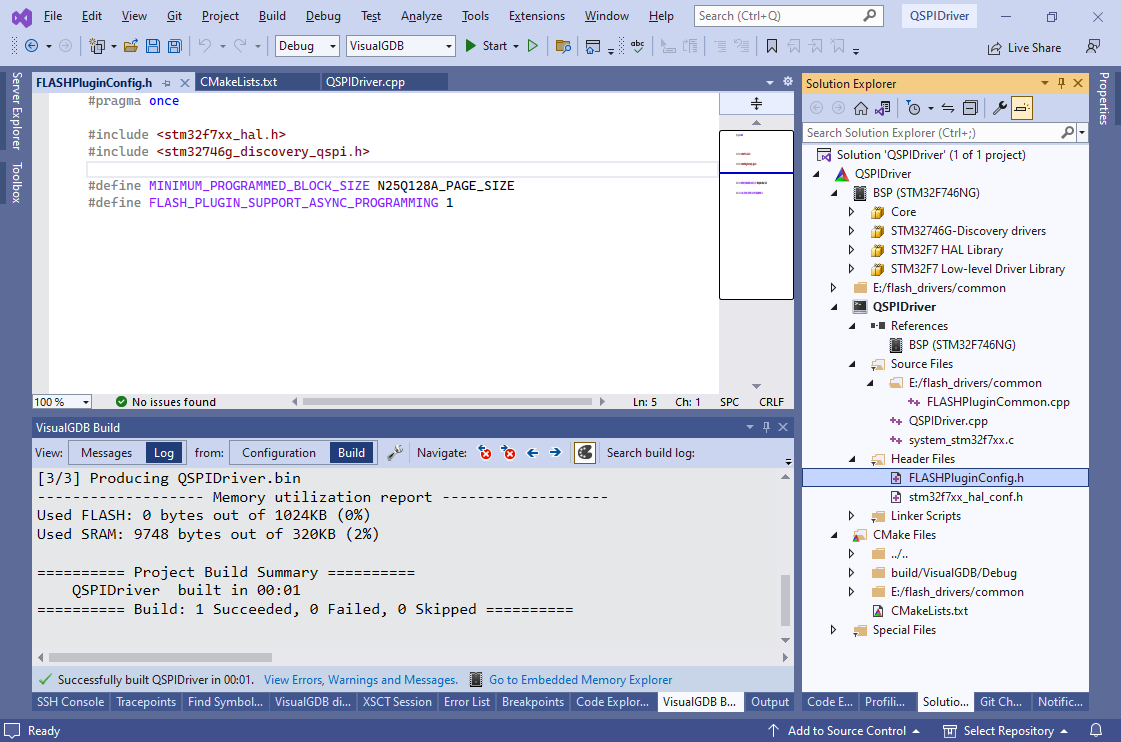 Now you should be able to build the project. Once the build succeeds, you have all the necessary components to begin developing the actual driver.
 - The FLASH driver is a normal ELF file compiled for your target device that must have several important functions that OpenOCD will use:
- First of all, it should have the FLASHPlugin_Probe() function that will be called to query the size of the FLASH memory, its base address and the amount of independently erasable sectors.
- The FLASHPlugin_FindWorkArea() function should locate the area in the SRAM that can be used to store the FLASH contents while it is being programmed.
- The FLASHPlugin_EraseSectors() function should erase a given range of sectors
- The FLASHPlugin_DoProgramSync() function will be responsible for actually programming the FLASH memory
- The FLASHPlugin_Unload() will be called by OpenOCD when the programming is complete and should undo any initialization done by the driver
The FLASH driver does not have a separate initialization function. Instead it should do all initialization in main() as usual and then call FLASHPlugin_InitDone() to signalize that the initialization is complete. OpenOCD will intercept this call and begin calling functions like FLASHPlugin_EraseSectors() once the initialization completes.
- Add the following implementation for the FLASHPlugin_Probe() function:
FLASHBankInfo FLASHPlugin_Probe(unsigned base, unsigned size, unsigned width1, unsigned width2)
{
    InterruptEnabler enabler;

    FLASHBankInfo result = {
        .BaseAddress = base,
        .BlockCount = N25Q128A_FLASH_SIZE / N25Q128A_SUBSECTOR_SIZE,
        .BlockSize = N25Q128A_SUBSECTOR_SIZE,
        .WriteBlockSize = MINIMUM_PROGRAMMED_BLOCK_SIZE
    };
    return result;
}
It will simply use the constants defined in the QSPI driver to provide the information about the FLASH memory to OpenOCD. Note that the base address comes from the base argument and will be specified when configuring the project.
- The FLASHPlugin_FindWorkArea() should simply return 4 kilobytes after the end of stack (the stack will be managed by OpenOCD and won’t be set to the end of RAM as usual):
WorkAreaInfo FLASHPlugin_FindWorkArea(void *endOfStack)
{
    InterruptEnabler enabler;

    WorkAreaInfo info = { .Address = endOfStack, .Size = 4096 };
    return info;
}
- The FLASHPlugin_EraseSectors() function should simply call BSP_QSPI_Erase_Block() for each erased sector:
int FLASHPlugin_EraseSectors(unsigned firstSector, unsigned sectorCount)
{
    InterruptEnabler enabler;

    for (unsigned i = 0; i < sectorCount; i++)
    {
        uint8_t error = BSP_QSPI_Erase_Block((firstSector + i) * N25Q128A_SUBSECTOR_SIZE);
        if (error != QSPI_OK)
            return -1;
    }
    return sectorCount;
}
- FLASHPlugin_DoProgramSync() should be just a wrapper to BSP_QSPI_Write():
int FLASHPlugin_DoProgramSync(unsigned startOffset, const void *pData, int bytesToWrite)
{
    uint8_t result = BSP_QSPI_Write((uint8_t *)pData, startOffset, bytesToWrite);
    if (result != QSPI_OK)
        return 0;
    return bytesToWrite;
}
- FLASHPlugin_Unload() will call the regular uninitialization functions and will explicitly disable all interrupts including the SysTick interrupt so that no interrupt handler gets called until the actual program that is being loaded is ready:
int FLASHPlugin_Unload()
{
    BSP_QSPI_DeInit();
    HAL_DeInit();
    SysTick->CTRL &= ~SysTick_CTRL_ENABLE_Msk;

    for (int i = 0; i < sizeof(NVIC->ICER) / sizeof(NVIC->ICER[0]); i++)
        NVIC->ICER[0] = -1;

    return 0;
}
- Finally the main() function will do the necessary initialization and call FLASHPlugin_InitDone() when ready:
int main(void)
{
    extern void *g_pfnVectors;

    SCB->VTOR = (uint32_t)&g_pfnVectors;
    HAL_Init();
    BSP_QSPI_Init();
    FLASHPlugin_InitDone();

    for (;;)
        ;
}
Note that FLASHPlugin_InitDone() will actually never get called as OpenOCD will intercept the call. The default implementation simply makes sure that all other plugin functions appear referenced by the code and hence won’t be discarded by the linker.
- Before trying the driver with the actual project, you can quickly step through its code in the debugger to see how it will work. The framework provides a function called TestFLASHProgramming() that simplifies that task. Simply call it from main as follows:
TestFLASHProgramming(0x90000000, 0);
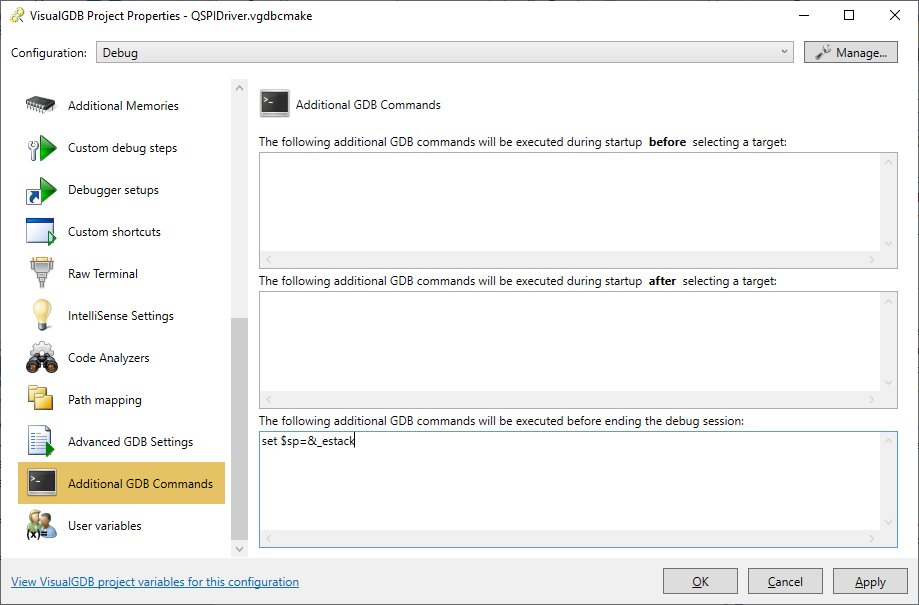
- Last thing that needs to be done before we can try out the driver is manually set the initial stack pointer via VisualGDB Project Properties. Add “set $sp=&_estack” to gdb startup commands:
- Now you can press F5 to start debugging and step through TestFLASHProgramming() to ensure that your functions return the expected values:
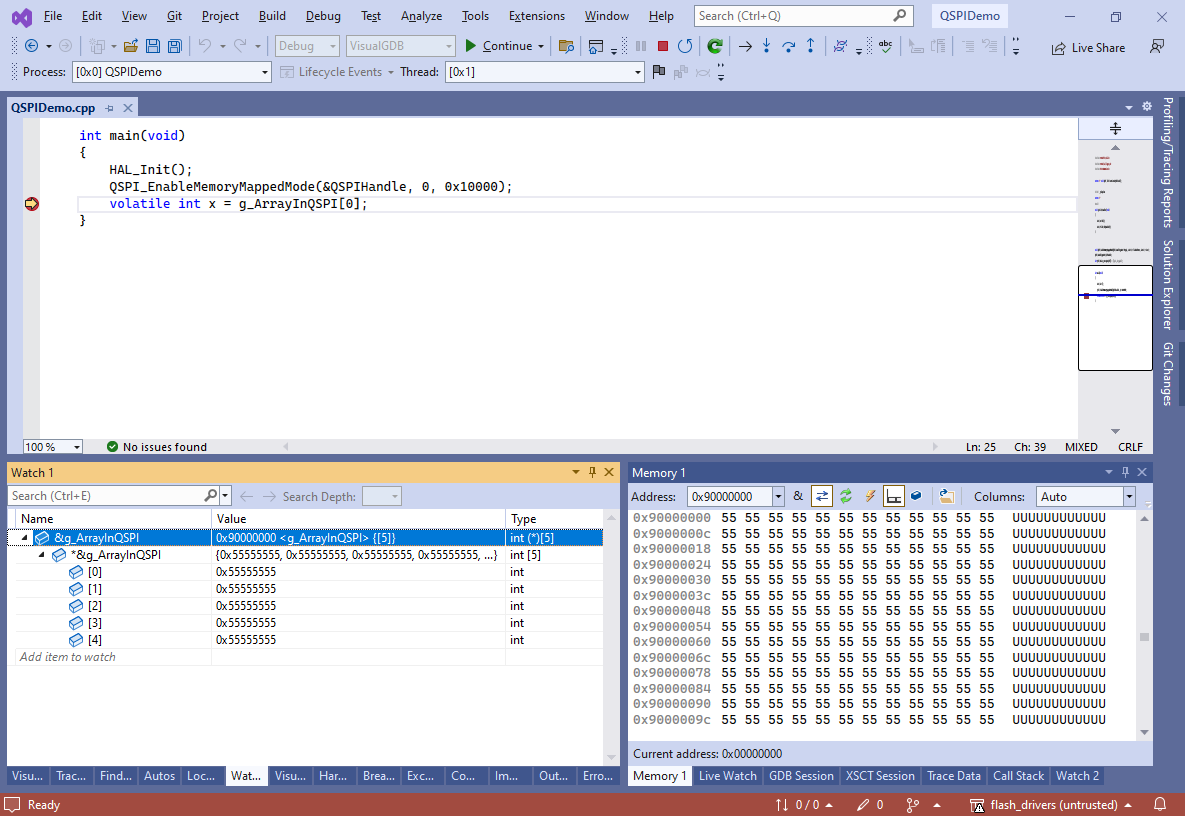
- TestFLASHProgramming() will program the first page of your flash with a repeating value of 0x55. You can verify that by running your first project again and seeing that the array placed in QSPI is now initialized with 0x55555555:
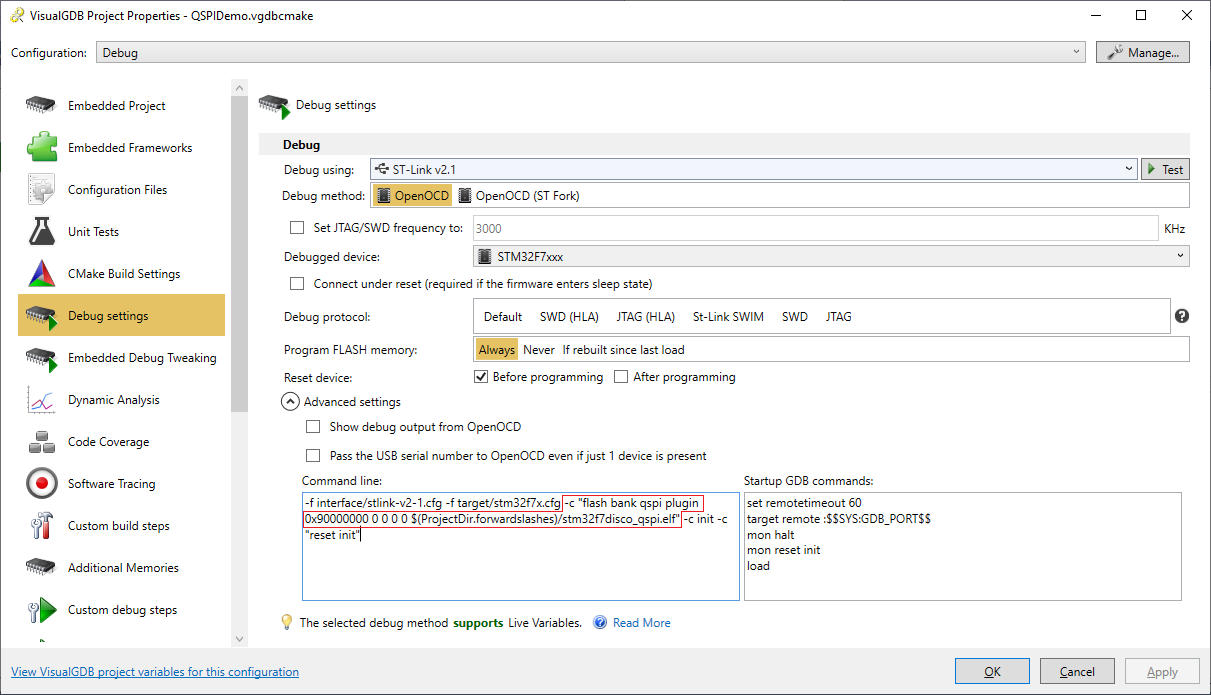
- Go back to your main project. Open VisualGDB Project Properties, expand the Advanced View and add the following line before the “-c init” command:
-c "flash bank qspi plugin 0x90000000 0 0 0 0 <path to QSPIDriver.elf>"
The “-c” part tells OpenOCD to load the QSPIDriver.elf plugin and call its probe() function with base=0x90000000 to find out the location and size of the QSPI memory. The “init” commands ensure that the initialization is performed in the correct order:
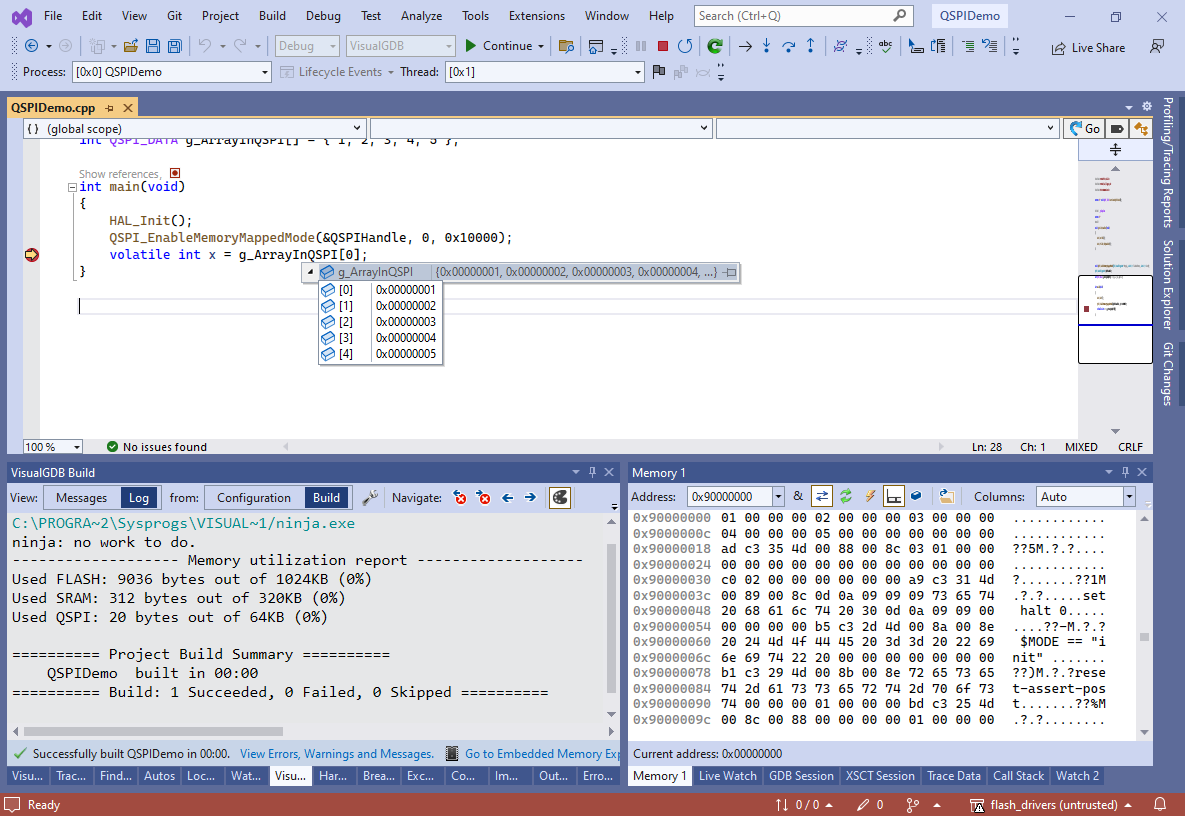
- Set a breakpoint at the last line of main() and press F5 to start debugging. Observe how the contents of the g_ArrayInQSPI now matches the expected values:
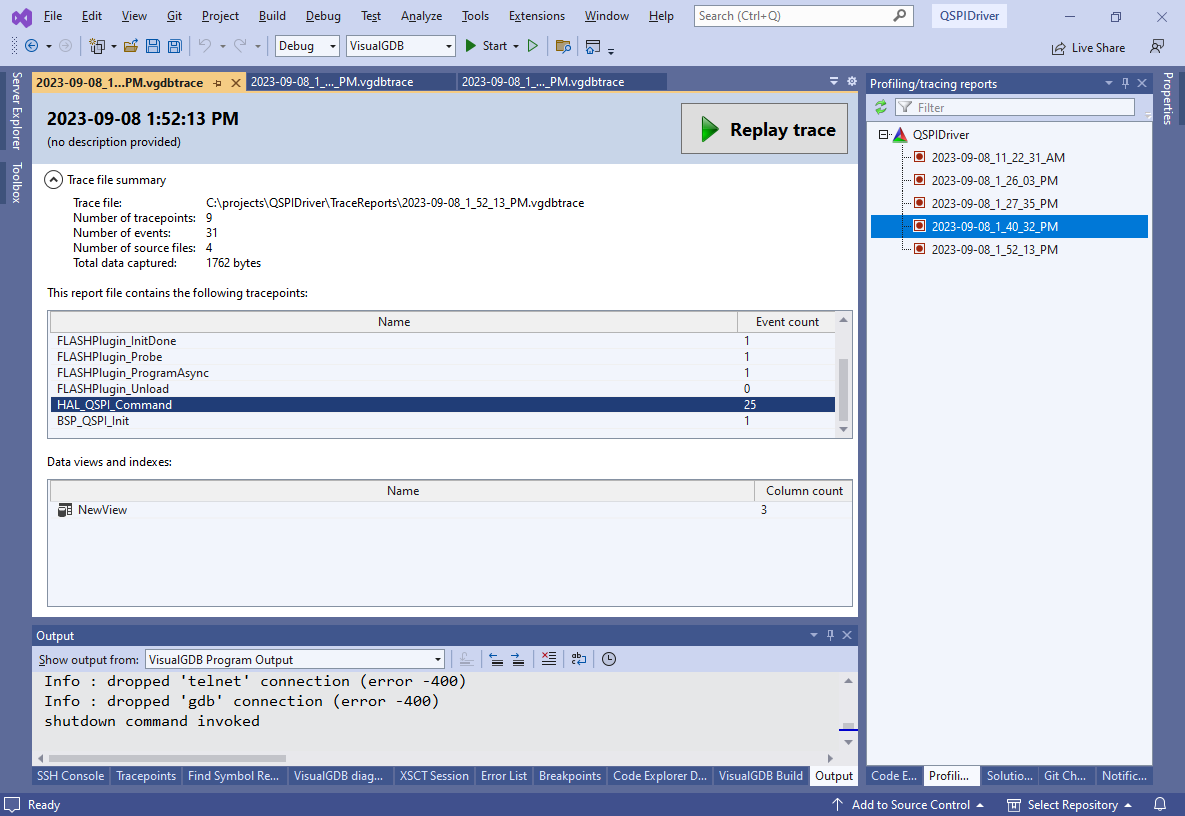
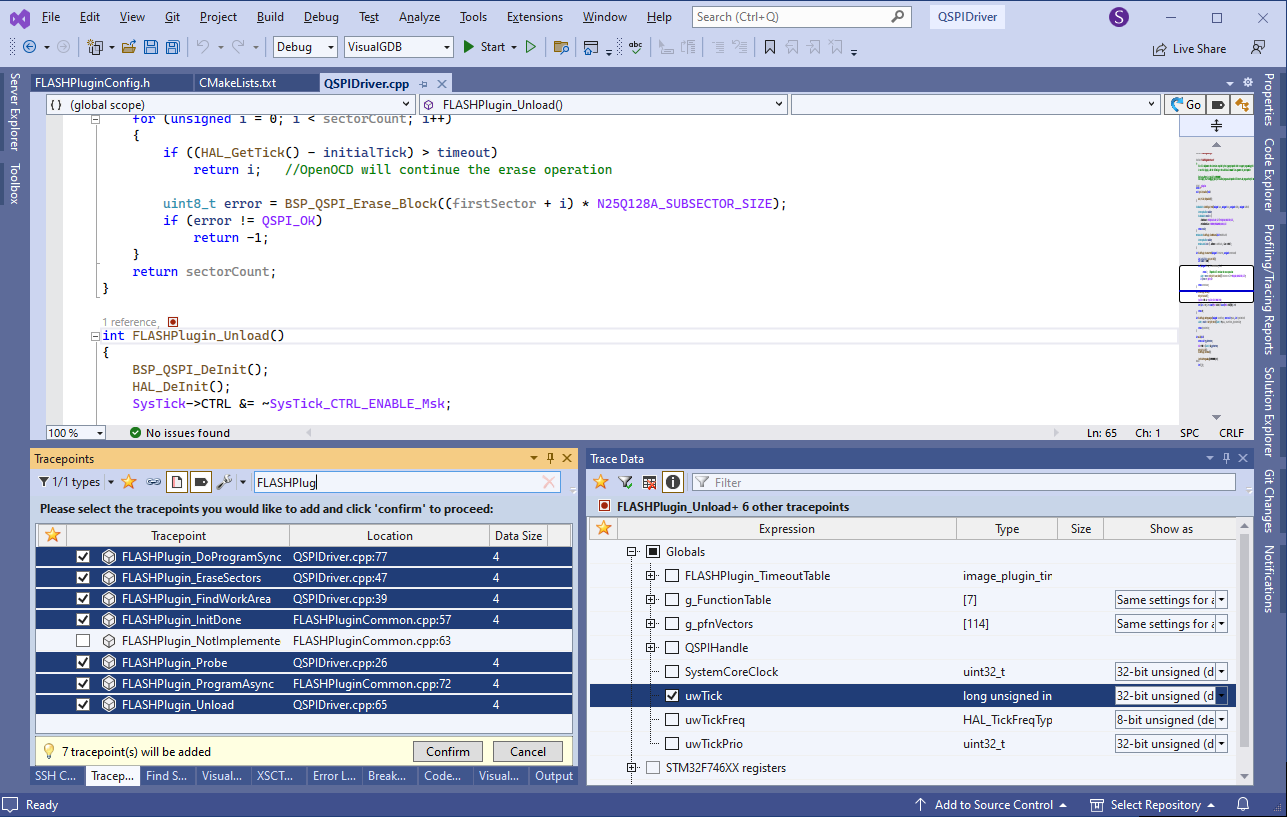
- If you are planning to port the FLASH plugin to a different device, you can use the VisualGDB Software Tracing (Custom Edition or higher) to quickly record all SPI commands issued by the driver. It can also record their timing and specific code paths. Go back to the FLASH plugin project, enable the software tracing as shown in this tutorial, and set tracepoints at FLASH_Plugin_*() functions recording the value of uwTick:
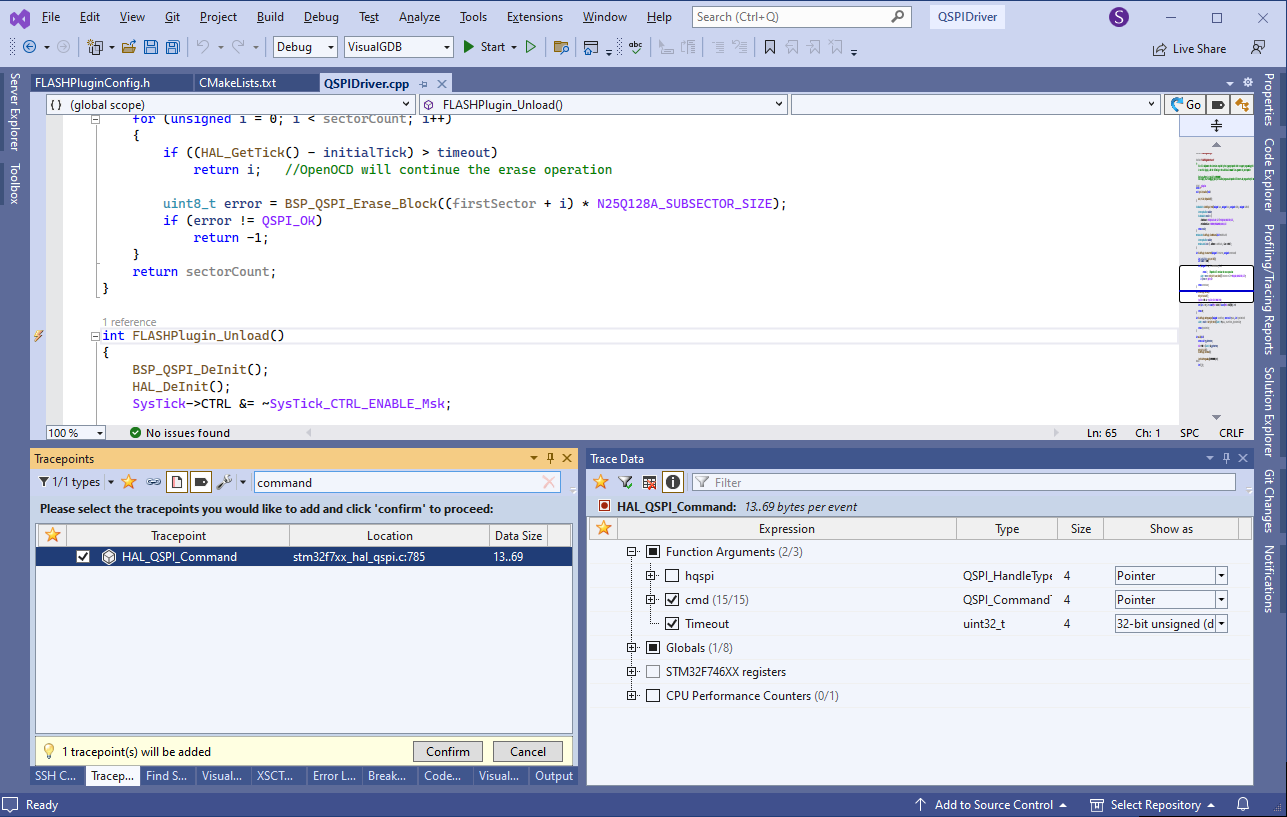
- Set another tracepoint in HAL_QSPI_Command() recording the cmd structure and uwTick as well:
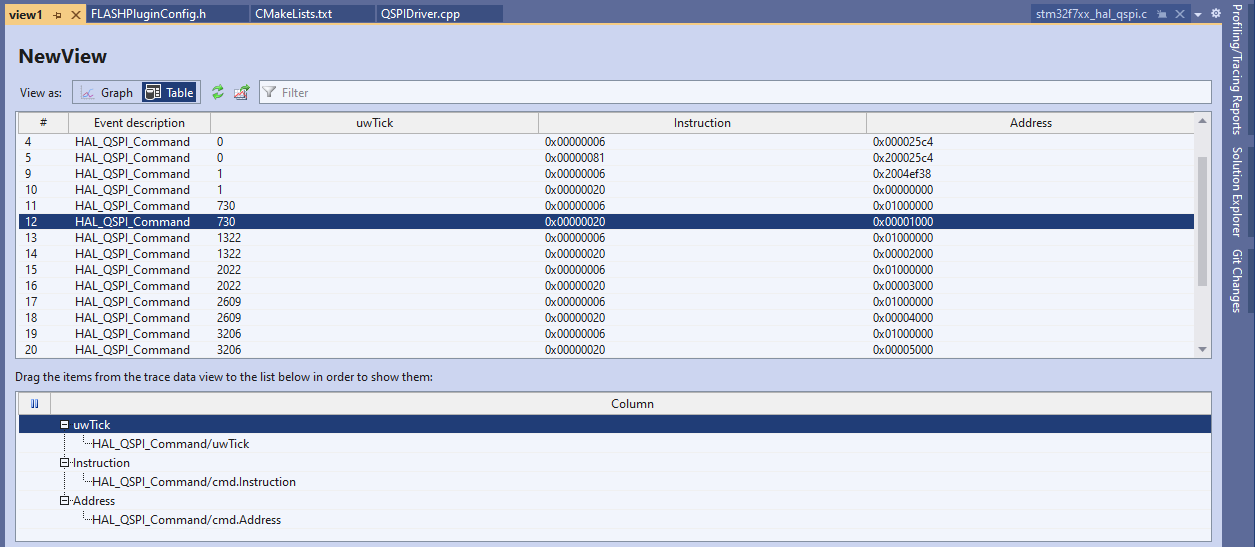
- Now you can run the program and immediately see in which order various FLASH plugin functions got called, and how many calls to HAL_QSPI_Command() each of them generated:
 Each call to HAL_QSPI_Command() will have the entire cmd structure recorded, so you can see which exact commands were executed.
 - You can also get a convenient table view of all QSPI commands (with instructions, addresses and timestamps) by creating a table view from the Trace Data window and dragging the variables you would like to watch into the bottom part of the view:
- The trace recordings are saved into the trace report files and can be viewed later. So if the FLASH driver stops working at some point, you can always review an older recording and see which QSPI commands it used when everything was working as expected: