Advanced ESP-IDF Project Structure
This page explains the typical structure of an ESP32 project, lists the involved components, and outlines the most common errors that may prevent the project from working correctly.
Contents
ESP-IDF and Toolchains
Project Structure
Build Systems
Debugging ESP32 Boards
Configuration
Unit Tests
Header Files
Troubleshooting Build Problems
Troubleshooting ESP-IDF/Toolchain Problems
Installing Multiple Toolchains
Resetting Python environment
ESP-ADF Structure
ESP-IDF 5.5
ESP-IDF and Toolchains
ESP32 projects are based on ESP-IDF – an open-source framework from Espressif. You can find documentation on ESP-IDF here, or a list of official releases on the Espressif’s Github Repository.
VisualGDB ESP-IDF-based projects are specifically designed as to work as a thin wrapper on top of the ESP-IDF build system. While VisualGDB provides convenient GUI for many common ESP-IDF tasks, it does not introduce any changes to the underlying build process. This ensures that:
- The projects edited with VisualGDB can still be built via command-line ESP-IDF tools, producing exactly the same results.
- Any project that can be built via ESP-IDF tools, can also be built with VisualGDB.
- Any extensions or examples that that work with the original ESP-IDF, will also work with VisualGDB-based projects.
Update: VisualGDB 6.1 and later now understands the the same IDF and tool layout that is used by the Espressif’s VS Code extension. You no longer need to download a separate toolchain from us, and can use the latest tools from Espressif, producing the same results as VS Code. See this page for details.
Project Structure
A typical ESP-IDF-based project consists of the following components:
- The main component containing the app_main() function.
- Zero or more additional project-specific components.
- Multiple ESP-IDF-specific components.
- Zero or more unit test components.
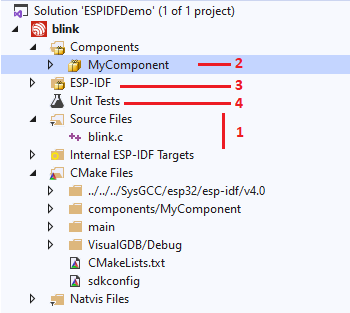 The contents of the main component are shown directly under the project’s node, while other components can be found under the Components node.
Each component is internally defined as a static library. The final firmware build by the project is obtained by linking all of the project’s components together.
Each component can define its own properties (e.g. include directories or preprocessor macros) via the regular VS Properties dialogs: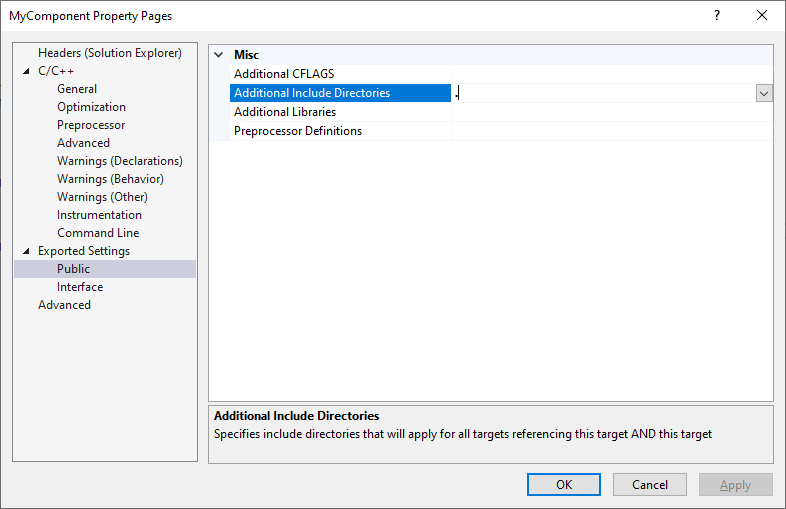 You can create new components in arbitrary locations, or reference existing component directories via the context menu on the Components node in Solution Explorer.
Build Systems
ESP-IDF projects are built using CMake scripts included in the ESP-IDF. If you encounter problems building the project, see the build problem troubleshooting section.
Debugging ESP32 Boards
ESP32 devices can be debugged via JTAG (this includes the ESP32 Arduino core). Generally, we advise using the ESP32-WROVER-KIT module, as it includes an on-board JTAG debugger and can be debugged out-of-the-box. Many other boards do not include a JTAG connector and require soldering in order get debugging to work. You can find example schematics for popular boards in our ESP32 tutorials.
If you do not have a JTAG debugger, you can still program the FLASH memory of the ESP32 module via the COM port by right-clicking on the project in Solution Explorer and selecting “Program FLASH Memory“.
Configuration
You can configure various parameters of the ESP32 projects via VisualGDB Project Properties -> ESP-IDF Project -> ESP-IDF Configuration: The configuration will be saved in the sdkconfig file that is used by the ESP-IDF build system when building the project.
Unit Tests
You can create and run unit tests on the ESP32 devices, as long as you have a JTAG debugger. See this tutorial for detailed step-by-step instructions.
Header Files
Because the ESP-IDF framework does not explicitly reference header files in the component definitions, VisualGDB tries to discover them dynamically based on the component’s source directory. Unless the automatic discovery of header files is disabled, adding existing headers to Solution Explorer will have no effect if the headers are not located in a place where they can be automatically discovered.
You can change the way VisualGDB discovers the headers for each target via per-target properties in Solution Explorer: 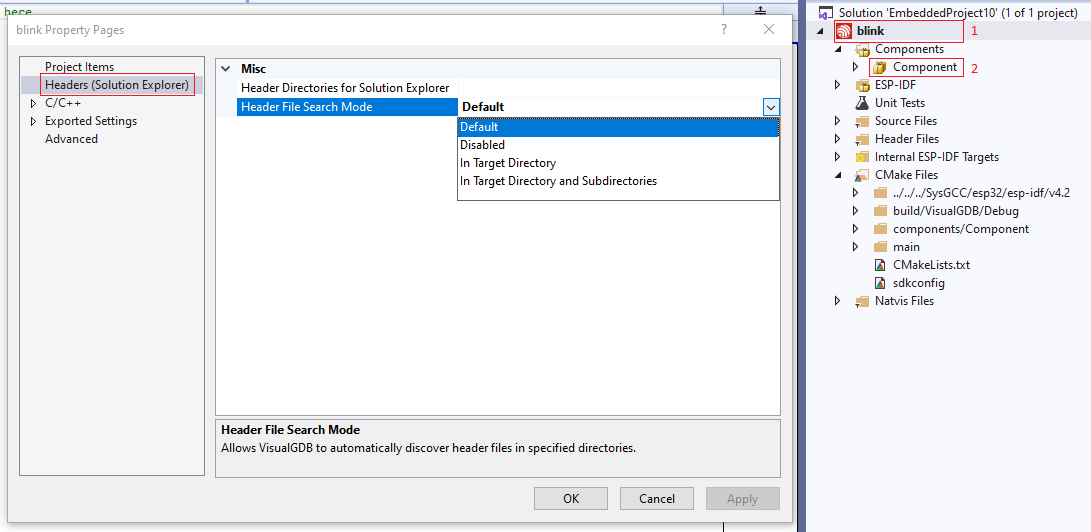 Note that unlike the regular Advanced CMake projects, header settings for ESP-IDF project node (1) will only affect the main component (<Project Directory>\main).
If you set the Header File Search Mode to Disabled, adding headers to a target explicitly add them to the idf_component_register() statement together with the sources.
Troubleshooting Build Problems
As the ESP32 projects are built by ESP-IDF itself, rather than by VisualGDB, many build issues are caused by incompatible configuration settings, missing external dependencies or unsupported combinations of ESP-IDF and toolchain (see this section). VisualGDB can help you narrow down the issue by exporting the exact build command line used by it, as we will show below.
Before you begin troubleshooting a build issue, make sure you understand whether it happens during the configuration phase, or build phase. The configuration phase happens when you just load the project. If it fails, the project will have an error icon in Solution Explorer. If this happens, try reloading the project (or doing a clean reload) via the context menu: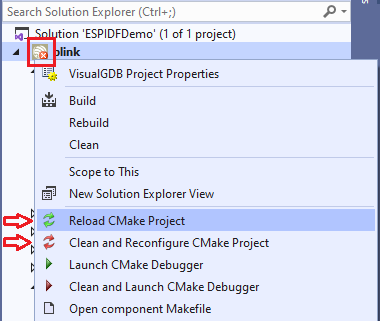 The build phase happens when you actually build the project via the Build Solution command.
Configuration problems are often caused by errors in CMake scripts or corrupt toolchain/ESP-IDF environments. Build problems are typically triggered by errors in the source code, or when trying to build a project created for an older ESP-IDF version. For both build and configuration, you can find out the exact command line used by VisualGDB to launch the ESP-IDF tools in the VisualGDB Build window: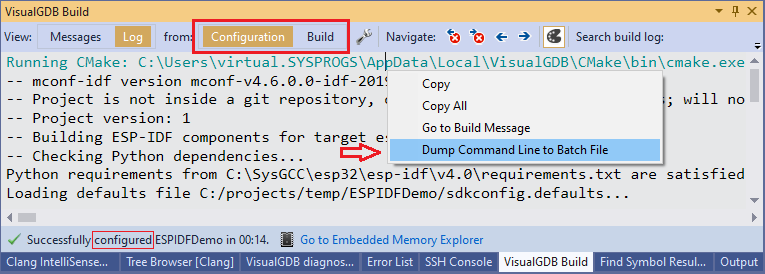 You can dump the command line to a batch file using the context menu. The file will include the working directory and any environment variables, so you will be able to reproduce the problem outside VisualGDB. Note that the same build log can contain multiple command lines. Each command line that can be dumped into a batch file is shown in cyan.
If you determine that the build or configuration fails due to missing environment variables, you can specify them via VisualGDB Project Properties -> CMake Build Settings: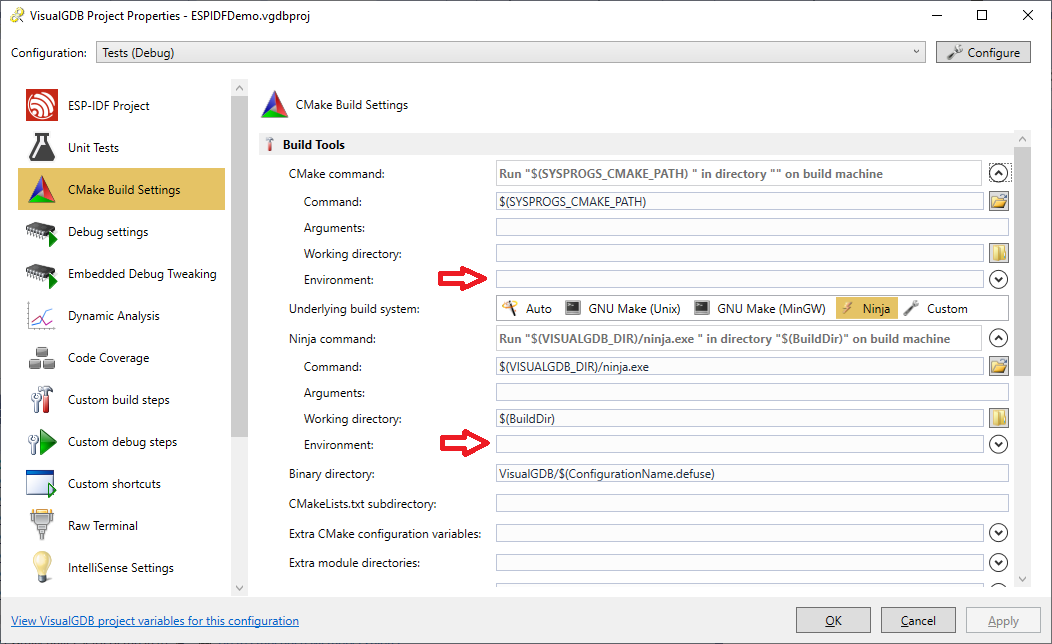
Troubleshooting ESP-IDF/Toolchain Compatibility
Update: VisualGDB 6.1 or later directly supports the same tool layout as used by Espressif’s VS Code extension. This simplifies troubleshooting and eliminates the need to download extra toolchains. Read more about it here.
If you encounter issues with an older version of the toolchain, please follow the steps below to ensure your ESP-IDF checkout and the toolchain are compatible:
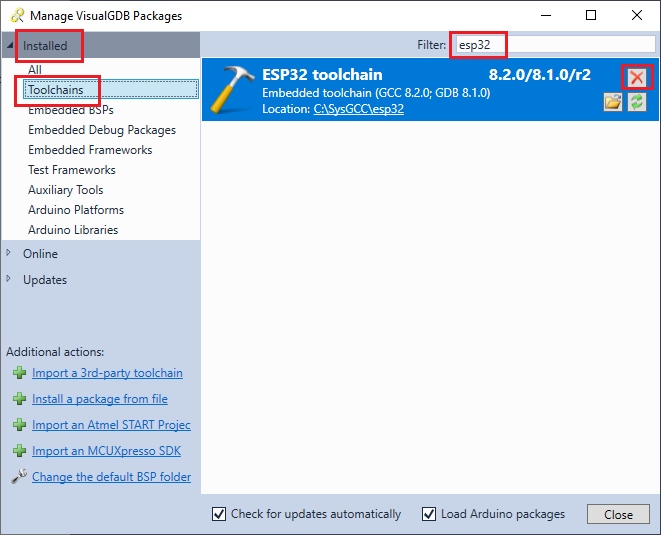
- Delete all existing ESP32 toolchains via Tools->VisualGDB->Manage VisualGDB Packages:
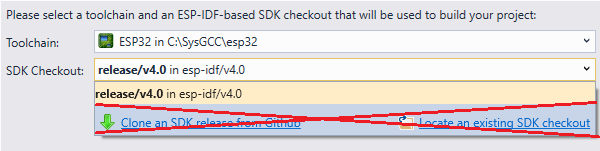
- Start the ESP-IDF project wizard and download a new toolchain using it (see this page for a full list of toolchains and compatible ESP-IDF versions). Make sure you use the ESP-IDF checkout shipped with the toolchain and DO NOT install one from Github or from elsewhere:
- Clone the “Blink” project sample and ensure it builds correctly.
- If the newly created project works, while your existing project doesn’t, the ESP-IDF version you are using may not be backward-compatible with your project. If this is the case, try downloading older ESP32 toolchains and building the project with them.
- Unless you are prepared to troubleshoot the ESP32 toolchain/IDF compatibility, DO NOT use the “Clone an SDK release from GitHub” or “Locate and existing SDK checkout” buttons in the VisualGDB GUI.
If it still doesn’t help, see the Resetting Python Environment section below.
If you would like to try a pre-release ESP-IDF version (e.g. v4.1 or later) that is not yet shipped with our toolchains, please make sure you use VisualGDB 5.5 Preview 6 or later and the esp32-gcc8.2.0-r3.exe toolchain (or later), as the older toolchains use a layout that is incompatible with newer ESP-IDF versions. It may still not work as expected, so unless you are prepared to troubleshoot toolchain/Python issues, please consider using stable ESP-IDF release shipped with our toolchains.
Installing Multiple Toolchains
VisualGDB distinguishes different toolchain versions by comparing the following parameters:
- GCC version
- GDB version
- Toolchain revision
Normally, the toolchain revision increases for bugfix releases that completely supersede the prior ones, however this is not the case for ESP32 toolchains, where multiple different revisions may be needed at the same time.
You can configure VisualGDB to recognize multiple ESP32 toolchains with the same GCC/GDB versions using one of the 2 methods below:
- Manually add another entry in registry to HKEY_CURRENT_USER\SOFTWARE\Sysprogs\GNUToolchains. The value name should start with SysGCC-, but otherwise can be arbitrary. The value should point to the toolchain directory.
- In the VisualGDB toolchain selector, click “Select a third party toolchain by locating gdb.exe“, change the filter from GDB executables to Toolchain Definition Files and point it to the toolchain.xml file in the toolchain directory.
Note that automatically managing multiple toolchain/BSP versions is supported starting from the Custom edition. If you are using a lower edition, consider manually changing the toolchain ID in the toolchain.xml file, so that VisualGDB will consider it a separate toolchain.
Resetting Python Environment
Update: VisualGDB 6.1 or later directly supports the same tool layout as used by Espressif’s VS Code extension, eliminating the need for troubleshooting steps below.
If you are using the ESP32 toolchain v8.2.0r3 or later, the Python environment would not be a part of the toolchain and would not be reset by reinstalling the toolchain. If you encounter Python-related problems, follow the steps below to reset the Python environment:
- Clear the Tools->Options->VisualGDB->General->Python Directory setting:
 See this page for more information about VisualGDB-managed Python installations.
 - Delete the %LOCALAPPDATA%\VisualGDB\Python* directories
- Delete/rename the %USERPROFILE%\.espressif folder that contains virtual Python environments
- Launch the ESP-IDF project wizard and let VisualGDB install the Python 3.x package:
 Unless you are prepared to troubleshoot Python issues, do not use any other Python environment.
ESP-ADF Structure
You can use VisualGDB to create projects based on the ESP-ADF framework as well. In order to do so, you can check out the ESP-ADF repository into your ESP32 toolchain: 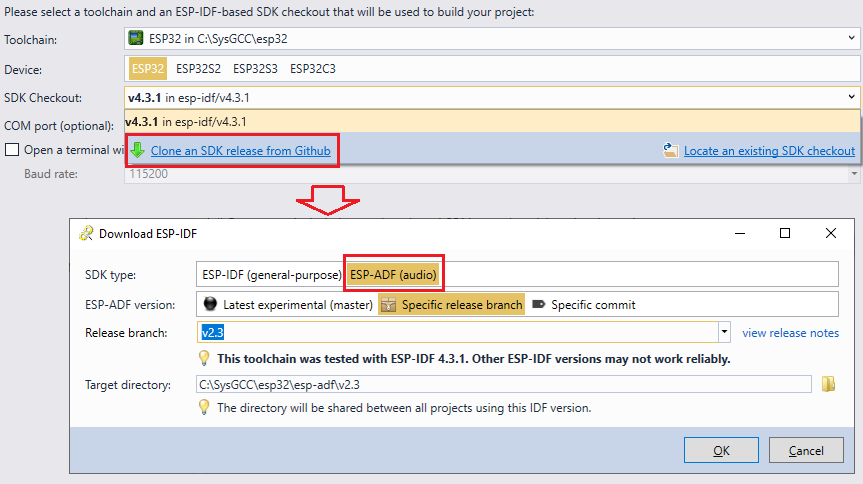 Note that ESP-ADF includes a separate copy of ESP-IDF as a Git submodule. However, there is a difference between the way it is handled by VisualGDB vs. the command-line Espressif tools:
- The Espressif’s command-line environment sets the IDF_PATH environment variable to the location of your ESP-IDF installation, that is separate from ESP-ADF. This effectively overrides the copy of ESP-IDF contained inside ESP-ADF. Updating your ESP-IDF later will implicitly affect the projects built with ESP-ADF, potentially causing problems after the update.
- VisualGDB sets the IDF_PATH variable based on the SDK version selected in the project properties. When building the ESP-ADF projects, it uses the ESP-IDF copy referenced by the selected ESP-ADF checkout (esp-adf\<version>\esp-idf). This allows having multiple ESP-ADF and ESP-IDF checkouts completely separated from each other. There are no implicit dependencies between them, and updating your ESP-IDF installations will not break ESP-ADF projects or vice versa.
As of ESP-ADF 2.3, the version of ESP-IDF referenced as a Git submodule is very old and may not work with some projects. To work around it, you need to manually go to the c:\SysGCC\esp32\esp-adf\<version>\esp-idf directory and run the following commands there:
git checkout <ESP-IDF tag name> git submodule update --recursive |
You can find out the exact tag name by running “git describe –tags” in your ESP-IDF checkout.
Note that not all versions of ESP-IDF and ESP-ADF are compatible. You can find out the ESP-IDF versions compatible with a specific ESP-ADF release by checking the <esp-adf>\docs\en\get-started\index.rst file (search for “ESP-IDF versions”).
ESP-IDF 5.5
ESP-IDF 5.5 and later versions are only supported using the new consolidated toolchain layout. Make sure you use VisualGDB 6.1 or later.